til
332 rows
This data as json, CSV (advanced)
Suggested facets: created (date), created_utc (date), updated (date), updated_utc (date)
| path ▼ | topic | title | url | body | html | shot | created | created_utc | updated | updated_utc | shot_hash | slug |
|---|---|---|---|---|---|---|---|---|---|---|---|---|
| amplitude_export-events-to-datasette.md | amplitude | Exporting Amplitude events to SQLite | https://github.com/simonw/til/blob/main/amplitude/export-events-to-datasette.md | [Amplitude](https://amplitude.com/) offers an "Export Data" button in the project settings page. This can export up to 365 days of events (up to 4GB per export), where the export is a zip file containing `*.json.gz` gzipped newline-delimited JSON. You can export multiple times, so if you have more than a year of events you can export them by specifying different date ranges. It's OK to overlap these ranges as each event has a uniue `uuid` that can be used to de-duplicate them. Here's how to import that into a SQLite database using `sqlite-utils`: ``` unzip export # The exported file does not have a .zip extension for some reason cd DIRECTORY_CREATED_FROM_EXPORT gzcat *.json.gz | sqlite-utils insert amplitude.db events --nl --alter --pk uuid --ignore - ``` Since we are using `--pk uuid` and `--ignore` it's safe to run this against as many exported `*.json.gz` files as you like, including exports that overlap each other. Then run `datasette amplitude.db` to browse the results. | <p><a href="https://amplitude.com/" rel="nofollow">Amplitude</a> offers an "Export Data" button in the project settings page. This can export up to 365 days of events (up to 4GB per export), where the export is a zip file containing <code>*.json.gz</code> gzipped newline-delimited JSON.</p> <p>You can export multiple times, so if you have more than a year of events you can export them by specifying different date ranges. It's OK to overlap these ranges as each event has a uniue <code>uuid</code> that can be used to de-duplicate them.</p> <p>Here's how to import that into a SQLite database using <code>sqlite-utils</code>:</p> <pre><code>unzip export # The exported file does not have a .zip extension for some reason cd DIRECTORY_CREATED_FROM_EXPORT gzcat *.json.gz | sqlite-utils insert amplitude.db events --nl --alter --pk uuid --ignore - </code></pre> <p>Since we are using <code>--pk uuid</code> and <code>--ignore</code> it's safe to run this against as many exported <code>*.json.gz</code> files as you like, including exports that overlap each other.</p> <p>Then run <code>datasette amplitude.db</code> to browse the results.</p> | <Binary: 82,338 bytes> | 2021-06-06T13:56:09-07:00 | 2021-06-06T20:56:09+00:00 | 2021-06-06T13:56:09-07:00 | 2021-06-06T20:56:09+00:00 | e12c89da0cb3c1fabcf189aaed72925a | export-events-to-datasette |
| asgi_lifespan-test-httpx.md | asgi | Writing tests for the ASGI lifespan protocol with HTTPX | https://github.com/simonw/til/blob/main/asgi/lifespan-test-httpx.md | Uvicorn silently ignores exceptions that occur during startup against the ASGI lifespan protocol - see [starlette/issues/486](https://github.com/encode/starlette/issues/486). You can disable this feature using the `lifespan="on"` parameter to `uvicorn.run()` - which Datasette now does as-of [16f592247a2a0e140ada487e9972645406dcae69](https://github.com/simonw/datasette/commit/16f592247a2a0e140ada487e9972645406dcae69) This exposed a bug in `datasette-debug-asgi`: it wasn't handling lifespan events correctly. [datasette-debug-asgi/issues/1](https://github.com/simonw/datasette-debug-asgi/issues/1) The unit tests weren't catching this because using HTTPX to make test requests [doesn't trigger lifespan events](https://github.com/encode/httpx/issues/350). Florimond Manca had run into this problem too, and built [asgi-lifespan](https://github.com/florimondmanca/asgi-lifespan) to address it. You can wrap an ASGI app in `async with LifespanManager(app):` and the correct lifespan events will be fired by that with block. Here's how to use it to [trigger lifespan events in a test](https://github.com/simonw/datasette-debug-asgi/blob/72d568d32a3159c763ce908c0b269736935c6987/test_datasette_debug_asgi.py): ```python from asgi_lifespan import LifespanManager @pytest.mark.asyncio async def test_datasette_debug_asgi(): ds = Datasette([], memory=True) app = ds.app() async with LifespanManager(app): async with httpx.AsyncClient(app=app) as client: response = await client.get("http://localhost/-/asgi-scope") assert 200 == response.status_code assert "text/plain; charset=UTF-8" == response.headers["content-type"] ``` | <p>Uvicorn silently ignores exceptions that occur during startup against the ASGI lifespan protocol - see <a href="https://github.com/encode/starlette/issues/486">starlette/issues/486</a>.</p> <p>You can disable this feature using the <code>lifespan="on"</code> parameter to <code>uvicorn.run()</code> - which Datasette now does as-of <a href="https://github.com/simonw/datasette/commit/16f592247a2a0e140ada487e9972645406dcae69">16f592247a2a0e140ada487e9972645406dcae69</a></p> <p>This exposed a bug in <code>datasette-debug-asgi</code>: it wasn't handling lifespan events correctly. <a href="https://github.com/simonw/datasette-debug-asgi/issues/1">datasette-debug-asgi/issues/1</a></p> <p>The unit tests weren't catching this because using HTTPX to make test requests <a href="https://github.com/encode/httpx/issues/350">doesn't trigger lifespan events</a>.</p> <p>Florimond Manca had run into this problem too, and built <a href="https://github.com/florimondmanca/asgi-lifespan">asgi-lifespan</a> to address it.</p> <p>You can wrap an ASGI app in <code>async with LifespanManager(app):</code> and the correct lifespan events will be fired by that with block.</p> <p>Here's how to use it to <a href="https://github.com/simonw/datasette-debug-asgi/blob/72d568d32a3159c763ce908c0b269736935c6987/test_datasette_debug_asgi.py">trigger lifespan events in a test</a>:</p> <div class="highlight highlight-source-python"><pre><span class="pl-k">from</span> <span class="pl-s1">asgi_lifespan</span> <span class="pl-k">import</span> <span class="pl-v">LifespanManager</span> <span class="pl-en">@<span class="pl-s1">pytest</span>.<span class="pl-s1">mark</span>.<span class="pl-s1">asyncio</span></span> <span class="pl-k">async</span> <span class="pl-k">def</span> <span class="pl-en">test_datasette_debug_asgi</span>(): <span class="pl-s1">ds</span> <span class="pl-c1">=</span> <span class="pl-v">Datasette</span>([], <span class="pl-s1">memory</span><span class="pl-c1">=</span><span class="pl-c1">True</span>) <span class="pl-s1">app</span> <… | <Binary: 79,669 bytes> | 2020-06-29T09:13:49-07:00 | 2020-06-29T16:13:49+00:00 | 2020-07-06T13:46:05-07:00 | 2020-07-06T20:46:05+00:00 | 4656e3d750ad850e94a3240ebcbcbb26 | lifespan-test-httpx |
| auth0_auth0-logout.md | auth0 | Logging users out of Auth0 | https://github.com/simonw/til/blob/main/auth0/auth0-logout.md | If you [implement Auth0](https://til.simonwillison.net/auth0/oauth-with-auth0) for login, you may be tempted to skip implementing logout. I started out just with a `/logout/` page that cleared my own site's cookies, ignoring the Auth0 side of it. Since users were still signed in to Auth0 (still had cookies there), this meant that if they clicked "login" again after clicking "logout" they would be logged straight in without needing to authenticate at all. There are two problems with this approach: 1. It defies user expectations. If someone logged out they want to be logged out. Users don't understand the difference between being logged out in your own site and logged out for Auth0. 2. Sometimes people have a legitimate reason for wanting to properly log out - if they are on a shared computer and they need to be able to sign out and then sign back in as a different account. For example, a couple who share the same computer and want to sign into their own separate accounts. I ran into this use-case pretty quickly! ## Logging users out of Auth0 The good news is this is easy to implement via a redirect. Clear your own site's cookies and then send them to: https://YOURDOMAIN.us.auth0.com/v2/logout?client_id=YOUR_CLIENT_ID&returnTo=URL That `returnTo` URL is where Auth0 will return them to. I used my site's homepage. It needs to be listed under "Allowed Logout URLs" in the Auth0 settings. Relevant Auth0 documentation: - [Logout](https://auth0.com/docs/authenticate/login/logout) Auth0 high level documentation - [Log Users Out of Auth0](https://auth0.com/docs/authenticate/login/logout/log-users-out-of-auth0) describes how you can log them out of Auth0 (what I wanted) or you can additionally log them out of Google SSO (not what I wanted) - [GET /v2/logout](https://auth0.com/docs/api/authentication#logout) API documentation I implemented this for [pillarpointstewards/issues/54](https://github.com/natbat/pillarpointstewards/issues/54), in [this commit](https://github.com/natbat/pillarpointstewards/commit/2a79… | <p>If you <a href="https://til.simonwillison.net/auth0/oauth-with-auth0" rel="nofollow">implement Auth0</a> for login, you may be tempted to skip implementing logout. I started out just with a <code>/logout/</code> page that cleared my own site's cookies, ignoring the Auth0 side of it.</p> <p>Since users were still signed in to Auth0 (still had cookies there), this meant that if they clicked "login" again after clicking "logout" they would be logged straight in without needing to authenticate at all.</p> <p>There are two problems with this approach:</p> <ol> <li>It defies user expectations. If someone logged out they want to be logged out. Users don't understand the difference between being logged out in your own site and logged out for Auth0.</li> <li>Sometimes people have a legitimate reason for wanting to properly log out - if they are on a shared computer and they need to be able to sign out and then sign back in as a different account.</li> </ol> <p>For example, a couple who share the same computer and want to sign into their own separate accounts. I ran into this use-case pretty quickly!</p> <h2> <a id="user-content-logging-users-out-of-auth0" class="anchor" href="#logging-users-out-of-auth0" aria-hidden="true"><span aria-hidden="true" class="octicon octicon-link"></span></a>Logging users out of Auth0</h2> <p>The good news is this is easy to implement via a redirect. Clear your own site's cookies and then send them to:</p> <pre><code>https://YOURDOMAIN.us.auth0.com/v2/logout?client_id=YOUR_CLIENT_ID&returnTo=URL </code></pre> <p>That <code>returnTo</code> URL is where Auth0 will return them to. I used my site's homepage.</p> <p>It needs to be listed under "Allowed Logout URLs" in the Auth0 settings.</p> <p>Relevant Auth0 documentation:</p> <ul> <li> <a href="https://auth0.com/docs/authenticate/login/logout" rel="nofollow">Logout</a> Auth0 high level documentation</li> <li> <a href="https://auth0.com/docs/authenticate/login/logout/log-users-out-of-auth0" rel="nofollow">Log Users Out of Auth0</a> describe… | <Binary: 78,950 bytes> | 2022-04-03T18:18:12-07:00 | 2022-04-04T01:18:12+00:00 | 2022-04-03T18:18:12-07:00 | 2022-04-04T01:18:12+00:00 | ca445cd68963cdace05d56bb313c46e9 | auth0-logout |
| auth0_oauth-with-auth0.md | auth0 | Simplest possible OAuth authentication with Auth0 | https://github.com/simonw/til/blob/main/auth0/oauth-with-auth0.md | [Auth0](https://auth0.com/) provides an authentication API which you can use to avoid having to deal with user accounts in your own web application. We used them last year for [VaccinateCA VIAL](https://github.com/CAVaccineInventory/vial), using the [Python Social Auth](https://github.com/python-social-auth/social-app-django) library recommended by the [Auth0 Django tutorial](https://auth0.com/docs/quickstart/webapp/django/01-login). That was quite a lot of code, so today I decided to figure out how to implement Auth0 authentication from first principles. Auth0 uses standard OAuth 2. Their documentation [leans very heavily](https://auth0.com/docs/quickstart/webapp) towards client libraries, but if you dig around enough you can find the [Authentication API](https://auth0.com/docs/api/authentication) documentation with the information you need. I found that pretty late, and figured out most of this by following [their Flask tutorial](https://auth0.com/docs/quickstart/webapp/python) and then [reverse engineering](https://github.com/natbat/pillarpointstewards/issues/6) what the prototype was actually doing. ## Initial setup To start, you need to create a new Auth0 application and note down three values. Mine looked something like this: ```python AUTH0_DOMAIN = "pillarpointstewards.us.auth0.com" AUTH0_CLIENT_ID = "DLXBMPbtamC2STUyV7R6OFJFDsSTHqEA" AUTH0_CLIENT_SECRET = "..." # Get it from that page ``` You also need to decide on the "callback URL" that authenticated users will be redirected to, then add that to the "Allowed Callback URLs" setting in Auth0. You can set this as a comma-separated list. My callback URL started out as `http://localhost:8000/callback`. ## Redirecting to Auth0 The first step is to redirect the user to Auth0 to sign in. The redirect URL looks something like this: ``` https://pillarpointstewards.us.auth0.com/authorize? response_type=code &client_id=DLXBMPbtamC2STUyV7R6OFJFDsSTHqEA &redirect_uri=http%3A%2F%2Flocalhost%3A8000%2Fcallback &scope=openid+profile+email &state=FtYFQ… | <p><a href="https://auth0.com/" rel="nofollow">Auth0</a> provides an authentication API which you can use to avoid having to deal with user accounts in your own web application.</p> <p>We used them last year for <a href="https://github.com/CAVaccineInventory/vial">VaccinateCA VIAL</a>, using the <a href="https://github.com/python-social-auth/social-app-django">Python Social Auth</a> library recommended by the <a href="https://auth0.com/docs/quickstart/webapp/django/01-login" rel="nofollow">Auth0 Django tutorial</a>.</p> <p>That was quite a lot of code, so today I decided to figure out how to implement Auth0 authentication from first principles.</p> <p>Auth0 uses standard OAuth 2. Their documentation <a href="https://auth0.com/docs/quickstart/webapp" rel="nofollow">leans very heavily</a> towards client libraries, but if you dig around enough you can find the <a href="https://auth0.com/docs/api/authentication" rel="nofollow">Authentication API</a> documentation with the information you need.</p> <p>I found that pretty late, and figured out most of this by following <a href="https://auth0.com/docs/quickstart/webapp/python" rel="nofollow">their Flask tutorial</a> and then <a href="https://github.com/natbat/pillarpointstewards/issues/6">reverse engineering</a> what the prototype was actually doing.</p> <h2> <a id="user-content-initial-setup" class="anchor" href="#initial-setup" aria-hidden="true"><span aria-hidden="true" class="octicon octicon-link"></span></a>Initial setup</h2> <p>To start, you need to create a new Auth0 application and note down three values. Mine looked something like this:</p> <div class="highlight highlight-source-python"><pre><span class="pl-v">AUTH0_DOMAIN</span> <span class="pl-c1">=</span> <span class="pl-s">"pillarpointstewards.us.auth0.com"</span> <span class="pl-v">AUTH0_CLIENT_ID</span> <span class="pl-c1">=</span> <span class="pl-s">"DLXBMPbtamC2STUyV7R6OFJFDsSTHqEA"</span> <span class="pl-v">AUTH0_CLIENT_SECRET</span> <span class="pl-c1">=</span> <span class="pl-s">"..."</span> <span cl… | <Binary: 84,792 bytes> | 2022-03-26T14:57:42-07:00 | 2022-03-26T21:57:42+00:00 | 2022-03-26T19:27:47-07:00 | 2022-03-27T02:27:47+00:00 | 1b78ef3b2c3b7a00a06af069ac7e9070 | oauth-with-auth0 |
| aws_athena-key-does-not-exist.md | aws | Athena error: The specified key does not exist | https://github.com/simonw/til/blob/main/aws/athena-key-does-not-exist.md | I was trying to run Athena queries against compressed JSON log files stored in an S3 bucket. No matter what I tried, I got the following error: > The specified key does not exist. (Service: Amazon S3; Status Code: 404; Error Code: NoSuchKey; Request ID: 4GHB3YX6DQHYTCPF; S3 Extended Request ID: 0LSAhwbo21RaZ+8/FOgKf1oh+dIkV0WO8DvtYmwQdBzddfILchiSyamFLenD8IOmrN+lDPxKTFP/7my0DKbVvw==; Proxy: null), S3 Extended Request ID: 0LSAhwbo21RaZ+8/FOgKf1oh+dIkV0WO8DvtYmwQdBzddfILchiSyamFLenD8IOmrN+lDPxKTFP/7my0DKbVvw== (Path: s3://my-logs-bucket/my-fly-app/2022-05-27/1653693921-a96e5844-02db-4e3e-9e9a-3eef00910271.log.gz) This is using the Fly log shipping recipe [described here previously](https://til.simonwillison.net/fly/fly-logs-to-s3). I couldn't find any search results online for this error in the context of Athena. After much head scratching... I spotted that the files in my bucket had keys that looked like this: - `my-fly-app/2022-05-27//1653693921-a96e5844-02db-4e3e-9e9a-3eef00910271.log.gz` Note that there's a `//` after the date instead of a `/`. But in the error message from Athena the same key is identified as `my-fly-app/2022-05-27/1653693921-a96e5844-02db-4e3e-9e9a-3eef00910271.log.gz` - without the double slash. It looks like Athena has a bug where it can't read files with `//` in their key! The fix was to first fix my log shipper so that it wrote files without that prefix. Upgrading to the most recent version in the Fly repo seemed to handle that. Then I needed to rename all of my existing keys. This wasn't easy: S3 doesn't have a bulk rename operation, so I ended up having to run a script that looked like this: ```bash aws s3 --recursive mv \ s3://my-logs-bucket/my-fly-app/2022-08-28// \ s3://my-logs-bucket/my-fly-app//2022-08-28/ aws s3 --recursive mv \ s3://my-logs-bucket/my-fly-app//2022-09-23// \ s3://my-logs-bucket/my-fly-app//2022-09-23/ ``` With a command for every single one of my folders that were mis-named. Having done this, Athena started working against my bucket! | <p>I was trying to run Athena queries against compressed JSON log files stored in an S3 bucket.</p> <p>No matter what I tried, I got the following error:</p> <blockquote> <p>The specified key does not exist. (Service: Amazon S3; Status Code: 404; Error Code: NoSuchKey; Request ID: 4GHB3YX6DQHYTCPF; S3 Extended Request ID: 0LSAhwbo21RaZ+8/FOgKf1oh+dIkV0WO8DvtYmwQdBzddfILchiSyamFLenD8IOmrN+lDPxKTFP/7my0DKbVvw==; Proxy: null), S3 Extended Request ID: 0LSAhwbo21RaZ+8/FOgKf1oh+dIkV0WO8DvtYmwQdBzddfILchiSyamFLenD8IOmrN+lDPxKTFP/7my0DKbVvw== (Path: s3://my-logs-bucket/my-fly-app/2022-05-27/1653693921-a96e5844-02db-4e3e-9e9a-3eef00910271.log.gz)</p> </blockquote> <p>This is using the Fly log shipping recipe <a href="https://til.simonwillison.net/fly/fly-logs-to-s3" rel="nofollow">described here previously</a>.</p> <p>I couldn't find any search results online for this error in the context of Athena.</p> <p>After much head scratching... I spotted that the files in my bucket had keys that looked like this:</p> <ul> <li><code>my-fly-app/2022-05-27//1653693921-a96e5844-02db-4e3e-9e9a-3eef00910271.log.gz</code></li> </ul> <p>Note that there's a <code>//</code> after the date instead of a <code>/</code>. But in the error message from Athena the same key is identified as <code>my-fly-app/2022-05-27/1653693921-a96e5844-02db-4e3e-9e9a-3eef00910271.log.gz</code> - without the double slash.</p> <p>It looks like Athena has a bug where it can't read files with <code>//</code> in their key!</p> <p>The fix was to first fix my log shipper so that it wrote files without that prefix. Upgrading to the most recent version in the Fly repo seemed to handle that.</p> <p>Then I needed to rename all of my existing keys. This wasn't easy: S3 doesn't have a bulk rename operation, so I ended up having to run a script that looked like this:</p> <div class="highlight highlight-source-shell"><pre>aws s3 --recursive mv \ s3://my-logs-bucket/my-fly-app/2022-08-28// \ s3://my-logs-bucket/my-fly-app//2022-08-28/ aws s3 --recursive mv \ s3://my-logs-… | <Binary: 94,886 bytes> | 2022-09-27T20:45:49-07:00 | 2022-09-28T03:45:49+00:00 | 2022-09-27T20:45:49-07:00 | 2022-09-28T03:45:49+00:00 | a8c1236f9396767642c8b18eb29c003e | athena-key-does-not-exist |
| aws_athena-newline-json.md | aws | Querying newline-delimited JSON logs using AWS Athena | https://github.com/simonw/til/blob/main/aws/athena-newline-json.md | I've been writing my Fly logs to S3 in newline-delimited JSON format using the recipe described in [Writing Fly logs to S3](https://til.simonwillison.net/fly/fly-logs-to-s3). I recently needed to run a search against those logs. I decided to use [AWS Athena](https://aws.amazon.com/athena/). (Scroll to the bottom for a cunning shortcut using GPT-3.) ## The log format My logs are shipped to S3 using [Vector](https://vector.dev/). It actually creates a huge number of tiny gzipped files in my S3 bucket, each one representing just a small number of log lines. The contents of one of those files looks like this: `{"event":{"provider":"app"},"fly":{"app":{"instance":"0e286551c30586","name":"dc-team-52-simon-46d213"},"region":"sjc"},"host":"0ad1","log":{"level":"info"},"message":"subprocess exited, litestream shutting down","timestamp":"2022-09-27T20:34:37.252022967Z"} {"event":{"provider":"app"},"fly":{"app":{"instance":"0e286551c30586","name":"dc-team-52-simon-46d213"},"region":"sjc"},"host":"0ad1","log":{"level":"info"},"message":"litestream shut down","timestamp":"2022-09-27T20:34:37.253080674Z"} {"event":{"provider":"runner"},"fly":{"app":{"instance":"0e286551c30586","name":"dc-team-52-simon-46d213"},"region":"sjc"},"host":"0ad1","log":{"level":"info"},"message":"machine exited with exit code 0, not restarting","timestamp":"2022-09-27T20:34:39.660159411Z"}` This is newline-delimited JSON. Here's the first of those lines pretty-printed for readability: ```json { "event": { "provider": "app" }, "fly": { "app": { "instance": "0e286551c30586", "name": "dc-team-52-simon-46d213" }, "region": "sjc" }, "host": "0ad1", "log": { "level": "info" }, "message": "subprocess exited, litestream shutting down", "timestamp": "2022-09-27T20:34:37.252022967Z" } ``` The challenge: how to teach Athena how to turn those files into a table I can run queries against? ## Defining an Athena table This was by far the hardest thing to figure out. To run queries in Athena, you first nee… | <p>I've been writing my Fly logs to S3 in newline-delimited JSON format using the recipe described in <a href="https://til.simonwillison.net/fly/fly-logs-to-s3" rel="nofollow">Writing Fly logs to S3</a>.</p> <p>I recently needed to run a search against those logs. I decided to use <a href="https://aws.amazon.com/athena/" rel="nofollow">AWS Athena</a>.</p> <p>(Scroll to the bottom for a cunning shortcut using GPT-3.)</p> <h2><a id="user-content-the-log-format" class="anchor" aria-hidden="true" href="#the-log-format"><span aria-hidden="true" class="octicon octicon-link"></span></a>The log format</h2> <p>My logs are shipped to S3 using <a href="https://vector.dev/" rel="nofollow">Vector</a>. It actually creates a huge number of tiny gzipped files in my S3 bucket, each one representing just a small number of log lines.</p> <p>The contents of one of those files looks like this:</p> <p><code>{"event":{"provider":"app"},"fly":{"app":{"instance":"0e286551c30586","name":"dc-team-52-simon-46d213"},"region":"sjc"},"host":"0ad1","log":{"level":"info"},"message":"subprocess exited, litestream shutting down","timestamp":"2022-09-27T20:34:37.252022967Z"} {"event":{"provider":"app"},"fly":{"app":{"instance":"0e286551c30586","name":"dc-team-52-simon-46d213"},"region":"sjc"},"host":"0ad1","log":{"level":"info"},"message":"litestream shut down","timestamp":"2022-09-27T20:34:37.253080674Z"} {"event":{"provider":"runner"},"fly":{"app":{"instance":"0e286551c30586","name":"dc-team-52-simon-46d213"},"region":"sjc"},"host":"0ad1","log":{"level":"info"},"message":"machine exited with exit code 0, not restarting","timestamp":"2022-09-27T20:34:39.660159411Z"}</code></p> <p>This is newline-delimited JSON. Here's the first of those lines pretty-printed for readability:</p> <div class="highlight highlight-source-json"><pre>{ <span class="pl-ent">"event"</span>: { <span class="pl-ent">"provider"</span>: <span class="pl-s"><span class="pl-pds">"</span>app<span class="pl-pds">"</span></span> }, <span class="pl-ent">"fly"</span>: { <… | <Binary: 64,925 bytes> | 2022-10-06T16:35:55-07:00 | 2022-10-06T23:35:55+00:00 | 2022-10-07T07:51:40-07:00 | 2022-10-07T14:51:40+00:00 | bff09038069ba066cdbe1e832a7f1c6e | athena-newline-json |
| aws_boto-command-line.md | aws | Using boto3 from the command line | https://github.com/simonw/til/blob/main/aws/boto-command-line.md | I found a useful pattern today for automating more complex AWS processes as pastable command line snippets, using [Boto3](https://aws.amazon.com/sdk-for-python/). The trick is to take advantage of the fact that `python3 -c '...'` lets you pass in a multi-line Python string which will be executed directly. I used that to create a new IAM role by running the following: ```bash python3 -c ' import boto3, json iam = boto3.client("iam") create_role_response = iam.create_role( Description=("Description of my role"), RoleName="my-new-role", AssumeRolePolicyDocument=json.dumps( { "Version": "2012-10-17", "Statement": [ { "Effect": "Allow", "Principal": { "AWS": "arn:aws:iam::462092780466:user/s3.read-write.my-previously-created-user" }, "Action": "sts:AssumeRole", } ], } ), MaxSessionDuration=12 * 60 * 60, ) # Attach AmazonS3FullAccess to it - note that even though we use full access # on the role itself any time we call sts.assume_role() we attach an additional # policy to ensure reduced access for the temporary credentials iam.attach_role_policy( RoleName="my-new-role", PolicyArn="arn:aws:iam::aws:policy/AmazonS3FullAccess", ) print(create_role_response["Role"]["Arn"]) ' ``` | <p>I found a useful pattern today for automating more complex AWS processes as pastable command line snippets, using <a href="https://aws.amazon.com/sdk-for-python/" rel="nofollow">Boto3</a>.</p> <p>The trick is to take advantage of the fact that <code>python3 -c '...'</code> lets you pass in a multi-line Python string which will be executed directly.</p> <p>I used that to create a new IAM role by running the following:</p> <div class="highlight highlight-source-shell"><pre>python3 -c <span class="pl-s"><span class="pl-pds">'</span></span> <span class="pl-s">import boto3, json</span> <span class="pl-s"></span> <span class="pl-s">iam = boto3.client("iam")</span> <span class="pl-s">create_role_response = iam.create_role(</span> <span class="pl-s"> Description=("Description of my role"),</span> <span class="pl-s"> RoleName="my-new-role",</span> <span class="pl-s"> AssumeRolePolicyDocument=json.dumps(</span> <span class="pl-s"> {</span> <span class="pl-s"> "Version": "2012-10-17",</span> <span class="pl-s"> "Statement": [</span> <span class="pl-s"> {</span> <span class="pl-s"> "Effect": "Allow",</span> <span class="pl-s"> "Principal": {</span> <span class="pl-s"> "AWS": "arn:aws:iam::462092780466:user/s3.read-write.my-previously-created-user"</span> <span class="pl-s"> },</span> <span class="pl-s"> "Action": "sts:AssumeRole",</span> <span class="pl-s"> }</span> <span class="pl-s"> ],</span> <span class="pl-s"> }</span> <span class="pl-s"> ),</span> <span class="pl-s"> MaxSessionDuration=12 * 60 * 60,</span> <span class="pl-s">)</span> <span class="pl-s"># Attach AmazonS3FullAccess to it - note that even though we use full access</span> <span class="pl-s"># on the role itself any time we call sts.assume_role() we attach an additional</span> <span class="pl-s"># policy to ensure reduced access for the temporary credentials</span> <… | <Binary: 58,094 bytes> | 2022-08-02T20:34:27-07:00 | 2022-08-03T03:34:27+00:00 | 2022-08-02T20:34:27-07:00 | 2022-08-03T03:34:27+00:00 | be4e6236df967f2d6d68f8caaf400be9 | boto-command-line |
| aws_helper-for-boto-aws-pagination.md | aws | Helper function for pagination using AWS boto3 | https://github.com/simonw/til/blob/main/aws/helper-for-boto-aws-pagination.md | I noticed that a lot of my boto3 code in [s3-credentials](https://github.com/simonw/s3-credentials) looked like this: ```python paginator = iam.get_paginator("list_user_policies") for response in paginator.paginate(UserName=username): for policy_name in response["PolicyNames"]: print(policy_name) ``` This was enough verbosity that I was hesitating on implementing pagination properly for some method calls. I came up with this helper function to use instead: ```python def paginate(service, method, list_key, **kwargs): paginator = service.get_paginator(method) for response in paginator.paginate(**kwargs): yield from response[list_key] ``` Now the above becomes: ```python for policy_name in paginate(iam, "list_user_policies", "PolicyNames", UserName=username): print(policy_name) ``` Here's [the issue](https://github.com/simonw/s3-credentials/issues/63) and the [refactoring commit](https://github.com/simonw/s3-credentials/commit/fc1e06ca3ffa2c73e196cffe741ef4e950204240). | <p>I noticed that a lot of my boto3 code in <a href="https://github.com/simonw/s3-credentials">s3-credentials</a> looked like this:</p> <div class="highlight highlight-source-python"><pre><span class="pl-s1">paginator</span> <span class="pl-c1">=</span> <span class="pl-s1">iam</span>.<span class="pl-en">get_paginator</span>(<span class="pl-s">"list_user_policies"</span>) <span class="pl-k">for</span> <span class="pl-s1">response</span> <span class="pl-c1">in</span> <span class="pl-s1">paginator</span>.<span class="pl-en">paginate</span>(<span class="pl-v">UserName</span><span class="pl-c1">=</span><span class="pl-s1">username</span>): <span class="pl-k">for</span> <span class="pl-s1">policy_name</span> <span class="pl-c1">in</span> <span class="pl-s1">response</span>[<span class="pl-s">"PolicyNames"</span>]: <span class="pl-en">print</span>(<span class="pl-s1">policy_name</span>)</pre></div> <p>This was enough verbosity that I was hesitating on implementing pagination properly for some method calls.</p> <p>I came up with this helper function to use instead:</p> <div class="highlight highlight-source-python"><pre><span class="pl-k">def</span> <span class="pl-en">paginate</span>(<span class="pl-s1">service</span>, <span class="pl-s1">method</span>, <span class="pl-s1">list_key</span>, <span class="pl-c1">**</span><span class="pl-s1">kwargs</span>): <span class="pl-s1">paginator</span> <span class="pl-c1">=</span> <span class="pl-s1">service</span>.<span class="pl-en">get_paginator</span>(<span class="pl-s1">method</span>) <span class="pl-k">for</span> <span class="pl-s1">response</span> <span class="pl-c1">in</span> <span class="pl-s1">paginator</span>.<span class="pl-en">paginate</span>(<span class="pl-c1">**</span><span class="pl-s1">kwargs</span>): <span class="pl-k">yield</span> <span class="pl-k">from</span> <span class="pl-s1">response</span>[<span class="pl-s1">list_key</span>]</pre></div> <p>Now the above becomes:</p> <div class="highlight highlight-source-python"><pre><span clas… | <Binary: 64,562 bytes> | 2022-01-19T11:49:58-08:00 | 2022-01-19T19:49:58+00:00 | 2022-01-19T11:49:58-08:00 | 2022-01-19T19:49:58+00:00 | c6247a16c6d08af6de0042edcc3e518d | helper-for-boto-aws-pagination |
| aws_instance-costs-per-month.md | aws | Display EC2 instance costs per month | https://github.com/simonw/til/blob/main/aws/instance-costs-per-month.md | The [EC2 pricing page](https://aws.amazon.com/ec2/pricing/on-demand/) shows cost per hour, which is pretty much useless. I want cost per month. The following JavaScript, pasted into the browser developer console, modifies the page to show cost-per-month instead. ```javascript Array.from( document.querySelectorAll('td') ).filter( el => el.textContent.toLowerCase().includes('per hour') ).forEach( el => el.textContent = '$' + (parseFloat( /\d+\.\d+/.exec(el.textContent)[0] ) * 24 * 30).toFixed(2) + ' per month' ) ``` | <p>The <a href="https://aws.amazon.com/ec2/pricing/on-demand/" rel="nofollow">EC2 pricing page</a> shows cost per hour, which is pretty much useless. I want cost per month. The following JavaScript, pasted into the browser developer console, modifies the page to show cost-per-month instead.</p> <div class="highlight highlight-source-js"><pre><span class="pl-v">Array</span><span class="pl-kos">.</span><span class="pl-en">from</span><span class="pl-kos">(</span> <span class="pl-smi">document</span><span class="pl-kos">.</span><span class="pl-en">querySelectorAll</span><span class="pl-kos">(</span><span class="pl-s">'td'</span><span class="pl-kos">)</span> <span class="pl-kos">)</span><span class="pl-kos">.</span><span class="pl-en">filter</span><span class="pl-kos">(</span> <span class="pl-s1">el</span> <span class="pl-c1">=></span> <span class="pl-s1">el</span><span class="pl-kos">.</span><span class="pl-c1">textContent</span><span class="pl-kos">.</span><span class="pl-en">toLowerCase</span><span class="pl-kos">(</span><span class="pl-kos">)</span><span class="pl-kos">.</span><span class="pl-en">includes</span><span class="pl-kos">(</span><span class="pl-s">'per hour'</span><span class="pl-kos">)</span> <span class="pl-kos">)</span><span class="pl-kos">.</span><span class="pl-en">forEach</span><span class="pl-kos">(</span> <span class="pl-s1">el</span> <span class="pl-c1">=></span> <span class="pl-s1">el</span><span class="pl-kos">.</span><span class="pl-c1">textContent</span> <span class="pl-c1">=</span> <span class="pl-s">'$'</span> <span class="pl-c1">+</span> <span class="pl-kos">(</span><span class="pl-en">parseFloat</span><span class="pl-kos">(</span> <span class="pl-pds">/<span class="pl-cce">\d</span><span class="pl-c1">+</span><span class="pl-cce">\.</span><span class="pl-cce">\d</span><span class="pl-c1">+</span>/</span><span class="pl-kos">.</span><span class="pl-en">exec</span><span class="pl-kos">(</span><span class="pl-s1">el</span><span class="pl-kos">.</span><span class="… | <Binary: 53,887 bytes> | 2020-09-06T19:43:29-07:00 | 2020-09-07T02:43:29+00:00 | 2020-09-06T19:43:29-07:00 | 2020-09-07T02:43:29+00:00 | 47d56d5c931266cac22ae86df8d494cf | instance-costs-per-month |
| aws_ocr-pdf-textract.md | aws | Running OCR against a PDF file with AWS Textract | https://github.com/simonw/til/blob/main/aws/ocr-pdf-textract.md | [Textract](https://aws.amazon.com/textract/) is the AWS OCR API. It's very good - I've fed it hand-written notes from the 1890s and it read them better than I could. It can be run directly against JPEG or PNG images up to 5MB, but if you want to run OCR against a PDF file you have to first upload it to an S3 bucket. **Update 30th June 2022**: I used what I learned in this TIL [to build s3-ocr](https://simonwillison.net/2022/Jun/30/s3-ocr/), a command line utility for running OCR against PDFs in an S3 bucket. ## Try it out first You don't need to use the API at all to try Textract out against a document: they offer a demo tool in the AWS console: https://us-west-1.console.aws.amazon.com/textract/home?region=us-west-1#/demo <img alt="Screenshot of the demo interface showing uploaded image and resulting text" src="https://user-images.githubusercontent.com/9599/176274424-441aee18-8e8c-44bf-9748-f53e33e3fa76.png" width="600"> ## Limits Relevant [limits](https://docs.aws.amazon.com/textract/latest/dg/limits.html) for PDF files: > For asynchronous operations, JPEG and PNG files have a 10MB size limit. PDF and TIFF files have a 500MB limit. PDF and TIFF files have a limit of 3,000 pages. > > For PDFs: The maximum height and width is 40 inches and 2880 points. PDFs cannot be password protected. PDFs can contain JPEG 2000 formatted images. ## Uploading to S3 I used my [s3-credentials](https://github.com/simonw/s3-credentials/) tool to create an S3 bucket with credentials for uploading files to it: ``` ~ % s3-credentials create sfms-history -c Created bucket: sfms-history Created user: 's3.read-write.sfms-history' with permissions boundary: 'arn:aws:iam::aws:policy/AmazonS3FullAccess' Attached policy s3.read-write.sfms-history to user s3.read-write.sfms-history Created access key for user: s3.read-write.sfms-history { "UserName": "s3.read-write.sfms-history", "AccessKeyId": "AKIAWXFXAIOZBOQM4XUH", "Status": "Active", "SecretAccessKey": "...", "CreateDate": "2022-06-28 17:55:10+00:00" } ``` I… | <p><a href="https://aws.amazon.com/textract/" rel="nofollow">Textract</a> is the AWS OCR API. It's very good - I've fed it hand-written notes from the 1890s and it read them better than I could.</p> <p>It can be run directly against JPEG or PNG images up to 5MB, but if you want to run OCR against a PDF file you have to first upload it to an S3 bucket.</p> <p><strong>Update 30th June 2022</strong>: I used what I learned in this TIL <a href="https://simonwillison.net/2022/Jun/30/s3-ocr/" rel="nofollow">to build s3-ocr</a>, a command line utility for running OCR against PDFs in an S3 bucket.</p> <h2> <a id="user-content-try-it-out-first" class="anchor" href="#try-it-out-first" aria-hidden="true"><span aria-hidden="true" class="octicon octicon-link"></span></a>Try it out first</h2> <p>You don't need to use the API at all to try Textract out against a document: they offer a demo tool in the AWS console:</p> <p><a href="https://us-west-1.console.aws.amazon.com/textract/home?region=us-west-1#/demo" rel="nofollow">https://us-west-1.console.aws.amazon.com/textract/home?region=us-west-1#/demo</a></p> <p><a href="https://user-images.githubusercontent.com/9599/176274424-441aee18-8e8c-44bf-9748-f53e33e3fa76.png" target="_blank" rel="nofollow"><img alt="Screenshot of the demo interface showing uploaded image and resulting text" src="https://user-images.githubusercontent.com/9599/176274424-441aee18-8e8c-44bf-9748-f53e33e3fa76.png" width="600" style="max-width:100%;"></a></p> <h2> <a id="user-content-limits" class="anchor" href="#limits" aria-hidden="true"><span aria-hidden="true" class="octicon octicon-link"></span></a>Limits</h2> <p>Relevant <a href="https://docs.aws.amazon.com/textract/latest/dg/limits.html" rel="nofollow">limits</a> for PDF files:</p> <blockquote> <p>For asynchronous operations, JPEG and PNG files have a 10MB size limit. PDF and TIFF files have a 500MB limit. PDF and TIFF files have a limit of 3,000 pages.</p> <p>For PDFs: The maximum height and width is 40 inches and 2880 points. PDFs cannot be password pro… | <Binary: 70,060 bytes> | 2022-06-28T12:32:43-07:00 | 2022-06-28T19:32:43+00:00 | 2022-06-30T15:48:16-07:00 | 2022-06-30T22:48:16+00:00 | 752af8acdf6d6838cef061e37bda9b59 | ocr-pdf-textract |
| aws_recovering-lightsail-data.md | aws | Recovering data from AWS Lightsail using EC2 | https://github.com/simonw/til/blob/main/aws/recovering-lightsail-data.md | I ran into problems with my AWS Lightsail instance: it exceeded the CPU burst quota for too long and was suspended, and I couldn't figure out how to un-suspend it. I had a snapshot of the hard drive and I wanted to recover the data from it. This ended up taking far longer than I expected - I imagine there's a better way of doing this but here's how I solved it. Short version: I migrated the snapshot to EC2, then launched an EC2 instance and mounted that snapshot as an EBS volume. Long version (because I had to figure out a lot of steps along the way): 1. I activated the Lightsail "Export to Amazon EC2" option on the snapshot 2. I waited a while for the export to complete 3. This launched a new EC2 instance for me... but for some reason I couldn't SSH into that instance. So I terminated it. 4. I used the EC2 web console to figure out the AWS identifier for the EC2 copy of the Lightsail snapshot - something like `snap-02a530e12a34` 5. I created a brand new EC2 instance and on the "Add storage" panel I added an EBS volume for `/dev/sdb` with the snapshot identifier I found in the previous step. I started this instance with a keypair so I could SSH into it. 6. I mounted the EBS volume - see section below 7. ... I used `scp` (with the keypair) to copy off the data ## Mounting the EBS volume I hadn't worked with EBS before so this took some figuring out. My instance was configured with `/dev/sdb` as an EBS volume. I confirmed that the data was accessible like so: [ec2-user@ip-172-31-26-179 dev]$ sudo file -s /dev/xvdb /dev/xvdb: x86 boot sector; partition 1: ID=0x83, active, starthead 32, startsector 2048, 167770079 sectors, code offset 0x63 Then I created a `/data` directory and mounted the volume: [ec2-user@ip-172-31-26-179 dev]$ sudo mkdir /data [ec2-user@ip-172-31-26-179 dev]$ sudo mount /dev/xvdb1 /data I actually tried `sudo mount /dev/xvdb /data` first and got a `mount: /data: wrong fs type` error - [this StackOverflow answer](https://serverfault.com/questions/632905/cannot-mount-an-exi… | <p>I ran into problems with my AWS Lightsail instance: it exceeded the CPU burst quota for too long and was suspended, and I couldn't figure out how to un-suspend it.</p> <p>I had a snapshot of the hard drive and I wanted to recover the data from it. This ended up taking far longer than I expected - I imagine there's a better way of doing this but here's how I solved it.</p> <p>Short version: I migrated the snapshot to EC2, then launched an EC2 instance and mounted that snapshot as an EBS volume.</p> <p>Long version (because I had to figure out a lot of steps along the way):</p> <ol> <li>I activated the Lightsail "Export to Amazon EC2" option on the snapshot</li> <li>I waited a while for the export to complete</li> <li>This launched a new EC2 instance for me... but for some reason I couldn't SSH into that instance. So I terminated it.</li> <li>I used the EC2 web console to figure out the AWS identifier for the EC2 copy of the Lightsail snapshot - something like <code>snap-02a530e12a34</code> </li> <li>I created a brand new EC2 instance and on the "Add storage" panel I added an EBS volume for <code>/dev/sdb</code> with the snapshot identifier I found in the previous step. I started this instance with a keypair so I could SSH into it.</li> <li>I mounted the EBS volume - see section below</li> <li>... I used <code>scp</code> (with the keypair) to copy off the data</li> </ol> <h2> <a id="user-content-mounting-the-ebs-volume" class="anchor" href="#mounting-the-ebs-volume" aria-hidden="true"><span aria-hidden="true" class="octicon octicon-link"></span></a>Mounting the EBS volume</h2> <p>I hadn't worked with EBS before so this took some figuring out. My instance was configured with <code>/dev/sdb</code> as an EBS volume. I confirmed that the data was accessible like so:</p> <pre><code>[ec2-user@ip-172-31-26-179 dev]$ sudo file -s /dev/xvdb /dev/xvdb: x86 boot sector; partition 1: ID=0x83, active, starthead 32, startsector 2048, 167770079 sectors, code offset 0x63 </code></pre> <p>Then I created a <code>/data</code> dire… | <Binary: 82,909 bytes> | 2021-01-16T13:07:24-08:00 | 2021-01-16T21:07:24+00:00 | 2021-01-16T13:07:24-08:00 | 2021-01-16T21:07:24+00:00 | cccb1e66be6677f244d6dba2918cd3a6 | recovering-lightsail-data |
| aws_s3-cors.md | aws | Adding a CORS policy to an S3 bucket | https://github.com/simonw/til/blob/main/aws/s3-cors.md | Amazon S3 buckets that are configured to work as public websites can support CORS, allowing assets such as JavaScript modules to be loaded by JavaScript running on other domains. This configuration happens at the bucket level - it's not something that can be applied to individual items. [Here's their documentation](https://docs.aws.amazon.com/AmazonS3/latest/userguide/enabling-cors-examples.html). As with so many AWS things it involves hand-crafting a JSON document: the documentation for that format, with useful examples, [is here](https://docs.aws.amazon.com/AmazonS3/latest/userguide/ManageCorsUsing.html). I opted to use the S3 web console option - find the bucket in the console interface, click the "Security" tab and you can paste in a JSON configuration. The configuration I tried first was this one: ```json [ { "AllowedHeaders": [ "*" ], "AllowedMethods": [ "GET" ], "AllowedOrigins": [ "https://simonwillison.net/" ], "ExposeHeaders": [] } ] ``` This should enable CORS access for GET requests from code running on my https://simonwillison.net/ site. The `AllowedOrigins` key is interesting: it works by inspecting the `Origin` header on the incoming request, and returning CORS headers based on if that origin matches one of the values in the list. I used `curl -i ... -H "Origin: value"` to confirm that this worked: ``` ~ % curl -i 'http://static.simonwillison.net.s3-website-us-west-1.amazonaws.com/static/2022/photoswipe/photoswipe-lightbox.esm.js' \ -H "Origin: https://simonwillison.net" | head -n 20 -x-amz-request-id: 4YY7ZBCVJ167XCR9 Date: Tue, 04 Jan 2022 21:02:44 GMT -Access-Control-Allow-Origin: * -Access-Control-Allow-Methods: GET :Vary: Origin, Access-Control-Request-Headers, Access-Control-Request-Method -Last-Modified: Tue, 04 Jan 2022 20:10:26 GMT -ETag: "8e26fa2b966ca8bac30678cdd6af765c" :Content-Type: text/javascript -Server: AmazonS3 ~ % curl -i 'http://static.simonwillison.net.s3-website-us-… | <p>Amazon S3 buckets that are configured to work as public websites can support CORS, allowing assets such as JavaScript modules to be loaded by JavaScript running on other domains.</p> <p>This configuration happens at the bucket level - it's not something that can be applied to individual items.</p> <p><a href="https://docs.aws.amazon.com/AmazonS3/latest/userguide/enabling-cors-examples.html" rel="nofollow">Here's their documentation</a>. As with so many AWS things it involves hand-crafting a JSON document: the documentation for that format, with useful examples, <a href="https://docs.aws.amazon.com/AmazonS3/latest/userguide/ManageCorsUsing.html" rel="nofollow">is here</a>.</p> <p>I opted to use the S3 web console option - find the bucket in the console interface, click the "Security" tab and you can paste in a JSON configuration.</p> <p>The configuration I tried first was this one:</p> <div class="highlight highlight-source-json"><pre>[ { <span class="pl-ent">"AllowedHeaders"</span>: [ <span class="pl-s"><span class="pl-pds">"</span>*<span class="pl-pds">"</span></span> ], <span class="pl-ent">"AllowedMethods"</span>: [ <span class="pl-s"><span class="pl-pds">"</span>GET<span class="pl-pds">"</span></span> ], <span class="pl-ent">"AllowedOrigins"</span>: [ <span class="pl-s"><span class="pl-pds">"</span>https://simonwillison.net/<span class="pl-pds">"</span></span> ], <span class="pl-ent">"ExposeHeaders"</span>: [] } ]</pre></div> <p>This should enable CORS access for GET requests from code running on my <a href="https://simonwillison.net/" rel="nofollow">https://simonwillison.net/</a> site.</p> <p>The <code>AllowedOrigins</code> key is interesting: it works by inspecting the <code>Origin</code> header on the incoming request, and returning CORS headers based on if that origin matches one of the values in the list.</p> <p>I used <code>curl -i ... -H "Origin: value"</code> to confirm that this worked:</p> <pre><co… | <Binary: 73,573 bytes> | 2022-01-04T15:42:13-08:00 | 2022-01-04T23:42:13+00:00 | 2022-01-04T20:33:18-08:00 | 2022-01-05T04:33:18+00:00 | 5e0c5c7fe12cdcc87bde2f7bc050a915 | s3-cors |
| awslambda_asgi-mangum.md | awslambda | Deploying Python web apps as AWS Lambda functions | https://github.com/simonw/til/blob/main/awslambda/asgi-mangum.md | I've been wanting to figure out how to do this for years. Today I finally put all of the pieces together for it. [AWS Lambda](https://aws.amazon.com/lambda/) can host functions written in Python. These are "scale to zero" - my favourite definition of serverless! - which means you only pay for the traffic that they serve. A project with no traffic costs nothing to run. You used to have to jump through a whole bunch of extra hoops to get a working URL that triggered those functions, but in April 2022 they [released Lambda Function URLs](https://aws.amazon.com/blogs/aws/announcing-aws-lambda-function-urls-built-in-https-endpoints-for-single-function-microservices/) and dramatically simplified that process. There are still a lot of steps involved though. Here's how to deploy a Python web application as a Lambda function. ## Set up the AWS CLI tool I did this so long ago I can't remember how. You need an AWS account and you need to have the [AWS CLI tool](https://aws.amazon.com/cli/) installed and configured. The `aws --version` should return a version number of `1.22.90` or higher, as [that's when they added function URL support](https://github.com/simonw/help-scraper/commit/d217b9d7f44a1200d0582d02aeccf27e006b8b78). I found I had too old a version of the tool. I ended up figuring out this as the way to upgrade it: ```bash head -n 1 $(which aws) ``` Output: ``` #!/usr/local/opt/python@3.9/bin/python3.9 ``` This showed me the location of the Python environment that contained the tool. I could then edit that path to upgrade it like so: ```bash /usr/local/opt/python@3.9/bin/pip3 install -U awscli ``` ## Create a Python handler function This is "hello world" as a Python handler function. Put it in `lambda_function.py`: ```python def lambda_handler(event, context): return { "statusCode": 200, "headers": { "Content-Type": "text/html" }, "body": "<h1>Hello World from Python</h1>" } ``` ## Add that to a zip file This is the part of the process that I found most… | <p>I've been wanting to figure out how to do this for years. Today I finally put all of the pieces together for it.</p> <p><a href="https://aws.amazon.com/lambda/" rel="nofollow">AWS Lambda</a> can host functions written in Python. These are "scale to zero" - my favourite definition of serverless! - which means you only pay for the traffic that they serve. A project with no traffic costs nothing to run.</p> <p>You used to have to jump through a whole bunch of extra hoops to get a working URL that triggered those functions, but in April 2022 they <a href="https://aws.amazon.com/blogs/aws/announcing-aws-lambda-function-urls-built-in-https-endpoints-for-single-function-microservices/" rel="nofollow">released Lambda Function URLs</a> and dramatically simplified that process.</p> <p>There are still a lot of steps involved though. Here's how to deploy a Python web application as a Lambda function.</p> <h2><a id="user-content-set-up-the-aws-cli-tool" class="anchor" aria-hidden="true" href="#set-up-the-aws-cli-tool"><span aria-hidden="true" class="octicon octicon-link"></span></a>Set up the AWS CLI tool</h2> <p>I did this so long ago I can't remember how. You need an AWS account and you need to have the <a href="https://aws.amazon.com/cli/" rel="nofollow">AWS CLI tool</a> installed and configured.</p> <p>The <code>aws --version</code> should return a version number of <code>1.22.90</code> or higher, as <a href="https://github.com/simonw/help-scraper/commit/d217b9d7f44a1200d0582d02aeccf27e006b8b78">that's when they added function URL support</a>.</p> <p>I found I had too old a version of the tool. I ended up figuring out this as the way to upgrade it:</p> <div class="highlight highlight-source-shell"><pre>head -n 1 <span class="pl-s"><span class="pl-pds">$(</span>which aws<span class="pl-pds">)</span></span></pre></div> <p>Output:</p> <pre><code>#!/usr/local/opt/python@3.9/bin/python3.9 </code></pre> <p>This showed me the location of the Python environment that contained the tool. I could then edit that path to upgrade it… | <Binary: 75,022 bytes> | 2022-09-18T20:08:14-07:00 | 2022-09-19T03:08:14+00:00 | 2022-09-19T11:39:51-07:00 | 2022-09-19T18:39:51+00:00 | d6285f78938f820ca587824fc6eba035 | asgi-mangum |
| azure_all-traffic-to-subdomain.md | azure | Writing an Azure Function that serves all traffic to a subdomain | https://github.com/simonw/til/blob/main/azure/all-traffic-to-subdomain.md | [Azure Functions](https://docs.microsoft.com/en-us/azure/azure-functions/) default to serving traffic from a path like `/api/FunctionName` - for example `https://your-subdomain.azurewebsites.net/api/MyFunction`. If you want to serve an entire website through a single function (e.g. using [Datasette](https://datasette.io/)) you need that function to we called for any traffic to that subdomain. Here's how to do that - to capture all traffic to any path under `https://your-subdomain.azurewebsites.net/`. First add the following section to your `host.json` file: ``` "extensions": { "http": { "routePrefix": "" } } ``` Then add `"route": "{*route}"` to the `function.json` file for the function that you would like to serve all traffic. Mine ended up looking like this: ```json { "scriptFile": "__init__.py", "bindings": [ { "authLevel": "Anonymous", "type": "httpTrigger", "direction": "in", "name": "req", "route": "{*route}", "methods": [ "get", "post" ] }, { "type": "http", "direction": "out", "name": "$return" } ] } ``` See https://github.com/simonw/azure-functions-datasette for an example that uses this pattern. | <p><a href="https://docs.microsoft.com/en-us/azure/azure-functions/" rel="nofollow">Azure Functions</a> default to serving traffic from a path like <code>/api/FunctionName</code> - for example <code>https://your-subdomain.azurewebsites.net/api/MyFunction</code>.</p> <p>If you want to serve an entire website through a single function (e.g. using <a href="https://datasette.io/" rel="nofollow">Datasette</a>) you need that function to we called for any traffic to that subdomain.</p> <p>Here's how to do that - to capture all traffic to any path under <code>https://your-subdomain.azurewebsites.net/</code>.</p> <p>First add the following section to your <code>host.json</code> file:</p> <pre><code> "extensions": { "http": { "routePrefix": "" } } </code></pre> <p>Then add <code>"route": "{*route}"</code> to the <code>function.json</code> file for the function that you would like to serve all traffic. Mine ended up looking like this:</p> <div class="highlight highlight-source-json"><pre>{ <span class="pl-s"><span class="pl-pds">"</span>scriptFile<span class="pl-pds">"</span></span>: <span class="pl-s"><span class="pl-pds">"</span>__init__.py<span class="pl-pds">"</span></span>, <span class="pl-s"><span class="pl-pds">"</span>bindings<span class="pl-pds">"</span></span>: [ { <span class="pl-s"><span class="pl-pds">"</span>authLevel<span class="pl-pds">"</span></span>: <span class="pl-s"><span class="pl-pds">"</span>Anonymous<span class="pl-pds">"</span></span>, <span class="pl-s"><span class="pl-pds">"</span>type<span class="pl-pds">"</span></span>: <span class="pl-s"><span class="pl-pds">"</span>httpTrigger<span class="pl-pds">"</span></span>, <span class="pl-s"><span class="pl-pds">"</span>direction<span class="pl-pds">"</span></span>: <span class="pl-s"><span class="pl-pds">"</span>in<span class="pl-pds">"</span></span>, <span class="pl-s"><span class="pl-pds">"</span>name<span class="pl-pds">"</span></span>: <span class="p… | <Binary: 62,309 bytes> | 2021-03-27T20:49:56-07:00 | 2021-03-28T03:49:56+00:00 | 2021-03-27T20:49:56-07:00 | 2021-03-28T03:49:56+00:00 | 70d46c9c26f38e5813d281c2b7c56c1d | all-traffic-to-subdomain |
| bash_escaping-a-string.md | bash | Escaping strings in Bash using !:q | https://github.com/simonw/til/blob/main/bash/escaping-a-string.md | TIL this trick, [via Pascal Hirsch](https://twitter.com/phphys/status/1311727268398465029) on Twitter. Enter a line of Bash starting with a `#` comment, then run `!:q` on the next line to see what that would be with proper Bash escaping applied. ``` bash-3.2$ # This string 'has single' "and double" quotes and a $ bash-3.2$ !:q '# This string '\''has single'\'' "and double" quotes and a $' bash: # This string 'has single' "and double" quotes and a $: command not found ``` How does this work? [James Coglan explains](https://twitter.com/mountain_ghosts/status/1311767073933099010): > The `!` character begins a history expansion; `!string` produces the last command beginning with `string`, and `:q` is a modifier that quotes the result; so I'm guessing this is equivalent to `!string` where `string` is `""`, so it produces the most recent command, just like `!!` does A bunch more useful tips in the [thread about this on Hacker News](https://news.ycombinator.com/item?id=24659282). | <p>TIL this trick, <a href="https://twitter.com/phphys/status/1311727268398465029" rel="nofollow">via Pascal Hirsch</a> on Twitter. Enter a line of Bash starting with a <code>#</code> comment, then run <code>!:q</code> on the next line to see what that would be with proper Bash escaping applied.</p> <pre><code>bash-3.2$ # This string 'has single' "and double" quotes and a $ bash-3.2$ !:q '# This string '\''has single'\'' "and double" quotes and a $' bash: # This string 'has single' "and double" quotes and a $: command not found </code></pre> <p>How does this work? <a href="https://twitter.com/mountain_ghosts/status/1311767073933099010" rel="nofollow">James Coglan explains</a>:</p> <blockquote> <p>The <code>!</code> character begins a history expansion; <code>!string</code> produces the last command beginning with <code>string</code>, and <code>:q</code> is a modifier that quotes the result; so I'm guessing this is equivalent to <code>!string</code> where <code>string</code> is <code>""</code>, so it produces the most recent command, just like <code>!!</code> does</p> </blockquote> <p>A bunch more useful tips in the <a href="https://news.ycombinator.com/item?id=24659282" rel="nofollow">thread about this on Hacker News</a>.</p> | <Binary: 80,156 bytes> | 2020-10-01T13:32:02-07:00 | 2020-10-01T20:32:02+00:00 | 2020-10-03T22:30:04-07:00 | 2020-10-04T05:30:04+00:00 | 7b7a5e24ac848f6bd511817576928928 | escaping-a-string |
| bash_escaping-sql-for-curl-to-datasette.md | bash | Escaping a SQL query to use with curl and Datasette | https://github.com/simonw/til/blob/main/bash/escaping-sql-for-curl-to-datasette.md | I used this pattern to pass a SQL query to Datasette's CSV export via curl and output the results, stripping off the first row (the header row) using `tail -n +2`. SQL queries need to be URL-encoded - I did that be echoing the SQL query and piping it to a Python one-liner that calls the `urllib.parse.quote()` function. ```bash curl -s "https://github-to-sqlite.dogsheep.net/github.csv?sql=$(echo ' select full_name from repos where rowid in ( select repos.rowid from repos, json_each(repos.topics) j where j.value = "datasette-io" ) and rowid in ( select repos.rowid from repos, json_each(repos.topics) j where j.value = "datasette-plugin" ) order by updated_at desc ' | python3 -c \ 'import sys; import urllib.parse; print(urllib.parse.quote(sys.stdin.read()))')" \ | tail -n +2 ``` Here's [that SQL query](https://github-to-sqlite.dogsheep.net/github?sql=select%0D%0A++full_name%0D%0Afrom%0D%0A++repos%0D%0Awhere%0D%0A++rowid+in+%28%0D%0A++++select%0D%0A++++++repos.rowid%0D%0A++++from%0D%0A++++++repos%2C%0D%0A++++++json_each%28repos.topics%29+j%0D%0A++++where%0D%0A++++++j.value+%3D+%22datasette-io%22%0D%0A++%29%0D%0A++and+rowid+in+%28%0D%0A++++select%0D%0A++++++repos.rowid%0D%0A++++from%0D%0A++++++repos%2C%0D%0A++++++json_each%28repos.topics%29+j%0D%0A++++where%0D%0A++++++j.value+%3D+%22datasette-plugin%22%0D%0A++%29%0D%0Aorder+by%0D%0A++updated_at+desc) in the Datasette web UI. The output from the bash one-liner looks like this: ``` simonw/datasette-edit-schema simonw/datasette-import-table simonw/datasette-dateutil simonw/datasette-seaborn simonw/datasette-backup simonw/datasette-yaml simonw/datasette-schema-versions simonw/datasette-graphql simonw/datasette-insert simonw/datasette-copyable simonw/datasette-auth-passwords simonw/datasette-glitch simonw/datasette-block-robots simonw/datasette-saved-queries simonw/datasette-psutil simonw/datasette-auth-tokens simonw/datasette-permissions-sql simonw/datasette-media simonw/datasette-… | <p>I used this pattern to pass a SQL query to Datasette's CSV export via curl and output the results, stripping off the first row (the header row) using <code>tail -n +2</code>.</p> <p>SQL queries need to be URL-encoded - I did that be echoing the SQL query and piping it to a Python one-liner that calls the <code>urllib.parse.quote()</code> function.</p> <div class="highlight highlight-source-shell"><pre>curl -s <span class="pl-s"><span class="pl-pds">"</span>https://github-to-sqlite.dogsheep.net/github.csv?sql=<span class="pl-s"><span class="pl-pds">$(</span>echo <span class="pl-s"><span class="pl-pds">'</span></span></span></span> <span class="pl-s"><span class="pl-s"><span class="pl-s">select</span></span></span> <span class="pl-s"><span class="pl-s"><span class="pl-s"> full_name</span></span></span> <span class="pl-s"><span class="pl-s"><span class="pl-s">from</span></span></span> <span class="pl-s"><span class="pl-s"><span class="pl-s"> repos</span></span></span> <span class="pl-s"><span class="pl-s"><span class="pl-s">where</span></span></span> <span class="pl-s"><span class="pl-s"><span class="pl-s"> rowid in (</span></span></span> <span class="pl-s"><span class="pl-s"><span class="pl-s"> select</span></span></span> <span class="pl-s"><span class="pl-s"><span class="pl-s"> repos.rowid</span></span></span> <span class="pl-s"><span class="pl-s"><span class="pl-s"> from</span></span></span> <span class="pl-s"><span class="pl-s"><span class="pl-s"> repos,</span></span></span> <span class="pl-s"><span class="pl-s"><span class="pl-s"> json_each(repos.topics) j</span></span></span> <span class="pl-s"><span class="pl-s"><span class="pl-s"> where</span></span></span> <span class="pl-s"><span class="pl-s"><span class="pl-s"> j.value = "datasette-io"</span></span></span> <span class="pl-s"><span class="pl-s"><span class="pl-s"> )</span></span></span> <span class="pl-s"><span class="pl-s"><span class="pl-s"> and rowid in (</span></span></span> <span class="pl-s"><span class="pl-s"><sp… | <Binary: 54,973 bytes> | 2020-12-08T11:05:59-08:00 | 2020-12-08T19:05:59+00:00 | 2020-12-08T11:05:59-08:00 | 2020-12-08T19:05:59+00:00 | 9af124acc855d09f35908a7eaed9be9f | escaping-sql-for-curl-to-datasette |
| bash_finding-bom-csv-files-with-ripgrep.md | bash | Finding CSV files that start with a BOM using ripgrep | https://github.com/simonw/til/blob/main/bash/finding-bom-csv-files-with-ripgrep.md | For [sqlite-utils issue 250](https://github.com/simonw/sqlite-utils/issues/250) I needed to locate some test CSV files that start with a UTF-8 BOM. Here's how I did that using [ripgrep](https://github.com/BurntSushi/ripgrep): ``` $ rg --multiline --encoding none '^(?-u:\xEF\xBB\xBF)' --glob '*.csv' . ``` The `--multiline` option means the search spans multiple lines - I only want to match entire files that begin with my search term, so this means that `^` will match the start of the file, not the start of individual lines. `--encoding none` runs the search against the raw bytes of the file, disabling ripgrep's default BOM detection. `--glob '*.csv'` causes ripgrep to search only CSV files. The regular expression itself looks like this: ^(?-u:\xEF\xBB\xBF) This is [rust regex](https://docs.rs/regex/1.5.4/regex/#syntax) syntax. `(?-u:` means "turn OFF the `u` flag for the duration of this block" - the `u` flag, which is on by default, causes the Rust regex engine to interpret input as unicode. So within the rest of that `(...)` block we can use escaped byte sequences. Finally, `\xEF\xBB\xBF` is the byte sequence for the UTF-8 BOM itself. | <p>For <a href="https://github.com/simonw/sqlite-utils/issues/250">sqlite-utils issue 250</a> I needed to locate some test CSV files that start with a UTF-8 BOM.</p> <p>Here's how I did that using <a href="https://github.com/BurntSushi/ripgrep">ripgrep</a>:</p> <pre><code>$ rg --multiline --encoding none '^(?-u:\xEF\xBB\xBF)' --glob '*.csv' . </code></pre> <p>The <code>--multiline</code> option means the search spans multiple lines - I only want to match entire files that begin with my search term, so this means that <code>^</code> will match the start of the file, not the start of individual lines.</p> <p><code>--encoding none</code> runs the search against the raw bytes of the file, disabling ripgrep's default BOM detection.</p> <p><code>--glob '*.csv'</code> causes ripgrep to search only CSV files.</p> <p>The regular expression itself looks like this:</p> <pre><code>^(?-u:\xEF\xBB\xBF) </code></pre> <p>This is <a href="https://docs.rs/regex/1.5.4/regex/#syntax" rel="nofollow">rust regex</a> syntax.</p> <p><code>(?-u:</code> means "turn OFF the <code>u</code> flag for the duration of this block" - the <code>u</code> flag, which is on by default, causes the Rust regex engine to interpret input as unicode. So within the rest of that <code>(...)</code> block we can use escaped byte sequences.</p> <p>Finally, <code>\xEF\xBB\xBF</code> is the byte sequence for the UTF-8 BOM itself.</p> | <Binary: 66,397 bytes> | 2021-05-28T22:23:45-07:00 | 2021-05-29T05:23:45+00:00 | 2021-05-28T22:23:45-07:00 | 2021-05-29T05:23:45+00:00 | 708508f8876dcdb33cc2e58461643886 | finding-bom-csv-files-with-ripgrep |
| bash_ignore-errors.md | bash | Ignoring errors in a section of a Bash script | https://github.com/simonw/til/blob/main/bash/ignore-errors.md | For [simonw/museums#32](https://github.com/simonw/museums/issues/32) I wanted to have certain lines in my Bash script ignore any errors: lines that used `sqlite-utils` to add columns and configure FTS, but that might fail with an error if the column already existed or FTS had already been configured. [This tip](https://stackoverflow.com/a/60362732) on StackOverflow lead me to the [following recipe](https://github.com/simonw/museums/blob/d94410440a5c81a5cb3a0f0b886a8cd30941b8a9/build.sh): ```bash #!/bin/bash set -euo pipefail yaml-to-sqlite browse.db museums museums.yaml --pk=id python annotate_nominatum.py browse.db python annotate_timestamps.py # Ignore errors in following block until set -e: set +e sqlite-utils add-column browse.db museums country 2>/dev/null sqlite3 browse.db < set-country.sql sqlite-utils disable-fts browse.db museums 2>/dev/null sqlite-utils enable-fts browse.db museums \ name description country osm_city \ --tokenize porter --create-triggers 2>/dev/null set -e ``` Everything between the `set +e` and the `set -e` lines can now error without the Bash script itself failing. The failing lines were still showing a bunch of Python tracebacks. I fixed that by redirecting their standard error output to `/dev/null` like this: ```bash sqlite-utils disable-fts browse.db museums 2>/dev/null ``` | <p>For <a href="https://github.com/simonw/museums/issues/32">simonw/museums#32</a> I wanted to have certain lines in my Bash script ignore any errors: lines that used <code>sqlite-utils</code> to add columns and configure FTS, but that might fail with an error if the column already existed or FTS had already been configured.</p> <p><a href="https://stackoverflow.com/a/60362732" rel="nofollow">This tip</a> on StackOverflow lead me to the <a href="https://github.com/simonw/museums/blob/d94410440a5c81a5cb3a0f0b886a8cd30941b8a9/build.sh">following recipe</a>:</p> <div class="highlight highlight-source-shell"><pre><span class="pl-c"><span class="pl-c">#!</span>/bin/bash</span> <span class="pl-c1">set</span> -euo pipefail yaml-to-sqlite browse.db museums museums.yaml --pk=id python annotate_nominatum.py browse.db python annotate_timestamps.py <span class="pl-c"><span class="pl-c">#</span> Ignore errors in following block until set -e:</span> <span class="pl-c1">set</span> +e sqlite-utils add-column browse.db museums country <span class="pl-k">2></span>/dev/null sqlite3 browse.db <span class="pl-k"><</span> set-country.sql sqlite-utils disable-fts browse.db museums <span class="pl-k">2></span>/dev/null sqlite-utils enable-fts browse.db museums \ name description country osm_city \ --tokenize porter --create-triggers <span class="pl-k">2></span>/dev/null <span class="pl-c1">set</span> -e</pre></div> <p>Everything between the <code>set +e</code> and the <code>set -e</code> lines can now error without the Bash script itself failing.</p> <p>The failing lines were still showing a bunch of Python tracebacks. I fixed that by redirecting their standard error output to <code>/dev/null</code> like this:</p> <div class="highlight highlight-source-shell"><pre>sqlite-utils disable-fts browse.db museums <span class="pl-k">2></span>/dev/null</pre></div> | <Binary: 67,518 bytes> | 2022-06-27T17:24:42-07:00 | 2022-06-28T00:24:42+00:00 | 2022-06-27T17:24:42-07:00 | 2022-06-28T00:24:42+00:00 | d8c7cdf1528485991e86832fb6951377 | ignore-errors |
| bash_loop-over-csv.md | bash | Looping over comma-separated values in Bash | https://github.com/simonw/til/blob/main/bash/loop-over-csv.md | Given a file (or a process) that produces comma separated values, here's how to split those into separate variables and use them in a bash script. The trick is to set the Bash `IFS` to a delimiter, then use `my_array=($my_string)` to split on that delimiter. Create a text file called `data.txt` containing this: ``` first,1 second,2 ``` You can create that by doing: ```bash echo 'first,1 second,2' > /tmp/data.txt ``` To loop over that file and print each line: ```bash for line in $(cat /tmp/data.txt); do echo $line done ``` To split each line into two separate variables in the loop, do this: ```bash for line in $(cat /tmp/data.txt); do IFS=$','; split=($line); unset IFS; # $split is now a bash array echo "Column 1: ${split[0]}" echo "Column 2: ${split[1]}" done ``` Outputs: ``` Column 1: first Column 2: 1 Column 1: second Column 2: 2 ``` Here's a script I wrote using this technique for the TIL [Use labels on Cloud Run services for a billing breakdown](https://til.simonwillison.net/til/til/cloudrun_use-labels-for-billing-breakdown.md): ```bash #!/bin/bash for line in $( gcloud run services list --platform=managed \ --format="csv(SERVICE,REGION)" \ --filter "NOT metadata.labels.service:*" \ | tail -n +2) do IFS=$','; service_and_region=($line); unset IFS; service=${service_and_region[0]} region=${service_and_region[1]} echo "service: $service region: $region" gcloud run services update $service \ --region=$region --platform=managed \ --update-labels service=$service echo done ``` | <p>Given a file (or a process) that produces comma separated values, here's how to split those into separate variables and use them in a bash script.</p> <p>The trick is to set the Bash <code>IFS</code> to a delimiter, then use <code>my_array=($my_string)</code> to split on that delimiter.</p> <p>Create a text file called <code>data.txt</code> containing this:</p> <pre><code>first,1 second,2 </code></pre> <p>You can create that by doing:</p> <div class="highlight highlight-source-shell"><pre><span class="pl-c1">echo</span> <span class="pl-s"><span class="pl-pds">'</span>first,1</span> <span class="pl-s">second,2<span class="pl-pds">'</span></span> <span class="pl-k">></span> /tmp/data.txt</pre></div> <p>To loop over that file and print each line:</p> <div class="highlight highlight-source-shell"><pre><span class="pl-k">for</span> <span class="pl-smi">line</span> <span class="pl-k">in</span> <span class="pl-s"><span class="pl-pds">$(</span>cat /tmp/data.txt<span class="pl-pds">)</span></span><span class="pl-k">;</span> <span class="pl-k">do</span> <span class="pl-c1">echo</span> <span class="pl-smi">$line</span> <span class="pl-k">done</span></pre></div> <p>To split each line into two separate variables in the loop, do this:</p> <div class="highlight highlight-source-shell"><pre><span class="pl-k">for</span> <span class="pl-smi">line</span> <span class="pl-k">in</span> <span class="pl-s"><span class="pl-pds">$(</span>cat /tmp/data.txt<span class="pl-pds">)</span></span><span class="pl-k">;</span> <span class="pl-k">do</span> IFS=<span class="pl-s"><span class="pl-pds">$'</span>,<span class="pl-pds">'</span></span><span class="pl-k">;</span> split=(<span class="pl-smi">$line</span>)<span class="pl-k">;</span> <span class="pl-c1">unset</span> IFS<span class="pl-k">;</span> <span class="pl-c"><span class="pl-c">#</span> $split is now a bash array</span> <span class="pl-c1">echo</span> <span class="pl-s"><span class="pl-pds">"</span>Column 1: <span class="pl-smi">${split[0]}</span><span class="pl-pds">"</sp… | <Binary: 51,126 bytes> | 2020-09-01T18:48:28-07:00 | 2020-09-02T01:48:28+00:00 | 2020-09-01T18:48:28-07:00 | 2020-09-02T01:48:28+00:00 | d06963c31326ae773a8e7face614668c | loop-over-csv |
| bash_nullglob-in-bash.md | bash | nullglob in bash | https://github.com/simonw/til/blob/main/bash/nullglob-in-bash.md | I ran into a tricky problem while working [on this issue](https://github.com/simonw/datasette-publish-fly/issues/17): the following line was behaving in an unexpected way for me: datasette content.db *.db --create What I expect this to do is to create a `content.db` database if one does not exist, and then start Datasette with both that database and any other databases that exist in the directory. The surprising behaviour occurred when the directory started off empty. Running the above in `bash` caused a file called `*.db` to be created in the directory. It turns out if `bash` can't find any files matching a wildcard it passes that wildcard as a literal value to the underlying command! `sh` does the same thing. `zsh` returns an error: ``` % datasette content.db *.db --create zsh: no matches found: *.db ``` The solution, for `bash`, is to set the `nullglob` shell option. That can be done like this: shopt -s nullglob This lasts for the rest of the interactive session, and causes `bash` to behave the way I expected it to, completely ignoring the `*.db` wildcard if it has no matches. ## Using this in a Dockerfile I originally ran into this because I had a `Dockerfile` with a last line that looked like this: `CMD datasette serve --host 0.0.0.0 --cors --inspect-file inspect-data.json --metadata metadata.json /data/tiddlywiki.db --create --port $PORT /data/*.db` The goal here was to serve any existing databases in the `/data/` mounted volume, and to explicitly create that `tiddlywiki.db` database if it did not exist. But it created a `*.db` database file if the folder was empty, due to the issue described above. I ended up using this recipe to work around the problem: `CMD ["/bin/bash", "-c", "shopt -s nullglob && datasette serve --host 0.0.0.0 --cors --inspect-file inspect-data.json /data/tiddlywiki.db --create --port $PORT /data/*.db"]` This uses `CMD` to execute `/bin/bash` and pass it a one-liner that sets `nullglob` and then calls Datasette. This worked as intended. | <p>I ran into a tricky problem while working <a href="https://github.com/simonw/datasette-publish-fly/issues/17">on this issue</a>: the following line was behaving in an unexpected way for me:</p> <pre><code>datasette content.db *.db --create </code></pre> <p>What I expect this to do is to create a <code>content.db</code> database if one does not exist, and then start Datasette with both that database and any other databases that exist in the directory.</p> <p>The surprising behaviour occurred when the directory started off empty. Running the above in <code>bash</code> caused a file called <code>*.db</code> to be created in the directory.</p> <p>It turns out if <code>bash</code> can't find any files matching a wildcard it passes that wildcard as a literal value to the underlying command!</p> <p><code>sh</code> does the same thing. <code>zsh</code> returns an error:</p> <pre><code>% datasette content.db *.db --create zsh: no matches found: *.db </code></pre> <p>The solution, for <code>bash</code>, is to set the <code>nullglob</code> shell option. That can be done like this:</p> <pre><code>shopt -s nullglob </code></pre> <p>This lasts for the rest of the interactive session, and causes <code>bash</code> to behave the way I expected it to, completely ignoring the <code>*.db</code> wildcard if it has no matches.</p> <h2> <a id="user-content-using-this-in-a-dockerfile" class="anchor" href="#using-this-in-a-dockerfile" aria-hidden="true"><span aria-hidden="true" class="octicon octicon-link"></span></a>Using this in a Dockerfile</h2> <p>I originally ran into this because I had a <code>Dockerfile</code> with a last line that looked like this:</p> <p><code>CMD datasette serve --host 0.0.0.0 --cors --inspect-file inspect-data.json --metadata metadata.json /data/tiddlywiki.db --create --port $PORT /data/*.db</code></p> <p>The goal here was to serve any existing databases in the <code>/data/</code> mounted volume, and to explicitly create that <code>tiddlywiki.db</code> database if it did not exist.</p> <p>But it created a <… | <Binary: 64,398 bytes> | 2022-02-14T21:16:05-08:00 | 2022-02-15T05:16:05+00:00 | 2022-02-14T21:16:05-08:00 | 2022-02-15T05:16:05+00:00 | 617dfd393565706d61b6bf41b1401c65 | nullglob-in-bash |
| bash_skip-csv-rows-with-odd-numbers.md | bash | Skipping CSV rows with odd numbers of quotes using ripgrep | https://github.com/simonw/til/blob/main/bash/skip-csv-rows-with-odd-numbers.md | I'm working with several huge CSV files - over 5 million rows total - and I ran into a problem: it turned out there were a few lines in those files that imported incorrectly because they were not correctly escaped. Here's an example of an invalid line: SAI Exempt,"Patty B"s Hats & Tees,LLC",,26 Broad St The apostrophe in `Patty B's Hats & Tees` is incorrectly represented here as a double quote, and since that's in a double quoted string it breaks that line of CSV. I decided to filter out any rows that had an odd number of quotation marks in them - saving those broken lines to try and clean up later. ## Finding rows with odd numbers of quotes StackOverflow [offered this regular expression](https://stackoverflow.com/a/16863999) for finding lines with an odd number of quotation marks: ``` [^"]*" # Match any number of non-quote characters, then a quote (?: # Now match an even number of quotes by matching: [^"]*" # any number of non-quote characters, then a quote [^"]*" # twice )* # and repeat any number of times. [^"]* # Finally, match any remaining non-quote characters ``` I translated this into a `ripgrep` expression, adding `^` to the beginning and `$` to the end in order to match whole strings. This command counted the number of invalid lines: rg '^[^"]*"(?:[^"]*"[^"]*")*[^"]*$' --glob '*.csv' --count 04.csv:52 03.csv:42 02.csv:24 01.csv:29 Adding `--invert-match` showed me the count of lines that did NOT have an odd number of quotes: rg '^[^"]*"(?:[^"]*"[^"]*")*[^"]*$' --glob '*.csv' --count --invert-match 05.csv:2829 04.csv:812351 03.csv:961311 02.csv:994265 01.csv:995404 This shows that the invalid lines are a tiny subset of the overall files. Removing `--count` shows the actual content. ## Importing into SQLite with sqlite-utils I used this for loop to import only the valid lines into a SQLite database: ```bash for file in *.csv; do rg --invert-match '^[^"]*"(?:[^"]*"[^"]*")*[^"]*$' $file | \ sqlite-utils insert m… | <p>I'm working with several huge CSV files - over 5 million rows total - and I ran into a problem: it turned out there were a few lines in those files that imported incorrectly because they were not correctly escaped.</p> <p>Here's an example of an invalid line:</p> <pre><code>SAI Exempt,"Patty B"s Hats & Tees,LLC",,26 Broad St </code></pre> <p>The apostrophe in <code>Patty B's Hats & Tees</code> is incorrectly represented here as a double quote, and since that's in a double quoted string it breaks that line of CSV.</p> <p>I decided to filter out any rows that had an odd number of quotation marks in them - saving those broken lines to try and clean up later.</p> <h2> <a id="user-content-finding-rows-with-odd-numbers-of-quotes" class="anchor" href="#finding-rows-with-odd-numbers-of-quotes" aria-hidden="true"><span aria-hidden="true" class="octicon octicon-link"></span></a>Finding rows with odd numbers of quotes</h2> <p>StackOverflow <a href="https://stackoverflow.com/a/16863999" rel="nofollow">offered this regular expression</a> for finding lines with an odd number of quotation marks:</p> <pre><code>[^"]*" # Match any number of non-quote characters, then a quote (?: # Now match an even number of quotes by matching: [^"]*" # any number of non-quote characters, then a quote [^"]*" # twice )* # and repeat any number of times. [^"]* # Finally, match any remaining non-quote characters </code></pre> <p>I translated this into a <code>ripgrep</code> expression, adding <code>^</code> to the beginning and <code>$</code> to the end in order to match whole strings.</p> <p>This command counted the number of invalid lines:</p> <pre><code>rg '^[^"]*"(?:[^"]*"[^"]*")*[^"]*$' --glob '*.csv' --count 04.csv:52 03.csv:42 02.csv:24 01.csv:29 </code></pre> <p>Adding <code>--invert-match</code> showed me the count of lines that did NOT have an odd number of quotes:</p> <pre><code>rg '^[^"]*"(?:[^"]*"[^"]*")*[^"]*$' --glob '*.csv' --count --invert-match 05.csv:2829 04.csv:812351 03.csv:961311 02.csv:994265… | <Binary: 68,046 bytes> | 2020-12-11T19:50:58-08:00 | 2020-12-12T03:50:58+00:00 | 2021-01-18T17:27:54-08:00 | 2021-01-19T01:27:54+00:00 | 79abed69911556279dfa18b015588d8c | skip-csv-rows-with-odd-numbers |
| bash_use-awk-to-add-a-prefix.md | bash | Using awk to add a prefix | https://github.com/simonw/til/blob/main/bash/use-awk-to-add-a-prefix.md | I wanted to dynamically run the following command against all files in a directory: ```bash pypi-to-sqlite content.db -f /tmp/pypi-datasette-packages/packages/airtable-export.json \ -f /tmp/pypi-datasette-packages/packages/csv-diff.json \ --prefix pypi_ ``` I can't use `/tmp/pypi-datasette-packages/packages/*.json` here because I need each file to be processed using the `-f` option. I found a solution using `awk`. The `awk` program `'{print "-f "$0}'` adds a prefix to the input, for example: ``` % echo "blah" | awk '{print "-f "$0}' -f blah ``` I wanted that trailing backslash too, so I used this: ```awk {print "-f "$0 " \\"} ``` Piping to `awk` works, so I combined that with `ls ../*.json` like so: ``` % ls /tmp/pypi-datasette-packages/packages/*.json | awk '{print "-f "$0 " \\"}' -f /tmp/pypi-datasette-packages/packages/airtable-export.json \ -f /tmp/pypi-datasette-packages/packages/csv-diff.json \ -f /tmp/pypi-datasette-packages/packages/csvs-to-sqlite.json \ ``` Then I used `eval` to execute the command. The full recipe looks like this: ```bash args=$(ls /tmp/pypi-datasette-packages/packages/*.json | awk '{print "-f "$0 " \\"}') eval "pypi-to-sqlite content.db $args --prefix pypi_" ``` Full details in [datasette.io issue 98](https://github.com/simonw/datasette.io/issues/98). | <p>I wanted to dynamically run the following command against all files in a directory:</p> <div class="highlight highlight-source-shell"><pre>pypi-to-sqlite content.db -f /tmp/pypi-datasette-packages/packages/airtable-export.json \ -f /tmp/pypi-datasette-packages/packages/csv-diff.json \ --prefix pypi_</pre></div> <p>I can't use <code>/tmp/pypi-datasette-packages/packages/*.json</code> here because I need each file to be processed using the <code>-f</code> option.</p> <p>I found a solution using <code>awk</code>. The <code>awk</code> program <code>'{print "-f "$0}'</code> adds a prefix to the input, for example:</p> <pre><code>% echo "blah" | awk '{print "-f "$0}' -f blah </code></pre> <p>I wanted that trailing backslash too, so I used this:</p> <div class="highlight highlight-source-awk"><pre>{<span class="pl-k">print</span> <span class="pl-s"><span class="pl-pds">"</span>-f <span class="pl-pds">"</span></span><span class="pl-c1">$0</span> <span class="pl-s"><span class="pl-pds">"</span> <span class="pl-cce">\\</span><span class="pl-pds">"</span></span>}</pre></div> <p>Piping to <code>awk</code> works, so I combined that with <code>ls ../*.json</code> like so:</p> <pre><code>% ls /tmp/pypi-datasette-packages/packages/*.json | awk '{print "-f "$0 " \\"}' -f /tmp/pypi-datasette-packages/packages/airtable-export.json \ -f /tmp/pypi-datasette-packages/packages/csv-diff.json \ -f /tmp/pypi-datasette-packages/packages/csvs-to-sqlite.json \ </code></pre> <p>Then I used <code>eval</code> to execute the command. The full recipe looks like this:</p> <div class="highlight highlight-source-shell"><pre>args=<span class="pl-s"><span class="pl-pds">$(</span>ls /tmp/pypi-datasette-packages/packages/<span class="pl-k">*</span>.json <span class="pl-k">|</span> awk <span class="pl-s"><span class="pl-pds">'</span>{print "-f "$0 " \\"}<span class="pl-pds">'</span></span><span class="pl-pds">)</span></span> <span class="pl-c1">eval</span> <span class="pl-s"><span class="pl-pds">"</span>pypi-to-sqlite content.db <span class="pl… | <Binary: 61,224 bytes> | 2022-04-08T09:25:04-07:00 | 2022-04-08T16:25:04+00:00 | 2022-04-08T09:25:04-07:00 | 2022-04-08T16:25:04+00:00 | 801ca3f33198f55a114494b5608cb6c1 | use-awk-to-add-a-prefix |
| caddy_pause-retry-traffic.md | caddy | Pausing traffic and retrying in Caddy | https://github.com/simonw/til/blob/main/caddy/pause-retry-traffic.md | A pattern I really like for zero-downtime deploys is the ability to "pause" HTTP traffic at the load balancer, such that incoming requests from browsers appear to take a few extra seconds to return, but under the hood they've actually been held in a queue while a backend server is swapped out or upgraded in some way. I first heard about this pattern [from Braintree](https://simonwillison.net/2011/Jun/30/braintree/), and a [conversation on Twitter](https://twitter.com/simonw/status/1463652411365494791) today brought up a few more examples, including [this NGINX Lua config](https://github.com/basecamp/intermission) from Basecamp. [Caddy](https://caddyserver.com/) creator Matt Holt [pointed me](https://twitter.com/mholt6/status/1463656086360051714) to [lb_try_duration and lb_try_interval](https://caddyserver.com/docs/caddyfile/directives/reverse_proxy#lb_try_duration) in Caddy, which can hold requests for up to a specific number of seconds, retrying the backend to see if it has become available again. I decided to try this out. This was my first time using Caddy and I'm really impressed with both the design of the software and the quality of the [getting started documentation](https://caddyserver.com/docs/getting-started). I installed Caddy using Homebrew: brew install caddy ## The Caddyfile You can configure Caddy in a bunch of different ways - the two main options are using JSON via the Caddy API or using their own custom Caddyfile format. Here's the `Caddyfile` I created: ``` { auto_https off } :80 { reverse_proxy localhost:8003 { lb_try_duration 30s lb_try_interval 1s } } ``` Caddy defaults to `https`, even on `localhost`, which is very cool but not what I wanted for this demo - hence the first block. The next block listens on port 80 and proxies to `localhost:8003` - with a 30s duration during which incoming requests will "pause" if the backend is not available, and a polling interval of 1s. ## Running Caddy I started Caddy in the same directory as my `Caddyfile` usin… | <p>A pattern I really like for zero-downtime deploys is the ability to "pause" HTTP traffic at the load balancer, such that incoming requests from browsers appear to take a few extra seconds to return, but under the hood they've actually been held in a queue while a backend server is swapped out or upgraded in some way.</p> <p>I first heard about this pattern <a href="https://simonwillison.net/2011/Jun/30/braintree/" rel="nofollow">from Braintree</a>, and a <a href="https://twitter.com/simonw/status/1463652411365494791" rel="nofollow">conversation on Twitter</a> today brought up a few more examples, including <a href="https://github.com/basecamp/intermission">this NGINX Lua config</a> from Basecamp.</p> <p><a href="https://caddyserver.com/" rel="nofollow">Caddy</a> creator Matt Holt <a href="https://twitter.com/mholt6/status/1463656086360051714" rel="nofollow">pointed me</a> to <a href="https://caddyserver.com/docs/caddyfile/directives/reverse_proxy#lb_try_duration" rel="nofollow">lb_try_duration and lb_try_interval</a> in Caddy, which can hold requests for up to a specific number of seconds, retrying the backend to see if it has become available again.</p> <p>I decided to try this out. This was my first time using Caddy and I'm really impressed with both the design of the software and the quality of the <a href="https://caddyserver.com/docs/getting-started" rel="nofollow">getting started documentation</a>.</p> <p>I installed Caddy using Homebrew:</p> <pre><code>brew install caddy </code></pre> <h2> <a id="user-content-the-caddyfile" class="anchor" href="#the-caddyfile" aria-hidden="true"><span aria-hidden="true" class="octicon octicon-link"></span></a>The Caddyfile</h2> <p>You can configure Caddy in a bunch of different ways - the two main options are using JSON via the Caddy API or using their own custom Caddyfile format.</p> <p>Here's the <code>Caddyfile</code> I created:</p> <pre><code>{ auto_https off } :80 { reverse_proxy localhost:8003 { lb_try_duration 30s lb_try_interval 1s } … | <Binary: 91,253 bytes> | 2021-11-24T17:18:24-08:00 | 2021-11-25T01:18:24+00:00 | 2021-11-24T18:37:21-08:00 | 2021-11-25T02:37:21+00:00 | 9abe5cc7d3baf71f2b3a28b0c12b8bbe | pause-retry-traffic |
| cloudflare_robots-txt-cloudflare-workers.md | cloudflare | Adding a robots.txt using Cloudflare workers | https://github.com/simonw/til/blob/main/cloudflare/robots-txt-cloudflare-workers.md | I got an unexpected traffic spike to https://russian-ira-facebook-ads.datasettes.com/ - which runs on Cloud Run - and decided to use `robots.txt` to block crawlers. Re-deploying that instance was a little hard because I didn't have a clean repeatable deployment script in place for it (it's an older project) - so I decided to try using Cloudflare workers for this instead. DNS was already running through Cloudflare, so switching it to "proxy" mode to enable Cloudflare caching and workers could be done in the Cloudflare control panel.  I navigated to the "Workers" section of the Cloudflare dashboard and clicked "Create a Service", then used their "Introduction (HTTP handler)" starting template. I modified it to look like this and saved it as `block-all-robots`: ```javascript addEventListener("fetch", (event) => { event.respondWith( handleRequest(event.request).catch( (err) => new Response(err.stack, { status: 500 }) ) ); }); async function handleRequest(request) { const { pathname } = new URL(request.url); if (pathname == "/robots.txt") { return new Response("User-agent: *\nDisallow: /", { headers: { "Content-Type": "text/plain" }, }); } } ``` After deploying it, https://block-all-robots.simonw.workers.dev/robots.txt started serving my new `robots.txt` file: ``` User-agent: * Disallow: / ``` Then in the Cloudflare dashboard for `datasettes.com` I found the "Workers" section (not to be confused with the "Workers" section where you create and edit workers) I clicked "Add route" and used the following settings: 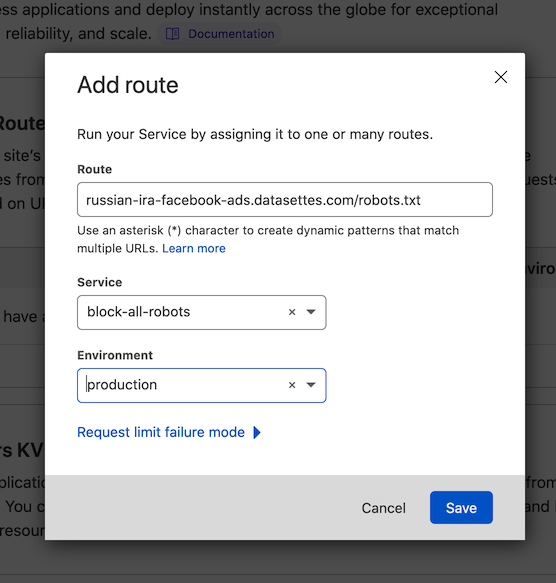 Route: `russian-ira-facebook-ads.datasettes.com/robots.txt` Service: `block-all-robots` Environment: `production` I clicked "Save" and https://russian-ira-facebo… | <p>I got an unexpected traffic spike to <a href="https://russian-ira-facebook-ads.datasettes.com/" rel="nofollow">https://russian-ira-facebook-ads.datasettes.com/</a> - which runs on Cloud Run - and decided to use <code>robots.txt</code> to block crawlers.</p> <p>Re-deploying that instance was a little hard because I didn't have a clean repeatable deployment script in place for it (it's an older project) - so I decided to try using Cloudflare workers for this instead.</p> <p>DNS was already running through Cloudflare, so switching it to "proxy" mode to enable Cloudflare caching and workers could be done in the Cloudflare control panel.</p> <p><a href="https://user-images.githubusercontent.com/9599/147008621-6f87de32-4f6d-4d6b-a685-542fd21da7aa.png" target="_blank" rel="nofollow"><img src="https://user-images.githubusercontent.com/9599/147008621-6f87de32-4f6d-4d6b-a685-542fd21da7aa.png" alt="Having turned on the Proxied toggle in the Cloudlfare control panel" style="max-width:100%;"></a></p> <p>I navigated to the "Workers" section of the Cloudflare dashboard and clicked "Create a Service", then used their "Introduction (HTTP handler)" starting template. I modified it to look like this and saved it as <code>block-all-robots</code>:</p> <div class="highlight highlight-source-js"><pre><span class="pl-en">addEventListener</span><span class="pl-kos">(</span><span class="pl-s">"fetch"</span><span class="pl-kos">,</span> <span class="pl-kos">(</span><span class="pl-s1">event</span><span class="pl-kos">)</span> <span class="pl-c1">=></span> <span class="pl-kos">{</span> <span class="pl-s1">event</span><span class="pl-kos">.</span><span class="pl-en">respondWith</span><span class="pl-kos">(</span> <span class="pl-en">handleRequest</span><span class="pl-kos">(</span><span class="pl-s1">event</span><span class="pl-kos">.</span><span class="pl-c1">request</span><span class="pl-kos">)</span><span class="pl-kos">.</span><span class="pl-en">catch</span><span class="pl-kos">(</span> <span class="pl-kos">(</span><sp… | <Binary: 87,420 bytes> | 2021-12-21T15:07:51-08:00 | 2021-12-21T23:07:51+00:00 | 2021-12-21T15:07:51-08:00 | 2021-12-21T23:07:51+00:00 | 36dbb3210d6769fb6c768cd1b12f367f | robots-txt-cloudflare-workers |
| cloudrun_gcloud-run-services-list.md | cloudrun | Using the gcloud run services list command | https://github.com/simonw/til/blob/main/cloudrun/gcloud-run-services-list.md | The `gcloud run services list` command lists your services running on Google Cloud Run: ``` ~ % gcloud run services list --platform=managed SERVICE REGION URL LAST DEPLOYED BY LAST DEPLOYED AT ✔ calands us-central1 https://calands-j7hipcg4aq-uc.a.run.app ...@gmail.com 2020-09-02T00:15:29.563846Z ✔ cloud-run-hello us-central1 https://cloud-run-hello-j7hipcg4aq-uc.a.run.app ...@gmail.com 2020-09-02T00:16:07.835843Z ✔ covid-19 us-central1 https://covid-19-j7hipcg4aq-uc.a.run.app ...@gmail.com 2020-09-02T00:16:46.979188Z ... ``` It has two useful but under-documented options: `--filter` which filters based on a special filter language, and `--format` which customizes the output format. ## --filter I found the `--filter` option really hard to figure out. It has [documentation here](https://cloud.google.com/sdk/gcloud/reference/topic/filters) describing the predicate language it uses, but I had to apply trial and error to find options that worked for `gcloud run services`. Here are a few I found. To see data for just one specific service by name, use `--filter=SERVICE:covid-19`. Lowercase `service` doesn't work for some reason. ``` ~ % gcloud run services list --platform=managed --filter=SERVICE:covid-19 SERVICE REGION URL LAST DEPLOYED BY LAST DEPLOYED AT ✔ covid-19 us-central1 https://covid-19-j7hipcg4aq-uc.a.run.app ...@gmail.com 2020-09-02T00:16:46.979188Z ``` To filter by labels that you have set on your services, use `--filter="metadata.labels.name=value"`. It took me a while to figure out I needed the `metadata.` prefix here. Here's a filter for every service that do… | <p>The <code>gcloud run services list</code> command lists your services running on Google Cloud Run:</p> <pre><code>~ % gcloud run services list --platform=managed SERVICE REGION URL LAST DEPLOYED BY LAST DEPLOYED AT ✔ calands us-central1 https://calands-j7hipcg4aq-uc.a.run.app ...@gmail.com 2020-09-02T00:15:29.563846Z ✔ cloud-run-hello us-central1 https://cloud-run-hello-j7hipcg4aq-uc.a.run.app ...@gmail.com 2020-09-02T00:16:07.835843Z ✔ covid-19 us-central1 https://covid-19-j7hipcg4aq-uc.a.run.app ...@gmail.com 2020-09-02T00:16:46.979188Z ... </code></pre> <p>It has two useful but under-documented options: <code>--filter</code> which filters based on a special filter language, and <code>--format</code> which customizes the output format.</p> <h2> <a id="user-content---filter" class="anchor" href="#--filter" aria-hidden="true"><span aria-hidden="true" class="octicon octicon-link"></span></a>--filter</h2> <p>I found the <code>--filter</code> option really hard to figure out. It has <a href="https://cloud.google.com/sdk/gcloud/reference/topic/filters" rel="nofollow">documentation here</a> describing the predicate language it uses, but I had to apply trial and error to find options that worked for <code>gcloud run services</code>. Here are a few I found.</p> <p>To see data for just one specific service by name, use <code>--filter=SERVICE:covid-19</code>. Lowercase <code>service</code> doesn't work for some reason.</p> <pre><code>~ % gcloud run services list --platform=managed --filter=SERVICE:covid-19 SERVICE REGION URL LAST DEPLOYED BY LAST DEPLOYED AT ✔ covid-19 us-central1 ht… | <Binary: 73,290 bytes> | 2020-09-01T21:40:04-07:00 | 2020-09-02T04:40:04+00:00 | 2020-09-01T21:40:25-07:00 | 2020-09-02T04:40:25+00:00 | 18f4f503f9530d61e27ad5f3c77d9bdd | gcloud-run-services-list |
| cloudrun_increase-cloud-scheduler-time-limit.md | cloudrun | Increasing the time limit for a Google Cloud Scheduler task | https://github.com/simonw/til/blob/main/cloudrun/increase-cloud-scheduler-time-limit.md | In [VIAL issue 724](https://github.com/CAVaccineInventory/vial/issues/724) a Cloud Scheduler job which triggered a Cloud Run hosted export script - by sending an HTTP POST to an endpoint - was returning an error. The logs showed the error happened exactly three minutes after the task started executing. Turns out the HTTP endpoint (which does a lot of work) was taking longer than three minutes, which is the undocumented default time limit for Cloud Scheduler jobs. Unfortunately it's not possible to increase this time limit using the Cloud Scheduler web console, but it IS possible to increase the limit using the CLI `gcloud` tool. To list the scheduler jobs: ``` ~ % gcloud beta scheduler jobs list --project django-vaccinateca ID LOCATION SCHEDULE (TZ) TARGET_TYPE STATE api-export-production us-west2 every 1 minutes (America/Los_Angeles) HTTP ENABLED api-export-staging us-west2 every 1 minutes (America/Los_Angeles) HTTP ENABLED mapbox-export us-west2 0 2,9,10,11,12,13,14,15,16,17,18,21 * * * (America/Los_Angeles) HTTP ENABLED resolve-missing-counties-production us-west2 */10 * * * * (America/Los_Angeles) HTTP ENABLED resolve-missing-counties-staging us-west2 */10 * * * * (America/Los_Angeles) HTTP ENABLED vaccinatethestates-api-export-production us-west2 */10 * * * * (America/Los_Angeles) HTTP ENABLED vaccinatethestates-api-export-staging us-west2 */10 * * * * (America/Los_Angeles) HTTP ENABLED ``` To increase the limit for one of them by name: ``` gcloud beta scheduler jobs update http \ vaccinatethestates-api-export-production \ --attempt-deadline=540s \ --project django-vaccinateca ``` You c… | <p>In <a href="https://github.com/CAVaccineInventory/vial/issues/724">VIAL issue 724</a> a Cloud Scheduler job which triggered a Cloud Run hosted export script - by sending an HTTP POST to an endpoint - was returning an error. The logs showed the error happened exactly three minutes after the task started executing.</p> <p>Turns out the HTTP endpoint (which does a lot of work) was taking longer than three minutes, which is the undocumented default time limit for Cloud Scheduler jobs.</p> <p>Unfortunately it's not possible to increase this time limit using the Cloud Scheduler web console, but it IS possible to increase the limit using the CLI <code>gcloud</code> tool.</p> <p>To list the scheduler jobs:</p> <pre><code>~ % gcloud beta scheduler jobs list --project django-vaccinateca ID LOCATION SCHEDULE (TZ) TARGET_TYPE STATE api-export-production us-west2 every 1 minutes (America/Los_Angeles) HTTP ENABLED api-export-staging us-west2 every 1 minutes (America/Los_Angeles) HTTP ENABLED mapbox-export us-west2 0 2,9,10,11,12,13,14,15,16,17,18,21 * * * (America/Los_Angeles) HTTP ENABLED resolve-missing-counties-production us-west2 */10 * * * * (America/Los_Angeles) HTTP ENABLED resolve-missing-counties-staging us-west2 */10 * * * * (America/Los_Angeles) HTTP ENABLED vaccinatethestates-api-export-production us-west2 */10 * * * * (America/Los_Angeles) HTTP ENABLED vaccinatethestates-api-export-staging us-west2 */10 * * * * (America/Los_Angeles) HTTP ENABLED </code></pre> <p>To increase the limit for one of them by name:</p> <pre><code>gcloud beta scheduler jobs update http \ vaccinatethestates-api-export-pro… | <Binary: 76,799 bytes> | 2021-07-08T17:38:15-07:00 | 2021-07-09T00:38:15+00:00 | 2021-07-08T17:40:18-07:00 | 2021-07-09T00:40:18+00:00 | d4b13be5a8c25bc542739471b7b680e0 | increase-cloud-scheduler-time-limit |
| cloudrun_listing-cloudbuild-files.md | cloudrun | Listing files uploaded to Cloud Build | https://github.com/simonw/til/blob/main/cloudrun/listing-cloudbuild-files.md | Today while running `datasette publish cloudrun ...` I noticed the following: ``` Uploading tarball of [.] to [gs://datasette-222320_cloudbuild/source/1618465936.523167-939ed21aedff4cb8a2c914c099fb48cd.tgz] ``` `gs://` indicates a Google Cloud Storage bucket. Can I see what's in that `datasette-222320_cloudbuild` bucket? Turns out I can: ``` ~ % gsutil ls -l gs://datasette-222320_cloudbuild/source/ | head -n 10 36929 2019-05-03T13:18:35Z gs://datasette-222320_cloudbuild/source/1556889512.4-7ffeb30ed7bc4173a8101cc3e7d6e12e.tgz 36929 2019-05-03T13:20:06Z gs://datasette-222320_cloudbuild/source/1556889605.56-5a5251a73b9646cca36b9afef8e578fd.tgz 36928 2019-05-03T13:20:23Z gs://datasette-222320_cloudbuild/source/1556889623.22-5ccfa45f935e4810ac322c15593233dc.tgz 36927 2019-05-03T13:21:33Z gs://datasette-222320_cloudbuild/source/1556889692.37-44759f37332047d9849cfb3773ef5b28.tgz 36962 2019-05-03T14:01:14Z gs://datasette-222320_cloudbuild/source/1556892073.6-d99f13f412054e13b4fb36670f454e50.tgz ``` The `-l` option adds the size information. Mine has 7438 objects in it! I panicked a bit when I saw this at the end: ``` ~ % gsutil ls -l gs://datasette-222320_cloudbuild/source/ | tail -n 10 152553673 2021-04-15T01:41:32Z gs://datasette-222320_cloudbuild/source/1618450815.99-26109d7f15bc478d999423e993091fd0.tgz 1283564 2021-04-15T02:23:47Z gs://datasette-222320_cloudbuild/source/1618453427.2-0e6193003ae14bff8be813f734b038b2.tgz 1284121 2021-04-15T03:11:09Z gs://datasette-222320_cloudbuild/source/1618456268.44-11595af453a74c9fb122b818e56d152e.tgz 18660297 2021-04-15T03:37:24Z gs://datasette-222320_cloudbuild/source/1618457837.52-71dfc8e6527042c6ba7b25afe91d006c.tgz 1283482 2021-04-15T04:10:28Z gs://datasette-222320_cloudbuild/source/1618459828.02-db9803983d024e7da2593a8db4c87b65.tgz 3654810 2021-04-15T04:39:26Z gs://datasette-222320_cloudbuild/source/1618461564.31-a9cff151b6bd4baba4ce68972bef4549.tgz 1283746 2021-04-15T05:11:01Z gs://datasette-222320_clou… | <p>Today while running <code>datasette publish cloudrun ...</code> I noticed the following:</p> <pre><code>Uploading tarball of [.] to [gs://datasette-222320_cloudbuild/source/1618465936.523167-939ed21aedff4cb8a2c914c099fb48cd.tgz] </code></pre> <p><code>gs://</code> indicates a Google Cloud Storage bucket. Can I see what's in that <code>datasette-222320_cloudbuild</code> bucket?</p> <p>Turns out I can:</p> <pre><code>~ % gsutil ls -l gs://datasette-222320_cloudbuild/source/ | head -n 10 36929 2019-05-03T13:18:35Z gs://datasette-222320_cloudbuild/source/1556889512.4-7ffeb30ed7bc4173a8101cc3e7d6e12e.tgz 36929 2019-05-03T13:20:06Z gs://datasette-222320_cloudbuild/source/1556889605.56-5a5251a73b9646cca36b9afef8e578fd.tgz 36928 2019-05-03T13:20:23Z gs://datasette-222320_cloudbuild/source/1556889623.22-5ccfa45f935e4810ac322c15593233dc.tgz 36927 2019-05-03T13:21:33Z gs://datasette-222320_cloudbuild/source/1556889692.37-44759f37332047d9849cfb3773ef5b28.tgz 36962 2019-05-03T14:01:14Z gs://datasette-222320_cloudbuild/source/1556892073.6-d99f13f412054e13b4fb36670f454e50.tgz </code></pre> <p>The <code>-l</code> option adds the size information.</p> <p>Mine has 7438 objects in it! I panicked a bit when I saw this at the end:</p> <pre><code>~ % gsutil ls -l gs://datasette-222320_cloudbuild/source/ | tail -n 10 152553673 2021-04-15T01:41:32Z gs://datasette-222320_cloudbuild/source/1618450815.99-26109d7f15bc478d999423e993091fd0.tgz 1283564 2021-04-15T02:23:47Z gs://datasette-222320_cloudbuild/source/1618453427.2-0e6193003ae14bff8be813f734b038b2.tgz 1284121 2021-04-15T03:11:09Z gs://datasette-222320_cloudbuild/source/1618456268.44-11595af453a74c9fb122b818e56d152e.tgz 18660297 2021-04-15T03:37:24Z gs://datasette-222320_cloudbuild/source/1618457837.52-71dfc8e6527042c6ba7b25afe91d006c.tgz 1283482 2021-04-15T04:10:28Z gs://datasette-222320_cloudbuild/source/1618459828.02-db9803983d024e7da2593a8db4c87b65.tgz 3654810 2021-04-15T04:39:26Z gs://datasette-222320_cloudbuild/sou… | <Binary: 77,312 bytes> | 2021-04-14T23:09:37-07:00 | 2021-04-15T06:09:37+00:00 | 2021-04-14T23:09:37-07:00 | 2021-04-15T06:09:37+00:00 | cbff23daed53586724ec425fc09017bd | listing-cloudbuild-files |
| cloudrun_multiple-gcloud-accounts.md | cloudrun | Switching between gcloud accounts | https://github.com/simonw/til/blob/main/cloudrun/multiple-gcloud-accounts.md | I have two different Google Cloud accounts active at the moment. Here's how to list them with `gcloud auth list`: ``` % gcloud auth list Credentialed Accounts ACTIVE ACCOUNT simon@example.com * me@gmail.com To set the active account, run: $ gcloud config set account `ACCOUNT` ``` And to switch between them with `gcloud config set account`: ``` % gcloud config set account me@gmail.com Updated property [core/account]. ``` | <p>I have two different Google Cloud accounts active at the moment. Here's how to list them with <code>gcloud auth list</code>:</p> <pre><code>% gcloud auth list Credentialed Accounts ACTIVE ACCOUNT simon@example.com * me@gmail.com To set the active account, run: $ gcloud config set account `ACCOUNT` </code></pre> <p>And to switch between them with <code>gcloud config set account</code>:</p> <pre><code>% gcloud config set account me@gmail.com Updated property [core/account]. </code></pre> | <Binary: 50,173 bytes> | 2021-05-18T14:35:37-07:00 | 2021-05-18T21:35:37+00:00 | 2021-09-23T11:42:26-07:00 | 2021-09-23T18:42:26+00:00 | be7b6208a2e3f8d86967eb00019c5db0 | multiple-gcloud-accounts |
| cloudrun_ship-dockerfile-to-cloud-run.md | cloudrun | How to deploy a folder with a Dockerfile to Cloud Run | https://github.com/simonw/til/blob/main/cloudrun/ship-dockerfile-to-cloud-run.md | I deployed https://metmusem.datasettes.com/ by creating a folder on my computer containing a Dockerfile and then shipping that folder up to Google Cloud Run. Normally I use [datasette publish cloudrun](https://docs.datasette.io/en/stable/publish.html#publishing-to-google-cloud-run) to deploy to Cloud Run, but in this case I decided to do it by hand. I created a folder and dropped two files into it: a `Dockerfile` and a `metadata.json`. BUT... this trick would work with more files in the same directory - it uploads the entire directory contents to be built by Google's cloud builder. `Dockerfile` ```dockerfile FROM python:3.6-slim-stretch RUN apt update RUN apt install -y python3-dev gcc wget ADD metadata.json metadata.json RUN wget -q "https://static.simonwillison.net/static/2018/MetObjects.db" RUN pip install datasette RUN datasette inspect MetObjects.db --inspect-file inspect-data.json EXPOSE $PORT CMD datasette serve MetObjects.db --host 0.0.0.0 --cors --port $PORT --inspect-file inspect-data.json -m metadata.json ``` The `PORT` is provided by Cloud Run. It's 8080 but they may change that in the future, so it's best to use an environment variable. Here's the `metadata.json`: ```json { "title": "The Metropolitan Museum of Art Open Access", "source": "metmuseum/openaccess", "source_url": "https://github.com/metmuseum/openaccess", "license": "CC0", "license_url": "https://creativecommons.org/publicdomain/zero/1.0/" } ``` Finally here's my `deploy.sh` script which I used to run the deploy. This needs to be run from within that directory: ```bash #!/bin/bash NAME="metmuseum" PROJECT=$(gcloud config get-value project) IMAGE="gcr.io/$PROJECT/$NAME" gcloud builds submit --tag $IMAGE gcloud run deploy --allow-unauthenticated --platform=managed --image $IMAGE $NAME --memory 2Gi ``` Before running the script I had installed the Cloud Run SDK and run `gcloud init` to login. The `NAME` variable ends up being used as the name of both my built image and my service. This needs to be unique in your C… | <p>I deployed <a href="https://metmusem.datasettes.com/" rel="nofollow">https://metmusem.datasettes.com/</a> by creating a folder on my computer containing a Dockerfile and then shipping that folder up to Google Cloud Run.</p> <p>Normally I use <a href="https://docs.datasette.io/en/stable/publish.html#publishing-to-google-cloud-run" rel="nofollow">datasette publish cloudrun</a> to deploy to Cloud Run, but in this case I decided to do it by hand.</p> <p>I created a folder and dropped two files into it: a <code>Dockerfile</code> and a <code>metadata.json</code>. BUT... this trick would work with more files in the same directory - it uploads the entire directory contents to be built by Google's cloud builder.</p> <p><code>Dockerfile</code></p> <div class="highlight highlight-source-dockerfile"><pre><span class="pl-k">FROM</span> python:3.6-slim-stretch <span class="pl-k">RUN</span> apt update <span class="pl-k">RUN</span> apt install -y python3-dev gcc wget <span class="pl-k">ADD</span> metadata.json metadata.json <span class="pl-k">RUN</span> wget -q <span class="pl-s">"https://static.simonwillison.net/static/2018/MetObjects.db"</span> <span class="pl-k">RUN</span> pip install datasette <span class="pl-k">RUN</span> datasette inspect MetObjects.db --inspect-file inspect-data.json <span class="pl-k">EXPOSE</span> $PORT <span class="pl-k">CMD</span> datasette serve MetObjects.db --host 0.0.0.0 --cors --port $PORT --inspect-file inspect-data.json -m metadata.json</pre></div> <p>The <code>PORT</code> is provided by Cloud Run. It's 8080 but they may change that in the future, so it's best to use an environment variable.</p> <p>Here's the <code>metadata.json</code>:</p> <div class="highlight highlight-source-json"><pre>{ <span class="pl-s"><span class="pl-pds">"</span>title<span class="pl-pds">"</span></span>: <span class="pl-s"><span class="pl-pds">"</span>The Metropolitan Museum of Art Open Access<span class="pl-pds">"</span></span>, <span class="pl-s"><span class="pl-pds">"</span>source<span class="pl-pds">"… | <Binary: 70,193 bytes> | 2020-08-04T20:36:31-07:00 | 2020-08-05T03:36:31+00:00 | 2020-12-29T13:55:23-08:00 | 2020-12-29T21:55:23+00:00 | b086f0e3bf24398095e41516db57e0cc | ship-dockerfile-to-cloud-run |
| cloudrun_tailing-cloud-run-request-logs.md | cloudrun | Tailing Google Cloud Run request logs and importing them into SQLite | https://github.com/simonw/til/blob/main/cloudrun/tailing-cloud-run-request-logs.md | The `gcloud` CLI tool has [the alpha ability to tail log files](https://cloud.google.com/logging/docs/reference/tools/gcloud-logging#live-tailing) - but it's a bit of a pain to setup. You have to install two extras for it. First, this: gcloud alpha logging tail That installs the functionality, but as the documentation will tell you: > To use `gcloud alpha logging tail`, you need to have Python 3 and the `grpcio` Python package installed. Assuming you have Python 3, the problem you have to solve is *which Python* is the `gcloud` tool using to run. After digging around in the source code using `cat $(which gcloud)` I spotted the following: CLOUDSDK_PYTHON=$(order_python python3 python2 python2.7 python) So it looks like (on macOS at least) it prefers to use the `python3` binary if it can find it. So this works to install `grpcio` somewhere it can see it: python3 -m pip install grpcio Having done that, you can start running commands. `gcloud logging logs list` shows a list of logs: ``` ~ % gcloud logging logs list NAME projects/datasette-222320/logs/cloudaudit.googleapis.com%2Factivity projects/datasette-222320/logs/cloudaudit.googleapis.com%2Fdata_access projects/datasette-222320/logs/cloudaudit.googleapis.com%2Fsystem_event projects/datasette-222320/logs/cloudbuild projects/datasette-222320/logs/clouderrorreporting.googleapis.com%2Finsights projects/datasette-222320/logs/cloudtrace.googleapis.com%2FTraceLatencyShiftDetected projects/datasette-222320/logs/run.googleapis.com%2Frequests projects/datasette-222320/logs/run.googleapis.com%2Fstderr projects/datasette-222320/logs/run.googleapis.com%2Fstdout projects/datasette-222320/logs/run.googleapis.com%2Fvarlog%2Fsystem ``` Then you can use `gcloud alpha logging tail projects/datasette-222320/logs/run.googleapis.com%2Frequests` to start logging. Only you also need a `CLOUDSDK_PYTHON_SITEPACKAGES=1` environment variable so that `gcloud` knows to look for the `grpcio` dependency. CLOUDSDK_PYTHON_SITEPACKAGES=1 \ gcloud alpha logging tai… | <p>The <code>gcloud</code> CLI tool has <a href="https://cloud.google.com/logging/docs/reference/tools/gcloud-logging#live-tailing" rel="nofollow">the alpha ability to tail log files</a> - but it's a bit of a pain to setup.</p> <p>You have to install two extras for it. First, this:</p> <pre><code>gcloud alpha logging tail </code></pre> <p>That installs the functionality, but as the documentation will tell you:</p> <blockquote> <p>To use <code>gcloud alpha logging tail</code>, you need to have Python 3 and the <code>grpcio</code> Python package installed.</p> </blockquote> <p>Assuming you have Python 3, the problem you have to solve is <em>which Python</em> is the <code>gcloud</code> tool using to run. After digging around in the source code using <code>cat $(which gcloud)</code> I spotted the following:</p> <pre><code>CLOUDSDK_PYTHON=$(order_python python3 python2 python2.7 python) </code></pre> <p>So it looks like (on macOS at least) it prefers to use the <code>python3</code> binary if it can find it.</p> <p>So this works to install <code>grpcio</code> somewhere it can see it:</p> <pre><code>python3 -m pip install grpcio </code></pre> <p>Having done that, you can start running commands. <code>gcloud logging logs list</code> shows a list of logs:</p> <pre><code>~ % gcloud logging logs list NAME projects/datasette-222320/logs/cloudaudit.googleapis.com%2Factivity projects/datasette-222320/logs/cloudaudit.googleapis.com%2Fdata_access projects/datasette-222320/logs/cloudaudit.googleapis.com%2Fsystem_event projects/datasette-222320/logs/cloudbuild projects/datasette-222320/logs/clouderrorreporting.googleapis.com%2Finsights projects/datasette-222320/logs/cloudtrace.googleapis.com%2FTraceLatencyShiftDetected projects/datasette-222320/logs/run.googleapis.com%2Frequests projects/datasette-222320/logs/run.googleapis.com%2Fstderr projects/datasette-222320/logs/run.googleapis.com%2Fstdout projects/datasette-222320/logs/run.googleapis.com%2Fvarlog%2Fsystem </code></pre> <p>Then you can use <code>gcloud alpha logging tail proj… | <Binary: 70,287 bytes> | 2021-08-09T11:32:01-07:00 | 2021-08-09T18:32:01+00:00 | 2021-08-13T22:07:23-07:00 | 2021-08-14T05:07:23+00:00 | eba49d224d98a67308c137bcc3f0e777 | tailing-cloud-run-request-logs |
| cloudrun_use-labels-for-billing-breakdown.md | cloudrun | Use labels on Cloud Run services for a billing breakdown | https://github.com/simonw/til/blob/main/cloudrun/use-labels-for-billing-breakdown.md | Thanks to [@glasnt](https://github.com/glasnt) for the tip on this one. If you want a per-service breakdown of pricing on your Google Cloud Run services within a project (each service is a different deployed application) the easiest way to do it is to apply labels to those services, then request a by-label pricing breakdown. This command will update a service (restarting it) with a new label: ```bash gcloud run services update csvconf --region=us-central1 --platform=managed --update-labels service=csvconf ``` I found it needed the `--platform=managed` and `--region=X` options to avoid it asking interactive questions. Here's a bash script which loops through all of the services that do NOT have a `service` label and applies one: ```bash #!/bin/bash for line in $( gcloud run services list --platform=managed \ --format="csv(SERVICE,REGION)" \ --filter "NOT metadata.labels.service:*" \ | tail -n +2) do IFS=$','; service_and_region=($line); unset IFS; service=${service_and_region[0]} region=${service_and_region[1]} echo "service: $service region: $region" gcloud run services update $service \ --region=$region --platform=managed \ --update-labels service=$service echo done ``` It runs the equivalent of this for each service: ``` gcloud run services update asgi-log-demo --region=us-central1 --platform=managed --update-labels service=asgi-log-demo ``` I saved that as a `runme.sh` script, run `chmod 755 runme.sh` and then `./runme.sh` to run it. The output of the script looked like this (one entry for each service) - each one took ~30s to run. ``` Service [covid-19] revision [covid-19-00122-zod] has been deployed and is serving 100 percent of traffic at https://covid-19-j7hipcg4aq-uc.a.run.app ✓ Deploying... Done. ✓ Creating Revision... … | <p>Thanks to <a href="https://github.com/glasnt">@glasnt</a> for the tip on this one. If you want a per-service breakdown of pricing on your Google Cloud Run services within a project (each service is a different deployed application) the easiest way to do it is to apply labels to those services, then request a by-label pricing breakdown.</p> <p>This command will update a service (restarting it) with a new label:</p> <div class="highlight highlight-source-shell"><pre>gcloud run services update csvconf --region=us-central1 --platform=managed --update-labels service=csvconf</pre></div> <p>I found it needed the <code>--platform=managed</code> and <code>--region=X</code> options to avoid it asking interactive questions.</p> <p>Here's a bash script which loops through all of the services that do NOT have a <code>service</code> label and applies one:</p> <div class="highlight highlight-source-shell"><pre><span class="pl-c"><span class="pl-c">#!</span>/bin/bash</span> <span class="pl-k">for</span> <span class="pl-smi">line</span> <span class="pl-k">in</span> <span class="pl-s"><span class="pl-pds">$(</span></span> <span class="pl-s"> gcloud run services list --platform=managed \</span> <span class="pl-s"> --format=<span class="pl-s"><span class="pl-pds">"</span>csv(SERVICE,REGION)<span class="pl-pds">"</span></span> \</span> <span class="pl-s"> --filter <span class="pl-s"><span class="pl-pds">"</span>NOT metadata.labels.service:*<span class="pl-pds">"</span></span> \</span> <span class="pl-s"> <span class="pl-k">|</span> tail -n +2<span class="pl-pds">)</span></span> <span class="pl-k">do</span> IFS=<span class="pl-s"><span class="pl-pds">$'</span>,<span class="pl-pds">'</span></span><span class="pl-k">;</span> service_and_region=(<span class="pl-smi">$line</span>)<span class="pl-k">;</span> <span class="pl-c1">unset</span> IFS<span class="pl-k">;</span> service=<span class="pl-smi">${service_and_region[0]}</span> region=<span class="pl-smi">${service_and_region[1]}</span> <span class="pl-c1">echo</span>… | <Binary: 74,162 bytes> | 2020-04-21T17:52:57-07:00 | 2020-04-22T00:52:57+00:00 | 2021-12-21T13:02:50-08:00 | 2021-12-21T21:02:50+00:00 | 9157d6cd2112e335ce93afbece19a833 | use-labels-for-billing-breakdown |
| cloudrun_using-build-args-with-cloud-run.md | cloudrun | Using build-arg variables with Cloud Run deployments | https://github.com/simonw/til/blob/main/cloudrun/using-build-args-with-cloud-run.md | For [datasette/issues/1522](https://github.com/simonw/datasette/issues/1522) I wanted to use a Docker build argument in a `Dockerfile` that would then be deployed to Cloud Run. I needed this to be able to control the version of Datasette that was deployed. Here's my simplified `Dockerfile`: ```dockerfile FROM python:3-alpine ARG DATASETTE_REF # Copy to environment variable for use in CMD later ENV VERSION_NOTE=$DATASETTE_REF RUN pip install https://github.com/simonw/datasette/archive/${DATASETTE_REF}.zip # Need to use "shell form" here to get variable substition: CMD datasette -h 0.0.0.0 -p 8080 --version-note $VERSION_NOTE ``` I can build this on my laptop like so: docker build -t datasette-build-arg-demo . \ --build-arg DATASETTE_REF=c617e1769ea27e045b0f2907ef49a9a1244e577d Then run it like this: docker run -p 5000:8080 --rm datasette-build-arg-demo And visit `http://localhost:5000/-/versions` to see the version number to confirm it worked. I wanted to deploy this to Cloud Run, using [this recipe](https://til.simonwillison.net/cloudrun/ship-dockerfile-to-cloud-run). Unfortunately, the `gcloud builds submit` command doesn't have a mechanism for specifying `--build-arg`. Instead, you need to use a YAML file and pass it with the `gcloud builds submit --config cloudbuild.yml` option. The YAML should look like this: ```yaml steps: - name: 'gcr.io/cloud-builders/docker' args: ['build', '-t', 'gc.io/MY-PROJECT/MY-NAME', '.', '--build-arg', 'DATASETTE_REF=c617e1769ea27e045b0f2907ef49a9a1244e577d'] - name: 'gcr.io/cloud-builders/docker' args: ['push', $IMAGE] ``` Since I want to dynamically populate my YAML file, I ended up using the following pattern in a `./deploy.sh` script: ```bash #!/bin/bash # https://til.simonwillison.net/cloudrun/using-build-args-with-cloud-run if [[ -z "$DATASETTE_REF" ]]; then echo "Must provide DATASETTE_REF environment variable" 1>&2 exit 1 fi NAME="datasette-apache-proxy-demo" PROJECT=$(gcloud config get-value project) IMAGE="gcr.io/$PROJECT/$NAME"… | <p>For <a href="https://github.com/simonw/datasette/issues/1522">datasette/issues/1522</a> I wanted to use a Docker build argument in a <code>Dockerfile</code> that would then be deployed to Cloud Run.</p> <p>I needed this to be able to control the version of Datasette that was deployed. Here's my simplified <code>Dockerfile</code>:</p> <div class="highlight highlight-source-dockerfile"><pre><span class="pl-k">FROM</span> python:3-alpine <span class="pl-k">ARG</span> DATASETTE_REF <span class="pl-c"><span class="pl-c">#</span> Copy to environment variable for use in CMD later</span> <span class="pl-k">ENV</span> VERSION_NOTE=$DATASETTE_REF <span class="pl-k">RUN</span> pip install https://github.com/simonw/datasette/archive/${DATASETTE_REF}.zip <span class="pl-c"><span class="pl-c">#</span> Need to use "shell form" here to get variable substition:</span> <span class="pl-k">CMD</span> datasette -h 0.0.0.0 -p 8080 --version-note $VERSION_NOTE</pre></div> <p>I can build this on my laptop like so:</p> <pre><code>docker build -t datasette-build-arg-demo . \ --build-arg DATASETTE_REF=c617e1769ea27e045b0f2907ef49a9a1244e577d </code></pre> <p>Then run it like this:</p> <pre><code>docker run -p 5000:8080 --rm datasette-build-arg-demo </code></pre> <p>And visit <code>http://localhost:5000/-/versions</code> to see the version number to confirm it worked.</p> <p>I wanted to deploy this to Cloud Run, using <a href="https://til.simonwillison.net/cloudrun/ship-dockerfile-to-cloud-run" rel="nofollow">this recipe</a>.</p> <p>Unfortunately, the <code>gcloud builds submit</code> command doesn't have a mechanism for specifying <code>--build-arg</code>.</p> <p>Instead, you need to use a YAML file and pass it with the <code>gcloud builds submit --config cloudbuild.yml</code> option. The YAML should look like this:</p> <div class="highlight highlight-source-yaml"><pre><span class="pl-ent">steps</span>: - <span class="pl-ent">name</span>: <span class="pl-s"><span class="pl-pds">'</span>gcr.io/cloud-builders/docker<span class="pl-pd… | <Binary: 61,078 bytes> | 2021-11-19T16:24:56-08:00 | 2021-11-20T00:24:56+00:00 | 2021-11-19T16:32:57-08:00 | 2021-11-20T00:32:57+00:00 | 328fd8809d3af0f5cdde5c937c7085bd | using-build-args-with-cloud-run |
| cocktails_tommys-margarita.md | cocktails | Tommy's Margarita | https://github.com/simonw/til/blob/main/cocktails/tommys-margarita.md | A few years ago I decided to learn how to make some classic cocktails. It is a very rewarding hobby. Of all of the drinks that I have learned to make, by far the biggest crowd pleaser is the Tommy's margarita. It is surprisingly easy, and is guaranteed to delight guests. It's also a great introduction to cocktail making in general.  The Tommy's margarita is a San Francisco drink. It was created by [Tommy's Mexican Restaurant](https://www.tommystequila.com/), a charming family Mexican restaurant over in the Richmond district which opened in 1965. They have one of the largest tequila collections in the USA, and they will make you a margarita from any of them. That's the first lesson of the Tommy's margarita: no tequila is too good for it, and the better the tequila the better the drink. Ingredients: - Fresh limes to squeeze (about one per drink) - A good reposado or añejo tequila - Agave syrup The ingredients are simple: freshly squeezed lime juice, agave syrup and a good reposado (rested) or añejo (aged) tequila. I've been using Partida Añejo and it's fantastic. I've also had great results from Patron Añejo (which is more widely available) and 1800 Reposado. For equipment: a cocktail shaker (I like two tins, not a tin-and-a-glass), a lime squeezer, a strainer and a glass. And plenty of ice. Also required: jiggers for measuring. Good craft cocktails require accurate measurement. Don't be tempted to eyeball. The drink is constructed in the shaker. Always start with the cheapest ingredients - that way mistakes are less expensive. Fill a shaker tin about a third of the way with ice. Any ice will do - save the fancy stuff for drinks that are presented with it (I serve my margaritas without ice). I use about five ice cubes per drink. Or for a more detailed, expert guide to shaking, consult [this guide on Serious Eats](https://www.seriouseats.com/how-to-shake-a-cocktail-like-a-pr… | <p>A few years ago I decided to learn how to make some classic cocktails. It is a very rewarding hobby.</p> <p>Of all of the drinks that I have learned to make, by far the biggest crowd pleaser is the Tommy's margarita. It is surprisingly easy, and is guaranteed to delight guests. It's also a great introduction to cocktail making in general.</p> <p><a target="_blank" rel="noopener noreferrer nofollow" href="https://camo.githubusercontent.com/4aa3d453749823f951a829c5d0404a6333abd32cd55b877f905c2e846f2de9eb/68747470733a2f2f7374617469632e73696d6f6e77696c6c69736f6e2e6e65742f7374617469632f323032322f746f6d6d79732d6d61726761726974612e6a7067"><img src="https://camo.githubusercontent.com/4aa3d453749823f951a829c5d0404a6333abd32cd55b877f905c2e846f2de9eb/68747470733a2f2f7374617469632e73696d6f6e77696c6c69736f6e2e6e65742f7374617469632f323032322f746f6d6d79732d6d61726761726974612e6a7067" alt="A tasty looking margarita in a moderately fancy cocktail glass" data-canonical-src="https://static.simonwillison.net/static/2022/tommys-margarita.jpg" style="max-width: 100%;"></a></p> <p>The Tommy's margarita is a San Francisco drink. It was created by <a href="https://www.tommystequila.com/" rel="nofollow">Tommy's Mexican Restaurant</a>, a charming family Mexican restaurant over in the Richmond district which opened in 1965. They have one of the largest tequila collections in the USA, and they will make you a margarita from any of them.</p> <p>That's the first lesson of the Tommy's margarita: no tequila is too good for it, and the better the tequila the better the drink.</p> <p>Ingredients:</p> <ul> <li>Fresh limes to squeeze (about one per drink)</li> <li>A good reposado or añejo tequila</li> <li>Agave syrup</li> </ul> <p>The ingredients are simple: freshly squeezed lime juice, agave syrup and a good reposado (rested) or añejo (aged) tequila. I've been using Partida Añejo and it's fantastic. I've also had great results from Patron Añejo (which is more widely available) and 1800 Reposado.</p> <p>For equipment: a cocktail shaker (I like tw… | <Binary: 171,612 bytes> | 2022-10-02T12:03:37-07:00 | 2022-10-02T19:03:37+00:00 | 2022-10-02T13:29:00-07:00 | 2022-10-02T20:29:00+00:00 | 990ce33b65e40356be0035f185b3484c | tommys-margarita |
| cocktails_whisky-sour.md | cocktails | Whisky sour | https://github.com/simonw/til/blob/main/cocktails/whisky-sour.md | I picked up the recipe for this one from [this video](https://www.tiktok.com/t/ZTRaxyxQP/) by [@notjustabartender](https://www.tiktok.com/@notjustabartender) on TikTok.  ## Ingredients per drink - 1 egg white - 1/2 oz rich Demerara syrup (see below - needs Demerara sugar, water and a bit of vodka) - .75oz lemon juice - 1.5oz rye (I used Rittenhouse) - Angostura bitters I made two drinks in one go, so I doubled these. I tried this recipe once with a fancy scotch but it wasn't nearly as nice as the one made with rye. ## Equipment - Jiggers - Cocktail shaker (I use two metal shaker cups that fit together) - Hand juicer - Strainer - 2 double glasses - Small saucepan and scales bottle if making Demerara syrup ## Rich Demerara syrup The syrup is a 2/1 ratio of sugar to water - so start with the saucepan on the scales and measure in around 20 units of Demerara sugar, then add 10 units of water. Heat and stir to dissolve together, without boiling too much. Stir in a tiny splash of vodka. Empty into the glass bottle with the funnel and leave to cool. ## Making two whisky sours 1. Put the two glasses in the ice box in the freezer to chill 2. Separate two egg whites. Put the egg whites in the shaker 3. Add 1.5 floz freshly squeezed lemon juice 4. Add 1 floz rich Demerara syrup 5. Add 3 floz rye 6. Dry shake vigorously in the shaker. Dry shaking means shaking without ice. I went about 15 seconds. The result should be a foamy egg white mix. 7. Now add ice - I added 6 cubes. Shake vigorously again - I did another 15s. 8. Strain into the chilled glasses, each containing another four ice cubes (or a big square ice cube if you have them) 9. Add a couple of drops of angostura bitters on the top | <p>I picked up the recipe for this one from <a href="https://www.tiktok.com/t/ZTRaxyxQP/" rel="nofollow">this video</a> by <a href="https://www.tiktok.com/@notjustabartender" rel="nofollow">@notjustabartender</a> on TikTok.</p> <p><a target="_blank" rel="noopener noreferrer nofollow" href="https://camo.githubusercontent.com/23b3b498a074e949733cc11ff8d2a91ae8cd96ae60fa2aca603d02caf3ec77ed/68747470733a2f2f7374617469632e73696d6f6e77696c6c69736f6e2e6e65742f7374617469632f323032322f776869736b792d736f75722e6a7067"><img src="https://camo.githubusercontent.com/23b3b498a074e949733cc11ff8d2a91ae8cd96ae60fa2aca603d02caf3ec77ed/68747470733a2f2f7374617469632e73696d6f6e77696c6c69736f6e2e6e65742f7374617469632f323032322f776869736b792d736f75722e6a7067" alt="A tasty looking whisky sour" data-canonical-src="https://static.simonwillison.net/static/2022/whisky-sour.jpg" style="max-width: 100%;"></a></p> <h2><a id="user-content-ingredients-per-drink" class="anchor" aria-hidden="true" href="#ingredients-per-drink"><span aria-hidden="true" class="octicon octicon-link"></span></a>Ingredients per drink</h2> <ul> <li>1 egg white</li> <li>1/2 oz rich Demerara syrup (see below - needs Demerara sugar, water and a bit of vodka)</li> <li>.75oz lemon juice</li> <li>1.5oz rye (I used Rittenhouse)</li> <li>Angostura bitters</li> </ul> <p>I made two drinks in one go, so I doubled these.</p> <p>I tried this recipe once with a fancy scotch but it wasn't nearly as nice as the one made with rye.</p> <h2><a id="user-content-equipment" class="anchor" aria-hidden="true" href="#equipment"><span aria-hidden="true" class="octicon octicon-link"></span></a>Equipment</h2> <ul> <li>Jiggers</li> <li>Cocktail shaker (I use two metal shaker cups that fit together)</li> <li>Hand juicer</li> <li>Strainer</li> <li>2 double glasses</li> <li>Small saucepan and scales bottle if making Demerara syrup</li> </ul> <h2><a id="user-content-rich-demerara-syrup" class="anchor" aria-hidden="true" href="#rich-demerara-syrup"><span aria-hidden="true" class="octicon octicon-link"></s… | <Binary: 177,342 bytes> | 2022-09-25T09:24:00-07:00 | 2022-09-25T16:24:00+00:00 | 2022-09-26T20:08:28-07:00 | 2022-09-27T03:08:28+00:00 | 02cffdf51d48cd639d9f59c3241d45c8 | whisky-sour |
| cookiecutter_conditionally-creating-directories.md | cookiecutter | Conditionally creating directories in cookiecutter | https://github.com/simonw/til/blob/main/cookiecutter/conditionally-creating-directories.md | I wanted my [datasette-plugin](https://github.com/simonw/datasette-plugin) cookiecutter template to create empty `static` and `templates` directories if the user replied `y` to the `include_static_directory` and `include_templates_directory` prompts. The solution was to add a `hooks/post_gen_project.py` script containing the following: ```python import os import shutil include_static_directory = bool("{{ cookiecutter.include_static_directory }}") include_templates_directory = bool("{{ cookiecutter.include_templates_directory }}") if include_static_directory: os.makedirs( os.path.join( os.getcwd(), "datasette_{{ cookiecutter.underscored }}", "static", ) ) if include_templates_directory: os.makedirs( os.path.join( os.getcwd(), "datasette_{{ cookiecutter.underscored }}", "templates", ) ) ``` Note that these scripts are run through the cookiecutter Jinja template system, so they can use `{{ }}` Jinja syntax to read cookiecutter inputs. | <p>I wanted my <a href="https://github.com/simonw/datasette-plugin">datasette-plugin</a> cookiecutter template to create empty <code>static</code> and <code>templates</code> directories if the user replied <code>y</code> to the <code>include_static_directory</code> and <code>include_templates_directory</code> prompts.</p> <p>The solution was to add a <code>hooks/post_gen_project.py</code> script containing the following:</p> <div class="highlight highlight-source-python"><pre><span class="pl-k">import</span> <span class="pl-s1">os</span> <span class="pl-k">import</span> <span class="pl-s1">shutil</span> <span class="pl-s1">include_static_directory</span> <span class="pl-c1">=</span> <span class="pl-en">bool</span>(<span class="pl-s">"{{ cookiecutter.include_static_directory }}"</span>) <span class="pl-s1">include_templates_directory</span> <span class="pl-c1">=</span> <span class="pl-en">bool</span>(<span class="pl-s">"{{ cookiecutter.include_templates_directory }}"</span>) <span class="pl-k">if</span> <span class="pl-s1">include_static_directory</span>: <span class="pl-s1">os</span>.<span class="pl-en">makedirs</span>( <span class="pl-s1">os</span>.<span class="pl-s1">path</span>.<span class="pl-en">join</span>( <span class="pl-s1">os</span>.<span class="pl-en">getcwd</span>(), <span class="pl-s">"datasette_{{ cookiecutter.underscored }}"</span>, <span class="pl-s">"static"</span>, ) ) <span class="pl-k">if</span> <span class="pl-s1">include_templates_directory</span>: <span class="pl-s1">os</span>.<span class="pl-en">makedirs</span>( <span class="pl-s1">os</span>.<span class="pl-s1">path</span>.<span class="pl-en">join</span>( <span class="pl-s1">os</span>.<span class="pl-en">getcwd</span>(), <span class="pl-s">"datasette_{{ cookiecutter.underscored }}"</span>, <span class="pl-s">"templates"</span>, ) )</pre></div> <p>Note that these scripts are run through the cookiecutter Jinja templat… | <Binary: 57,163 bytes> | 2021-01-27T15:56:28-08:00 | 2021-01-27T23:56:28+00:00 | 2021-01-27T15:56:28-08:00 | 2021-01-27T23:56:28+00:00 | e0f45335a94143e5aac8b22e5820e564 | conditionally-creating-directories |
| cookiecutter_pytest-for-cookiecutter.md | cookiecutter | Testing cookiecutter templates with pytest | https://github.com/simonw/til/blob/main/cookiecutter/pytest-for-cookiecutter.md | I added some unit tests to my [datasette-plugin](https://github.com/simonw/datasette-plugin) cookiecutter template today, since the latest features involved adding a `hooks/post_gen_project.py` script. Here's [the full test script](https://github.com/simonw/datasette-plugin/blob/503e6fef8e1000ab70103a61571d47ce966064ba/tests/test_cookiecutter_template.py) I wrote. It lives in `tests/test_cookiecutter_template.py` in the root of the repository. To run the tests I have to use `pytest tests` because running just `pytest` gets confused when it tries to run the templated tests that form part of the cookiecutter template. The pattern I'm using looks like this: ```python from cookiecutter.main import cookiecutter import pathlib TEMPLATE_DIRECTORY = str(pathlib.Path(__file__).parent.parent) def test_static_and_templates(tmpdir): cookiecutter( template=TEMPLATE_DIRECTORY, output_dir=str(tmpdir), no_input=True, extra_context={ "plugin_name": "foo", "description": "blah", "include_templates_directory": "y", "include_static_directory": "y", }, ) assert paths(tmpdir) == { "datasette-foo", "datasette-foo/.github", "datasette-foo/.github/workflows", "datasette-foo/.github/workflows/publish.yml", "datasette-foo/.github/workflows/test.yml", "datasette-foo/.gitignore", "datasette-foo/datasette_foo", "datasette-foo/datasette_foo/__init__.py", "datasette-foo/datasette_foo/static", "datasette-foo/datasette_foo/templates", "datasette-foo/README.md", "datasette-foo/setup.py", "datasette-foo/tests", "datasette-foo/tests/test_foo.py", } setup_py = (tmpdir / "datasette-foo" / "setup.py").read_text("utf-8") assert ( 'package_data={\n "datasette_foo": ["static/*", "templates/*"]\n }' ) in setup_py def paths(directory): paths = list(pathlib.Path(directory).glob("**/*")) paths = [r.re… | <p>I added some unit tests to my <a href="https://github.com/simonw/datasette-plugin">datasette-plugin</a> cookiecutter template today, since the latest features involved adding a <code>hooks/post_gen_project.py</code> script.</p> <p>Here's <a href="https://github.com/simonw/datasette-plugin/blob/503e6fef8e1000ab70103a61571d47ce966064ba/tests/test_cookiecutter_template.py">the full test script</a> I wrote. It lives in <code>tests/test_cookiecutter_template.py</code> in the root of the repository.</p> <p>To run the tests I have to use <code>pytest tests</code> because running just <code>pytest</code> gets confused when it tries to run the templated tests that form part of the cookiecutter template.</p> <p>The pattern I'm using looks like this:</p> <div class="highlight highlight-source-python"><pre><span class="pl-k">from</span> <span class="pl-s1">cookiecutter</span>.<span class="pl-s1">main</span> <span class="pl-k">import</span> <span class="pl-s1">cookiecutter</span> <span class="pl-k">import</span> <span class="pl-s1">pathlib</span> <span class="pl-v">TEMPLATE_DIRECTORY</span> <span class="pl-c1">=</span> <span class="pl-en">str</span>(<span class="pl-s1">pathlib</span>.<span class="pl-v">Path</span>(<span class="pl-s1">__file__</span>).<span class="pl-s1">parent</span>.<span class="pl-s1">parent</span>) <span class="pl-k">def</span> <span class="pl-en">test_static_and_templates</span>(<span class="pl-s1">tmpdir</span>): <span class="pl-en">cookiecutter</span>( <span class="pl-s1">template</span><span class="pl-c1">=</span><span class="pl-v">TEMPLATE_DIRECTORY</span>, <span class="pl-s1">output_dir</span><span class="pl-c1">=</span><span class="pl-en">str</span>(<span class="pl-s1">tmpdir</span>), <span class="pl-s1">no_input</span><span class="pl-c1">=</span><span class="pl-c1">True</span>, <span class="pl-s1">extra_context</span><span class="pl-c1">=</span>{ <span class="pl-s">"plugin_name"</span>: <span class="pl-s">"foo"</span>, <span class="p… | <Binary: 63,953 bytes> | 2021-01-27T15:50:02-08:00 | 2021-01-27T23:50:02+00:00 | 2021-01-27T15:58:29-08:00 | 2021-01-27T23:58:29+00:00 | d71fe0d87b578550b41660a4de61ee0f | pytest-for-cookiecutter |
| datasette_crawling-datasette-with-datasette.md | datasette | Crawling Datasette with Datasette | https://github.com/simonw/til/blob/main/datasette/crawling-datasette-with-datasette.md | I wanted to add the new tutorials on https://datasette.io/tutorials to the search index that is used by the https://datasette.io/-/beta search engine. To do this, I needed the content of those tutorials in a SQLite database table. But the tutorials are implemented as static pages in [templates/pages/tutorials](https://github.com/simonw/datasette.io/tree/9dffe361b0210b9d8b1f2fb820a3f2193f0f2fc7/templates/pages/tutorials) - so I needed to crawl that content and insert it into a table. I ended up using a combination of the `datasette.client` mechanism ([documented here](https://docs.datasette.io/en/stable/internals.html#internals-datasette-client)), [Beautiful Soup](https://www.crummy.com/software/BeautifulSoup/bs4/doc/) and [sqlite-utils](https://sqlite-utils.readthedocs.io/) - all wrapped up in [a Python script](https://github.com/simonw/datasette.io/blob/9dffe361b0210b9d8b1f2fb820a3f2193f0f2fc7/index_tutorials.py) that's now called as part of [the GitHub Actions build process](https://github.com/simonw/datasette.io/blob/9dffe361b0210b9d8b1f2fb820a3f2193f0f2fc7/scripts/build.sh#L35) for the site. I'm also using [configuration directory mode](https://docs.datasette.io/en/stable/settings.html#config-dir). Here's the annotated script: ```python import asyncio from bs4 import BeautifulSoup as Soup from datasette.app import Datasette import pathlib import sqlite_utils # This is an async def function because it needs to call await ds.client async def main(): db = sqlite_utils.Database("content.db") # We need to simulate the full https://datasette.io/ site - including all # of its custom templates and plugins. On the command-line we would do this # by running "datasette ." - using configuration directory mode. This is # the equivalent of that when constructing the Datasette object directly: ds = Datasette(config_dir=pathlib.Path(".")) # Equivalent of fetching the HTML from https://datasette.io/tutorials index_response = await ds.client.get("/tutorials") index_soup = Soup(index_re… | <p>I wanted to add the new tutorials on <a href="https://datasette.io/tutorials" rel="nofollow">https://datasette.io/tutorials</a> to the search index that is used by the <a href="https://datasette.io/-/beta" rel="nofollow">https://datasette.io/-/beta</a> search engine.</p> <p>To do this, I needed the content of those tutorials in a SQLite database table. But the tutorials are implemented as static pages in <a href="https://github.com/simonw/datasette.io/tree/9dffe361b0210b9d8b1f2fb820a3f2193f0f2fc7/templates/pages/tutorials">templates/pages/tutorials</a> - so I needed to crawl that content and insert it into a table.</p> <p>I ended up using a combination of the <code>datasette.client</code> mechanism (<a href="https://docs.datasette.io/en/stable/internals.html#internals-datasette-client" rel="nofollow">documented here</a>), <a href="https://www.crummy.com/software/BeautifulSoup/bs4/doc/" rel="nofollow">Beautiful Soup</a> and <a href="https://sqlite-utils.readthedocs.io/" rel="nofollow">sqlite-utils</a> - all wrapped up in <a href="https://github.com/simonw/datasette.io/blob/9dffe361b0210b9d8b1f2fb820a3f2193f0f2fc7/index_tutorials.py">a Python script</a> that's now called as part of <a href="https://github.com/simonw/datasette.io/blob/9dffe361b0210b9d8b1f2fb820a3f2193f0f2fc7/scripts/build.sh#L35">the GitHub Actions build process</a> for the site.</p> <p>I'm also using <a href="https://docs.datasette.io/en/stable/settings.html#config-dir" rel="nofollow">configuration directory mode</a>.</p> <p>Here's the annotated script:</p> <div class="highlight highlight-source-python"><pre><span class="pl-k">import</span> <span class="pl-s1">asyncio</span> <span class="pl-k">from</span> <span class="pl-s1">bs4</span> <span class="pl-k">import</span> <span class="pl-v">BeautifulSoup</span> <span class="pl-k">as</span> <span class="pl-v">Soup</span> <span class="pl-k">from</span> <span class="pl-s1">datasette</span>.<span class="pl-s1">app</span> <span class="pl-k">import</span> <span class="pl-v">Datasette</span> <span class="p… | <Binary: 77,466 bytes> | 2022-02-27T22:37:16-08:00 | 2022-02-28T06:37:16+00:00 | 2022-02-27T22:37:16-08:00 | 2022-02-28T06:37:16+00:00 | 20fa7576084d0bd54463685c205d2be5 | crawling-datasette-with-datasette |
| datasette_datasette-on-replit.md | datasette | Running Datasette on Replit | https://github.com/simonw/til/blob/main/datasette/datasette-on-replit.md | I figured out how to run Datasette on https://replit.com/ The trick is to start a new Python project and then drop the following into the `main.py` file: ```python import uvicorn from datasette.app import Datasette ds = Datasette(memory=True, files=[]) if __name__ == "__main__": uvicorn.run(ds.app(), host="0.0.0.0", port=8000) ``` Replit is smart enough to automatically create a `pyproject.toml` file with `datasette` and `uvicorn` as dependencies. It will also notice that the application is running on port 8000 and set `https://name-of-prject.your-username.repl.co` to proxy to that port. Plus it will restart the server any time it recieves new traffic (and pause it in between groups of requests). To serve a database file, download it using `wget` in the Replit console and add it to the `files=[]` argument. I ran this: wget https://datasette.io/content.db Then changed that first line to: ```python ds = Datasette(files=["content.db"]) ``` And restarted the server. | <p>I figured out how to run Datasette on <a href="https://replit.com/" rel="nofollow">https://replit.com/</a></p> <p>The trick is to start a new Python project and then drop the following into the <code>main.py</code> file:</p> <div class="highlight highlight-source-python"><pre><span class="pl-k">import</span> <span class="pl-s1">uvicorn</span> <span class="pl-k">from</span> <span class="pl-s1">datasette</span>.<span class="pl-s1">app</span> <span class="pl-k">import</span> <span class="pl-v">Datasette</span> <span class="pl-s1">ds</span> <span class="pl-c1">=</span> <span class="pl-v">Datasette</span>(<span class="pl-s1">memory</span><span class="pl-c1">=</span><span class="pl-c1">True</span>, <span class="pl-s1">files</span><span class="pl-c1">=</span>[]) <span class="pl-k">if</span> <span class="pl-s1">__name__</span> <span class="pl-c1">==</span> <span class="pl-s">"__main__"</span>: <span class="pl-s1">uvicorn</span>.<span class="pl-en">run</span>(<span class="pl-s1">ds</span>.<span class="pl-en">app</span>(), <span class="pl-s1">host</span><span class="pl-c1">=</span><span class="pl-s">"0.0.0.0"</span>, <span class="pl-s1">port</span><span class="pl-c1">=</span><span class="pl-c1">8000</span>)</pre></div> <p>Replit is smart enough to automatically create a <code>pyproject.toml</code> file with <code>datasette</code> and <code>uvicorn</code> as dependencies. It will also notice that the application is running on port 8000 and set <code>https://name-of-prject.your-username.repl.co</code> to proxy to that port. Plus it will restart the server any time it recieves new traffic (and pause it in between groups of requests).</p> <p>To serve a database file, download it using <code>wget</code> in the Replit console and add it to the <code>files=[]</code> argument. I ran this:</p> <pre><code>wget https://datasette.io/content.db </code></pre> <p>Then changed that first line to:</p> <div class="highlight highlight-source-python"><pre><span class="pl-s1">ds</span> <span class="pl-c1">=</span> <span class="pl-v">… | <Binary: 58,425 bytes> | 2021-05-02T11:50:05-07:00 | 2021-05-02T18:50:05+00:00 | 2021-05-02T11:50:05-07:00 | 2021-05-02T18:50:05+00:00 | 96e900155fbcb773fcc32dfbbc2bf55c | datasette-on-replit |
| datasette_issues-open-for-less-than-x-seconds.md | datasette | Querying for GitHub issues open for less than 60 seconds | https://github.com/simonw/til/blob/main/datasette/issues-open-for-less-than-x-seconds.md | While [writing this thread](https://twitter.com/simonw/status/1370390336514658310) about my habit of opening issues and closing them a few seconds later just so I could link to them in a commit message I decided to answer the question "How many of my issues were open for less than 60 seconds?" Thanks to [github-to-sqlite](https://datasette.io/tools/github-to-sqlite) I have an [issues database table](https://github-to-sqlite.dogsheep.net/github/issues) containing issues from all of my public projects. I needed to figure out how to calculate the difference between `closed_at` and `created_at` in seconds. This works: ```sql select strftime('%s',issues.closed_at) - strftime('%s',issues.created_at) as duration_open_in_seconds ... ``` I wanted to be able to input the number of seconds as a parameter. I used this: ```sql duration_open_in_seconds < CAST(:max_duration_in_seconds AS INTEGER) ``` This is the full query - [try it out here](https://github-to-sqlite.dogsheep.net/github?sql=select%0D%0A++json_object%28%0D%0A++++%27label%27%2C+repos.full_name+%7C%7C+%27+%23%27+%7C%7C+issues.number%2C%0D%0A++++%27href%27%2C+%27https%3A%2F%2Fgithub.com%2F%27+%7C%7C+repos.full_name+%7C%7C+%27%2Fissues%2F%27+%7C%7C+issues.number%0D%0A++%29+as+link%2C%0D%0A++strftime%28%27%25s%27%2Cissues.closed_at%29+-+strftime%28%27%25s%27%2Cissues.created_at%29+as+duration_open_in_seconds%2C%0D%0A++issues.number+as+issue_number%2C%0D%0A++issues.title%2C%0D%0A++users.login%2C%0D%0A++issues.closed_at%2C%0D%0A++issues.created_at%2C%0D%0A++issues.body%2C%0D%0A++issues.type%0D%0Afrom%0D%0A++issues+join+repos+on+issues.repo+%3D+repos.id%0D%0A++join+users+on+issues.user+%3D+users.id%0D%0A++where+issues.closed_at+is+not+null+and+duration_open_in_seconds+%3C+CAST%28%3Amax_duration_in_seconds+AS+INTEGER%29%0D%0Aorder+by%0D%0A++issues.closed_at+desc&max_duration_in_seconds=60): ```sql select json_object( 'label', repos.full_name || ' #' || issues.number, 'href', 'https://github.com/' || repos.full_name || '/issues/' || issues.number ) as link… | <p>While <a href="https://twitter.com/simonw/status/1370390336514658310" rel="nofollow">writing this thread</a> about my habit of opening issues and closing them a few seconds later just so I could link to them in a commit message I decided to answer the question "How many of my issues were open for less than 60 seconds?"</p> <p>Thanks to <a href="https://datasette.io/tools/github-to-sqlite" rel="nofollow">github-to-sqlite</a> I have an <a href="https://github-to-sqlite.dogsheep.net/github/issues" rel="nofollow">issues database table</a> containing issues from all of my public projects.</p> <p>I needed to figure out how to calculate the difference between <code>closed_at</code> and <code>created_at</code> in seconds. This works:</p> <div class="highlight highlight-source-sql"><pre><span class="pl-k">select</span> strftime(<span class="pl-s"><span class="pl-pds">'</span>%s<span class="pl-pds">'</span></span>,<span class="pl-c1">issues</span>.<span class="pl-c1">closed_at</span>) <span class="pl-k">-</span> strftime(<span class="pl-s"><span class="pl-pds">'</span>%s<span class="pl-pds">'</span></span>,<span class="pl-c1">issues</span>.<span class="pl-c1">created_at</span>) <span class="pl-k">as</span> duration_open_in_seconds ...</pre></div> <p>I wanted to be able to input the number of seconds as a parameter. I used this:</p> <div class="highlight highlight-source-sql"><pre>duration_open_in_seconds <span class="pl-k"><</span> CAST(:max_duration_in_seconds <span class="pl-k">AS</span> <span class="pl-k">INTEGER</span>)</pre></div> <p>This is the full query - <a href="https://github-to-sqlite.dogsheep.net/github?sql=select%0D%0A++json_object%28%0D%0A++++%27label%27%2C+repos.full_name+%7C%7C+%27+%23%27+%7C%7C+issues.number%2C%0D%0A++++%27href%27%2C+%27https%3A%2F%2Fgithub.com%2F%27+%7C%7C+repos.full_name+%7C%7C+%27%2Fissues%2F%27+%7C%7C+issues.number%0D%0A++%29+as+link%2C%0D%0A++strftime%28%27%25s%27%2Cissues.closed_at%29+-+strftime%28%27%25s%27%2Cissues.created_at%29+as+duration_open_in_seconds%2C%0D%0A++issues.n… | <Binary: 72,270 bytes> | 2021-03-12T07:34:42-08:00 | 2021-03-12T15:34:42+00:00 | 2021-03-12T07:34:42-08:00 | 2021-03-12T15:34:42+00:00 | e0f132933840169839c18ddd06e78cac | issues-open-for-less-than-x-seconds |
| datasette_redirects-for-datasette.md | datasette | Redirects for Datasette | https://github.com/simonw/til/blob/main/datasette/redirects-for-datasette.md | I made some changes to my https://til.simonwillison.net/ site that resulted in cleaner URL designs, so I needed to setup some redirects. I configured the redirects using a one-off Datasette plugin called `redirects.py` which I dropped into the `plugins/` directory for the Datasette instance: ```python from datasette import hookimpl from datasette.utils.asgi import Response @hookimpl def register_routes(): return ( (r"^/til/til/(?P<topic>[^_]+)_(?P<slug>[^\.]+)\.md$", lambda request: Response.redirect( "/{topic}/{slug}".format(**request.url_vars), status=301 )), ("^/til/feed.atom$", lambda: Response.redirect("/tils/feed.atom", status=301)), ( "^/til/search$", lambda request: Response.redirect( "/tils/search" + (("?" + request.query_string) if request.query_string else ""), status=301, ), ), ) ``` | <p>I made some changes to my <a href="https://til.simonwillison.net/" rel="nofollow">https://til.simonwillison.net/</a> site that resulted in cleaner URL designs, so I needed to setup some redirects. I configured the redirects using a one-off Datasette plugin called <code>redirects.py</code> which I dropped into the <code>plugins/</code> directory for the Datasette instance:</p> <div class="highlight highlight-source-python"><pre><span class="pl-k">from</span> <span class="pl-s1">datasette</span> <span class="pl-k">import</span> <span class="pl-s1">hookimpl</span> <span class="pl-k">from</span> <span class="pl-s1">datasette</span>.<span class="pl-s1">utils</span>.<span class="pl-s1">asgi</span> <span class="pl-k">import</span> <span class="pl-v">Response</span> <span class="pl-en">@<span class="pl-s1">hookimpl</span></span> <span class="pl-k">def</span> <span class="pl-en">register_routes</span>(): <span class="pl-k">return</span> ( (<span class="pl-s">r"^/til/til/(?P<topic>[^_]+)_(?P<slug>[^\.]+)\.md$"</span>, <span class="pl-k">lambda</span> <span class="pl-s1">request</span>: <span class="pl-v">Response</span>.<span class="pl-en">redirect</span>( <span class="pl-s">"/{topic}/{slug}"</span>.<span class="pl-en">format</span>(<span class="pl-c1">**</span><span class="pl-s1">request</span>.<span class="pl-s1">url_vars</span>), <span class="pl-s1">status</span><span class="pl-c1">=</span><span class="pl-c1">301</span> )), (<span class="pl-s">"^/til/feed.atom$"</span>, <span class="pl-k">lambda</span>: <span class="pl-v">Response</span>.<span class="pl-en">redirect</span>(<span class="pl-s">"/tils/feed.atom"</span>, <span class="pl-s1">status</span><span class="pl-c1">=</span><span class="pl-c1">301</span>)), ( <span class="pl-s">"^/til/search$"</span>, <span class="pl-k">lambda</span> <span class="pl-s1">request</span>: <span class="pl-v">Response</span>.<span class="pl-en">redirect</span>( <span class="pl-s">"/til… | <Binary: 63,285 bytes> | 2020-11-25T11:53:32-08:00 | 2020-11-25T19:53:32+00:00 | 2020-11-25T11:53:32-08:00 | 2020-11-25T19:53:32+00:00 | d8510c8f4cb6c43f65afd4a6acb5d643 | redirects-for-datasette |
| datasette_register-new-plugin-hooks.md | datasette | Registering new Datasette plugin hooks by defining them in other plugins | https://github.com/simonw/til/blob/main/datasette/register-new-plugin-hooks.md | I'm experimenting with a Datasette plugin that itself adds new plugin hooks which other plugins can then interact with. It's called [datasette-low-disk-space-hook](https://github.com/simonw/datasette-low-disk-space-hook), and it adds a new plugin hook called `low_disk_space(datasette)`, defined in the [datasette_low_disk_space_hook/hookspecs.py](https://github.com/simonw/datasette-low-disk-space-hook/blob/0.1a0/datasette_low_disk_space_hook/hookspecs.py) module. The hook is registered by this code in [datasette_low_disk_space_hook/\_\_init\_\_.py](https://github.com/simonw/datasette-low-disk-space-hook/blob/0.1a0/datasette_low_disk_space_hook/__init__.py) ```python from datasette.utils import await_me_maybe from datasette.plugins import pm from . import hookspecs pm.add_hookspecs(hookspecs) ``` This imports the plugin manager directly from Datasette and uses it to add the new hooks. I was worried that the `pm.add_hookspects(hookspecs)` line was not guaranteed to be executed if that module had not been imported. It turns out that having this `entrpoints=` line in [setup.py](https://github.com/simonw/datasette-low-disk-space-hook/blob/0.1a0/setup.py) is enough to ensure that the module is imported and the `pm.add_hookspecs()` line is executed: ```python from setuptools import setup setup( name="datasette-low-disk-space-hook", # ... entry_points={"datasette": ["low_disk_space_hook = datasette_low_disk_space_hook"]}, # ... ) ``` | <p>I'm experimenting with a Datasette plugin that itself adds new plugin hooks which other plugins can then interact with.</p> <p>It's called <a href="https://github.com/simonw/datasette-low-disk-space-hook">datasette-low-disk-space-hook</a>, and it adds a new plugin hook called <code>low_disk_space(datasette)</code>, defined in the <a href="https://github.com/simonw/datasette-low-disk-space-hook/blob/0.1a0/datasette_low_disk_space_hook/hookspecs.py">datasette_low_disk_space_hook/hookspecs.py</a> module.</p> <p>The hook is registered by this code in <a href="https://github.com/simonw/datasette-low-disk-space-hook/blob/0.1a0/datasette_low_disk_space_hook/__init__.py">datasette_low_disk_space_hook/__init__.py</a></p> <div class="highlight highlight-source-python"><pre><span class="pl-k">from</span> <span class="pl-s1">datasette</span>.<span class="pl-s1">utils</span> <span class="pl-k">import</span> <span class="pl-s1">await_me_maybe</span> <span class="pl-k">from</span> <span class="pl-s1">datasette</span>.<span class="pl-s1">plugins</span> <span class="pl-k">import</span> <span class="pl-s1">pm</span> <span class="pl-k">from</span> . <span class="pl-k">import</span> <span class="pl-s1">hookspecs</span> <span class="pl-s1">pm</span>.<span class="pl-en">add_hookspecs</span>(<span class="pl-s1">hookspecs</span>)</pre></div> <p>This imports the plugin manager directly from Datasette and uses it to add the new hooks.</p> <p>I was worried that the <code>pm.add_hookspects(hookspecs)</code> line was not guaranteed to be executed if that module had not been imported.</p> <p>It turns out that having this <code>entrpoints=</code> line in <a href="https://github.com/simonw/datasette-low-disk-space-hook/blob/0.1a0/setup.py">setup.py</a> is enough to ensure that the module is imported and the <code>pm.add_hookspecs()</code> line is executed:</p> <div class="highlight highlight-source-python"><pre><span class="pl-k">from</span> <span class="pl-s1">setuptools</span> <span class="pl-k">import</span> <span class="pl-s1">setup</sp… | <Binary: 64,078 bytes> | 2022-06-17T13:04:35-07:00 | 2022-06-17T20:04:35+00:00 | 2022-06-17T13:04:35-07:00 | 2022-06-17T20:04:35+00:00 | 38c23e5679fa88c44f7e14038ea1b4ae | register-new-plugin-hooks |
| datasette_reuse-click-for-register-commands.md | datasette | Reusing an existing Click tool with register_commands | https://github.com/simonw/til/blob/main/datasette/reuse-click-for-register-commands.md | The [register_commands](https://docs.datasette.io/en/stable/plugin_hooks.html#register-commands-cli) plugin hook lets you add extra sub-commands to the `datasette` CLI tool. I have a lot of existing tools that I'd like to also make available as plugins. I figured out this pattern for my [git-history](https://datasette.io/tools/git-history) tool today: ```python from datasette import hookimpl from git_history.cli import cli as git_history_cli @hookimpl def register_commands(cli): cli.add_command(git_history_cli, name="git-history") ``` Now I can run the following: ``` % datasette git-history --help Usage: datasette git-history [OPTIONS] COMMAND [ARGS]... Tools for analyzing Git history using SQLite Options: --version Show the version and exit. --help Show this message and exit. Commands: file Analyze the history of a specific file and write it to SQLite ``` I initially tried doing this: ```python @hookimpl def register_commands(cli): cli.command(name="git-history")(git_history_file) ``` But got the following error: TypeError: Attempted to convert a callback into a command twice. Using [cli.add_command()](https://click.palletsprojects.com/en/8.0.x/api/?highlight=add_command#click.Group.add_command) turns out to be the right way to do this. Research issue for this: [datasette#1538](https://github.com/simonw/datasette/issues/1538). | <p>The <a href="https://docs.datasette.io/en/stable/plugin_hooks.html#register-commands-cli" rel="nofollow">register_commands</a> plugin hook lets you add extra sub-commands to the <code>datasette</code> CLI tool.</p> <p>I have a lot of existing tools that I'd like to also make available as plugins. I figured out this pattern for my <a href="https://datasette.io/tools/git-history" rel="nofollow">git-history</a> tool today:</p> <div class="highlight highlight-source-python"><pre><span class="pl-k">from</span> <span class="pl-s1">datasette</span> <span class="pl-k">import</span> <span class="pl-s1">hookimpl</span> <span class="pl-k">from</span> <span class="pl-s1">git_history</span>.<span class="pl-s1">cli</span> <span class="pl-k">import</span> <span class="pl-s1">cli</span> <span class="pl-k">as</span> <span class="pl-s1">git_history_cli</span> <span class="pl-en">@<span class="pl-s1">hookimpl</span></span> <span class="pl-k">def</span> <span class="pl-en">register_commands</span>(<span class="pl-s1">cli</span>): <span class="pl-s1">cli</span>.<span class="pl-en">add_command</span>(<span class="pl-s1">git_history_cli</span>, <span class="pl-s1">name</span><span class="pl-c1">=</span><span class="pl-s">"git-history"</span>)</pre></div> <p>Now I can run the following:</p> <pre><code>% datasette git-history --help Usage: datasette git-history [OPTIONS] COMMAND [ARGS]... Tools for analyzing Git history using SQLite Options: --version Show the version and exit. --help Show this message and exit. Commands: file Analyze the history of a specific file and write it to SQLite </code></pre> <p>I initially tried doing this:</p> <div class="highlight highlight-source-python"><pre><span class="pl-en">@<span class="pl-s1">hookimpl</span></span> <span class="pl-k">def</span> <span class="pl-en">register_commands</span>(<span class="pl-s1">cli</span>): <span class="pl-s1">cli</span>.<span class="pl-en">command</span>(<span class="pl-s1">name</span><span class="pl-c1">=</span><span class="pl-s">"git-histo… | <Binary: 58,592 bytes> | 2021-11-29T09:32:07-08:00 | 2021-11-29T17:32:07+00:00 | 2021-11-29T09:32:07-08:00 | 2021-11-29T17:32:07+00:00 | 3322ac874006f755fec92e2caa623e21 | reuse-click-for-register-commands |
| datasette_search-all-columns-trick.md | datasette | Searching all columns of a table in Datasette | https://github.com/simonw/til/blob/main/datasette/search-all-columns-trick.md | I came up with this trick today, when I wanted to run a `LIKE` search against every column in a table. The trick is to generate a SQL query that does a `LIKE` search against every column of a table. We can generate that query using another query: ```sql select 'select * from "' || :table || '" where ' || group_concat( '"' || name || '" like ''%'' || :search || ''%''', ' or ' ) from pragma_table_info(:table) ``` Here's what you get when you [run that query](https://fivethirtyeight.datasettes.com/fivethirtyeight?sql=select%0D%0A++%27select+*+from+%22%27+%7C%7C+%3Atable+%7C%7C+%27%22+where+%27+%7C%7C+group_concat%28%0D%0A++++%27%22%27+%7C%7C+name+%7C%7C+%27%22+like+%27%27%25%27%27+%7C%7C+%3Asearch+%7C%7C+%27%27%25%27%27%27%2C%0D%0A++++%27+or+%27%0D%0A++%29%0D%0Afrom%0D%0A++pragma_table_info%28%3Atable%29&table=avengers%2Favengers) against the [avengers example table](https://fivethirtyeight.datasettes.com/fivethirtyeight/avengers%2Favengers) from FiveThirtyEight (pretty-printed): ```sql select * from "avengers/avengers" where "URL" like '%' || :search || '%' or "Name/Alias" like '%' || :search || '%' or "Appearances" like '%' || :search || '%' or "Current?" like '%' || :search || '%' or "Gender" like '%' || :search || '%' or "Probationary Introl" like '%' || :search || '%' or "Full/Reserve Avengers Intro" like '%' || :search || '%' or "Year" like '%' || :search || '%' or "Years since joining" like '%' || :search || '%' or "Honorary" like '%' || :search || '%' or "Death1" like '%' || :search || '%' or "Return1" like '%' || :search || '%' or "Death2" like '%' || :search || '%' or "Return2" like '%' || :search || '%' or "Death3" like '%' || :search || '%' or "Return3" like '%' || :search || '%' or "Death4" like '%' || :search || '%' or "Return4" like '%' || :search || '%' or "Death5" like '%' || :search || '%' or "Return5" like '%' || :search || '%' or "Notes" like '%' || :search || '%' ``` Here's [an example search](https://fivethirtyeight.datasettes.com/f… | <p>I came up with this trick today, when I wanted to run a <code>LIKE</code> search against every column in a table.</p> <p>The trick is to generate a SQL query that does a <code>LIKE</code> search against every column of a table. We can generate that query using another query:</p> <div class="highlight highlight-source-sql"><pre><span class="pl-k">select</span> <span class="pl-s"><span class="pl-pds">'</span>select * from "<span class="pl-pds">'</span></span> <span class="pl-k">||</span> :table <span class="pl-k">||</span> <span class="pl-s"><span class="pl-pds">'</span>" where <span class="pl-pds">'</span></span> <span class="pl-k">||</span> group_concat( <span class="pl-s"><span class="pl-pds">'</span>"<span class="pl-pds">'</span></span> <span class="pl-k">||</span> name <span class="pl-k">||</span> <span class="pl-s"><span class="pl-pds">'</span>" like <span class="pl-pds">'</span><span class="pl-pds">'</span>%<span class="pl-pds">'</span><span class="pl-pds">'</span> || :search || <span class="pl-pds">'</span><span class="pl-pds">'</span>%<span class="pl-pds">'</span><span class="pl-pds">'</span><span class="pl-pds">'</span></span>, <span class="pl-s"><span class="pl-pds">'</span> or <span class="pl-pds">'</span></span> ) <span class="pl-k">from</span> pragma_table_info(:table)</pre></div> <p>Here's what you get when you <a href="https://fivethirtyeight.datasettes.com/fivethirtyeight?sql=select%0D%0A++%27select+*+from+%22%27+%7C%7C+%3Atable+%7C%7C+%27%22+where+%27+%7C%7C+group_concat%28%0D%0A++++%27%22%27+%7C%7C+name+%7C%7C+%27%22+like+%27%27%25%27%27+%7C%7C+%3Asearch+%7C%7C+%27%27%25%27%27%27%2C%0D%0A++++%27+or+%27%0D%0A++%29%0D%0Afrom%0D%0A++pragma_table_info%28%3Atable%29&table=avengers%2Favengers" rel="nofollow">run that query</a> against the <a href="https://fivethirtyeight.datasettes.com/fivethirtyeight/avengers%2Favengers" rel="nofollow">avengers example table</a> from FiveThirtyEight (pretty-printed):</p> <div class="highlight highlight-source-sql"><pre><span class="pl-k">select</s… | <Binary: 56,826 bytes> | 2021-08-23T11:48:22-07:00 | 2021-08-23T18:48:22+00:00 | 2021-08-23T12:05:47-07:00 | 2021-08-23T19:05:47+00:00 | e24510529260e6312f52947cb05723d0 | search-all-columns-trick |
| datasette_serving-mbtiles.md | datasette | Serving MBTiles with datasette-media | https://github.com/simonw/til/blob/main/datasette/serving-mbtiles.md | The [MBTiles](https://github.com/mapbox/mbtiles-spec) format uses SQLite to bundle map tiles for use with libraries such as Leaflet. I figured out how to use the [datasette-media](https://datasette.io/plugins/datasette-media) to serve tiles from this MBTiles file containing two zoom levels of tiles for San Francisco: https://static.simonwillison.net/static/2021/San_Francisco.mbtiles This TIL is now entirely obsolete: I used this prototype to build the new [datasette-tiles](https://datasette.io/plugins/datasette-tiles) plugin. ```yaml plugins: datasette-cluster-map: tile_layer: "/-/media/tiles/{z},{x},{y}" tile_layer_options: attribution: "© OpenStreetMap contributors" tms: 1 bounds: [[37.61746256103807, -122.57290320721465],[37.85395101481279, -122.27695899334748]] minZoom: 15 maxZoom: 16 datasette-media: tiles: database: San_Francisco sql: with comma_locations as ( select instr(:key, ',') as first_comma, instr(:key, ',') + instr(substr(:key, instr(:key, ',') + 1), ',') as second_comma ), variables as ( select substr(:key, 0, first_comma) as z, substr(:key, first_comma + 1, second_comma - first_comma - 1) as x, substr(:key, second_comma + 1) as y from comma_locations ) select tile_data as content, 'image/png' as content_type from tiles, variables where zoom_level = variables.z and tile_column = variables.x and tile_row = variables.y ``` | <p>The <a href="https://github.com/mapbox/mbtiles-spec">MBTiles</a> format uses SQLite to bundle map tiles for use with libraries such as Leaflet.</p> <p>I figured out how to use the <a href="https://datasette.io/plugins/datasette-media" rel="nofollow">datasette-media</a> to serve tiles from this MBTiles file containing two zoom levels of tiles for San Francisco: <a href="https://static.simonwillison.net/static/2021/San_Francisco.mbtiles" rel="nofollow">https://static.simonwillison.net/static/2021/San_Francisco.mbtiles</a></p> <p>This TIL is now entirely obsolete: I used this prototype to build the new <a href="https://datasette.io/plugins/datasette-tiles" rel="nofollow">datasette-tiles</a> plugin.</p> <div class="highlight highlight-source-yaml"><pre><span class="pl-ent">plugins</span>: <span class="pl-ent">datasette-cluster-map</span>: <span class="pl-ent">tile_layer</span>: <span class="pl-s"><span class="pl-pds">"</span>/-/media/tiles/{z},{x},{y}<span class="pl-pds">"</span></span> <span class="pl-ent">tile_layer_options</span>: <span class="pl-ent">attribution</span>: <span class="pl-s"><span class="pl-pds">"</span>© OpenStreetMap contributors<span class="pl-pds">"</span></span> <span class="pl-ent">tms</span>: <span class="pl-c1">1</span> <span class="pl-ent">bounds</span>: <span class="pl-s">[[37.61746256103807, -122.57290320721465],[37.85395101481279, -122.27695899334748]]</span> <span class="pl-ent">minZoom</span>: <span class="pl-c1">15</span> <span class="pl-ent">maxZoom</span>: <span class="pl-c1">16</span> <span class="pl-ent">datasette-media</span>: <span class="pl-ent">tiles</span>: <span class="pl-ent">database</span>: <span class="pl-s">San_Francisco</span> <span class="pl-ent">sql</span>: <span class="pl-s">with comma_locations as (</span> <span class="pl-s">select instr(:key, ',') as first_comma,</span> <span class="pl-s">instr(:key, ',') + instr(substr(:key, instr(:key, ',') + 1), ',') as second_comma</span> … | <Binary: 71,538 bytes> | 2021-02-03T15:12:05-08:00 | 2021-02-03T23:12:05+00:00 | 2021-02-03T15:12:05-08:00 | 2021-02-03T23:12:05+00:00 | cc9a5cbba9f61f58837d25d2b323bcbc | serving-mbtiles |
| deno_annotated-deno-deploy-demo.md | deno | Annotated code for a demo of WebSocket chat in Deno Deploy | https://github.com/simonw/til/blob/main/deno/annotated-deno-deploy-demo.md | Deno Deploy is a hosted Deno service that promises [a multi-tenant JavaScript engine running in 25 data centers across the world](https://deno.com/blog/deploy-beta1/). Today [this demo](https://dash.deno.com/playground/mini-ws-chat) by [Ondřej Žára](https://twitter.com/0ndras/status/1457027832404713479) showed up [on Hacker News](https://news.ycombinator.com/item?id=29131751), which implements "a multi-datacenter chat, client+server in 23 lines of TS". Here's my annotated copy of the code, which I wrote while figuring out how it works. ```typescript // listenAndServe is the Deno standard mechanism for creating an HTTP server // https://deno.land/manual/examples/http_server#using-the-codestdhttpcode-library import { listenAndServe } from "https://deno.land/std/http/server.ts" // Set of all of the currently open WebSocket connections from browsers const sockets = new Set<WebSocket>(), /* BroadcastChannel is a concept that is unique to the Deno Deploy environment. https://deno.com/deploy/docs/runtime-broadcast-channel/ It is modelled after the browser API of the same name. It sets up a channel between ALL instances of the server-side script running in every one of the Deno Deploy global network of data centers. The argument is the name of the channel, which apparently can be an empty string. */ channel = new BroadcastChannel(""), headers = {"Content-type": "text/html"}, /* This is the bare-bones HTML for the browser side of the application It creates a WebSocket connection back to the host, and sets it up so any message that arrives via that WebSocket will be appended to the textContent of the pre element on the page. The input element has an onkeyup that checks for the Enter key and sends the value of that element over the WebSocket channel to the server. */ html = `<script>let ws = new WebSocket("wss://"+location.host) ws.onmessage = e => pre.textContent += e.data+"\\n"</script> <input onkeyup="event.key=='Enter'&&ws.send(this.value)"><pre id=pre>` /* This bit does the broadcast work: any ti… | <p>Deno Deploy is a hosted Deno service that promises <a href="https://deno.com/blog/deploy-beta1/" rel="nofollow">a multi-tenant JavaScript engine running in 25 data centers across the world</a>.</p> <p>Today <a href="https://dash.deno.com/playground/mini-ws-chat" rel="nofollow">this demo</a> by <a href="https://twitter.com/0ndras/status/1457027832404713479" rel="nofollow">Ondřej Žára</a> showed up <a href="https://news.ycombinator.com/item?id=29131751" rel="nofollow">on Hacker News</a>, which implements "a multi-datacenter chat, client+server in 23 lines of TS".</p> <p>Here's my annotated copy of the code, which I wrote while figuring out how it works.</p> <div class="highlight highlight-source-ts"><pre><span class="pl-c">// listenAndServe is the Deno standard mechanism for creating an HTTP server</span> <span class="pl-c">// https://deno.land/manual/examples/http_server#using-the-codestdhttpcode-library</span> <span class="pl-k">import</span> <span class="pl-kos">{</span> <span class="pl-s1">listenAndServe</span> <span class="pl-kos">}</span> <span class="pl-k">from</span> <span class="pl-s">"https://deno.land/std/http/server.ts"</span> <span class="pl-c">// Set of all of the currently open WebSocket connections from browsers</span> <span class="pl-k">const</span> <span class="pl-s1">sockets</span> <span class="pl-c1">=</span> <span class="pl-k">new</span> <span class="pl-smi">Set</span><span class="pl-kos"><</span><span class="pl-smi">WebSocket</span><span class="pl-kos">></span><span class="pl-kos">(</span><span class="pl-kos">)</span><span class="pl-kos">,</span> <span class="pl-c">/*</span> <span class="pl-c">BroadcastChannel is a concept that is unique to the Deno Deploy environment.</span> <span class="pl-c"></span> <span class="pl-c">https://deno.com/deploy/docs/runtime-broadcast-channel/</span> <span class="pl-c"></span> <span class="pl-c">It is modelled after the browser API of the same name.</span> <span class="pl-c"></span> <span class="pl-c">It sets up a channel between ALL instances of the … | <Binary: 75,043 bytes> | 2021-11-06T18:34:17-07:00 | 2021-11-07T01:34:17+00:00 | 2021-11-07T09:01:47-08:00 | 2021-11-07T17:01:47+00:00 | cd72f542e30595301089ca728b6be770 | annotated-deno-deploy-demo |
| digitalocean_datasette-on-digitalocean-app-platform.md | digitalocean | Running Datasette on DigitalOcean App Platform | https://github.com/simonw/til/blob/main/digitalocean/datasette-on-digitalocean-app-platform.md | [App Platform](https://www.digitalocean.com/docs/app-platform/) is the new PaaS from DigitalOcean. I figured out how to run Datasette on it. The bare minimum needed is a GitHub repository with two files: `requirements.txt` and `Procfile`. `requirements.txt` can contain a single line: ``` datasette ``` `Procfile` needs this: ``` web: datasette . -h 0.0.0.0 -p $PORT --cors ``` Your web process needs to listen on `0.0.0.0` and on the port in the `$PORT` environment variable. Connect this GitHub repository up to DigitalOcean App Platform and it will deploy the application - detecting that it's a Python application (due to the `requirements.txt` file), installing those requirements and then starting up the process in the `Procfile`. Any SQLite `.db` files that you add to the root of the GitHub repository will be automatically served by Datasette when it starts up. Because Datasette is run using `datasette .` it will also automatically pick up a `metadata.json` file or anything in custom `templates/` or `plugins/` folders, as described in [Configuration directory mode](https://docs.datasette.io/en/stable/config.html#configuration-directory-mode) in the documentation. ## Building database files I don't particularly like putting binary SQLite files in a GitHub repository - I prefer to store CSV files or SQL text files and build them into a database file as part of the deployment process. The best way I've found to do this in a DigitalOcean App is to create a `build.sh` script that builds the database, then execute it using a `Build Command`. One way to do this is to visit the "Components" tab end click "Edit" in the Commands section, then set the "Build Command" to `. build.sh`. Now any code you add to a `build.sh` script in your repo will be executed as part of the deployment. A better way (thanks, [Kamal Nasser](https://www.digitalocean.com/community/questions/configure-a-build-command-for-a-python-project-without-using-the-web-ui?comment=92105)) is to use a `bin/pre_compile` or `bin/post_compile` script in … | <p><a href="https://www.digitalocean.com/docs/app-platform/" rel="nofollow">App Platform</a> is the new PaaS from DigitalOcean. I figured out how to run Datasette on it.</p> <p>The bare minimum needed is a GitHub repository with two files: <code>requirements.txt</code> and <code>Procfile</code>.</p> <p><code>requirements.txt</code> can contain a single line:</p> <pre><code>datasette </code></pre> <p><code>Procfile</code> needs this:</p> <pre><code>web: datasette . -h 0.0.0.0 -p $PORT --cors </code></pre> <p>Your web process needs to listen on <code>0.0.0.0</code> and on the port in the <code>$PORT</code> environment variable.</p> <p>Connect this GitHub repository up to DigitalOcean App Platform and it will deploy the application - detecting that it's a Python application (due to the <code>requirements.txt</code> file), installing those requirements and then starting up the process in the <code>Procfile</code>.</p> <p>Any SQLite <code>.db</code> files that you add to the root of the GitHub repository will be automatically served by Datasette when it starts up.</p> <p>Because Datasette is run using <code>datasette .</code> it will also automatically pick up a <code>metadata.json</code> file or anything in custom <code>templates/</code> or <code>plugins/</code> folders, as described in <a href="https://docs.datasette.io/en/stable/config.html#configuration-directory-mode" rel="nofollow">Configuration directory mode</a> in the documentation.</p> <h2> <a id="user-content-building-database-files" class="anchor" href="#building-database-files" aria-hidden="true"><span aria-hidden="true" class="octicon octicon-link"></span></a>Building database files</h2> <p>I don't particularly like putting binary SQLite files in a GitHub repository - I prefer to store CSV files or SQL text files and build them into a database file as part of the deployment process.</p> <p>The best way I've found to do this in a DigitalOcean App is to create a <code>build.sh</code> script that builds the database, then execute it using a <code>Build Comm… | <Binary: 62,729 bytes> | 2020-10-06T19:45:25-07:00 | 2020-10-07T02:45:25+00:00 | 2020-10-07T07:29:46-07:00 | 2020-10-07T14:29:46+00:00 | 412787a6bcb503088eddbc6cfbd2114f | datasette-on-digitalocean-app-platform |
| django_almost-facet-counts-django-admin.md | django | How to almost get facet counts in the Django admin | https://github.com/simonw/til/blob/main/django/almost-facet-counts-django-admin.md | For a tantalizing moment today I thought I'd found a recipe for adding facet counts to the Django admin. I love faceted browsing. I've implemented it at least a dozen times in my career, using everything from Solr and Elasticsearch to PostgreSQL (see [Implementing faceted search with Django and PostgreSQL](https://simonwillison.net/2017/Oct/5/django-postgresql-faceted-search/)) or SQLite (see [Datasette Facets](https://simonwillison.net/2018/May/20/datasette-facets/)). The Django admin almost has facets out of the box, thanks to the `list_filter` interface. But they're missing the all-imprtant count values! Those are the thing that makes faceted search so valuable to me. Today I decided to try and add them. ## Almost facet counts Here's my first attempt. This assumes a model has a `State` foreign key, and adds faceting by state: ```python class StateCountFilter(admin.SimpleListFilter): title = 'State count' parameter_name = 'state_count' def lookups(self, request, model_admin): qs = model_admin.get_queryset(request) states_and_counts = qs.values_list( "state__abbreviation", "state__name" ).annotate(n = Count('state__abbreviation')) for abbreviation, name, count in states_and_counts: yield abbreviation, '{}: {:,}'.format(name, count) def queryset(self, request, queryset): state = self.value() if state: return queryset.filter( state__abbreviation=state ) # Then add this to the ModelAdmin: @admin.register(Location) class LocationAdmin(admin.ModelAdmin): list_filter = ( StateCountFilter, ) ``` I tried this out, and for a glorious moment I thought I had solved it! I added it to another column too, and started trying it out. <img width="1217" alt="110856792-eda4a000-826c-11eb-8f99-2676c1030423" src="https://user-images.githubusercontent.com/9599/110865748-f4391480-8278-11eb-90b4-a12b42f3c5de.png"> Then I attempted to apply one of the filters: <img width="1190" alt="… | <p>For a tantalizing moment today I thought I'd found a recipe for adding facet counts to the Django admin.</p> <p>I love faceted browsing. I've implemented it at least a dozen times in my career, using everything from Solr and Elasticsearch to PostgreSQL (see <a href="https://simonwillison.net/2017/Oct/5/django-postgresql-faceted-search/" rel="nofollow">Implementing faceted search with Django and PostgreSQL</a>) or SQLite (see <a href="https://simonwillison.net/2018/May/20/datasette-facets/" rel="nofollow">Datasette Facets</a>).</p> <p>The Django admin almost has facets out of the box, thanks to the <code>list_filter</code> interface. But they're missing the all-imprtant count values! Those are the thing that makes faceted search so valuable to me. Today I decided to try and add them.</p> <h2> <a id="user-content-almost-facet-counts" class="anchor" href="#almost-facet-counts" aria-hidden="true"><span aria-hidden="true" class="octicon octicon-link"></span></a>Almost facet counts</h2> <p>Here's my first attempt. This assumes a model has a <code>State</code> foreign key, and adds faceting by state:</p> <div class="highlight highlight-source-python"><pre><span class="pl-k">class</span> <span class="pl-v">StateCountFilter</span>(<span class="pl-s1">admin</span>.<span class="pl-v">SimpleListFilter</span>): <span class="pl-s1">title</span> <span class="pl-c1">=</span> <span class="pl-s">'State count'</span> <span class="pl-s1">parameter_name</span> <span class="pl-c1">=</span> <span class="pl-s">'state_count'</span> <span class="pl-k">def</span> <span class="pl-en">lookups</span>(<span class="pl-s1">self</span>, <span class="pl-s1">request</span>, <span class="pl-s1">model_admin</span>): <span class="pl-s1">qs</span> <span class="pl-c1">=</span> <span class="pl-s1">model_admin</span>.<span class="pl-en">get_queryset</span>(<span class="pl-s1">request</span>) <span class="pl-s1">states_and_counts</span> <span class="pl-c1">=</span> <span class="pl-s1">qs</span>.<span class="pl-en">values_lis… | <Binary: 78,565 bytes> | 2021-03-11T14:50:25-08:00 | 2021-03-11T22:50:25+00:00 | 2021-03-11T14:50:25-08:00 | 2021-03-11T22:50:25+00:00 | 2dfba328de3d3ebec6519713a6c970a7 | almost-facet-counts-django-admin |
| django_django-admin-horizontal-scroll.md | django | Usable horizontal scrollbars in the Django admin for mouse users | https://github.com/simonw/til/blob/main/django/django-admin-horizontal-scroll.md | I got a complaint from a Windows-with-mouse user of a Django admin project I'm working on: they couldn't see the right hand columns in a table without scrolling horizontally, but since the horizontal scrollbar was only available at the bottom of the page they had to scroll all the way to the bottom first in order to scroll sideways. As a trackpad user I'm not affected by this, since I can two-finger scroll sideways anywhere on the table. (I've had the same exact complaint about Datasette in the past, so I'm very interested in solutions). Matthew Somerville [on Twitter](https://twitter.com/dracos/status/1384391599476641793) suggested setting the maxmimum height of the table to the height of the window, which would cause the horizontal scrollbar to always be available. Here's the recipe I came up with for doing that for tables in the Django admin: ```html <script> function resizeTable() { /* So Windows mouse users can see the horizontal scrollbar https://github.com/CAVaccineInventory/vial/issues/363 */ if (window.matchMedia('screen and (min-width: 800px)').matches) { let container = document.querySelector("#changelist-form .results"); let paginator = document.querySelector("p.paginator"); if (!container || !paginator) { return; } let height = window.innerHeight - container.getBoundingClientRect().top - paginator.getBoundingClientRect().height - 10; container.style.overflowY = "auto"; container.style.height = height + "px"; } } window.addEventListener("load", resizeTable); </script> ``` I added the `window.matchMedia()` check when I realized that this approach wasn't useful at mobile screen sizes. Here `#changelist-form .results` is a `<div>` that wraps the main table on the page, and `p.paginator` is the pagination links shown directly below the table. I decided to set the vertically scrollable height to `window height - top-of-table - paginator height - 10px`. I added this code to my project's custom `admin/base_site.html` templa… | <p>I got a complaint from a Windows-with-mouse user of a Django admin project I'm working on: they couldn't see the right hand columns in a table without scrolling horizontally, but since the horizontal scrollbar was only available at the bottom of the page they had to scroll all the way to the bottom first in order to scroll sideways.</p> <p>As a trackpad user I'm not affected by this, since I can two-finger scroll sideways anywhere on the table.</p> <p>(I've had the same exact complaint about Datasette in the past, so I'm very interested in solutions).</p> <p>Matthew Somerville <a href="https://twitter.com/dracos/status/1384391599476641793" rel="nofollow">on Twitter</a> suggested setting the maxmimum height of the table to the height of the window, which would cause the horizontal scrollbar to always be available.</p> <p>Here's the recipe I came up with for doing that for tables in the Django admin:</p> <div class="highlight highlight-text-html-basic"><pre><span class="pl-kos"><</span><span class="pl-ent">script</span><span class="pl-kos">></span> <span class="pl-k">function</span> <span class="pl-en">resizeTable</span><span class="pl-kos">(</span><span class="pl-kos">)</span> <span class="pl-kos">{</span> <span class="pl-c">/* So Windows mouse users can see the horizontal scrollbar</span> <span class="pl-c"> https://github.com/CAVaccineInventory/vial/issues/363 */</span> <span class="pl-k">if</span> <span class="pl-kos">(</span><span class="pl-smi">window</span><span class="pl-kos">.</span><span class="pl-en">matchMedia</span><span class="pl-kos">(</span><span class="pl-s">'screen and (min-width: 800px)'</span><span class="pl-kos">)</span><span class="pl-kos">.</span><span class="pl-c1">matches</span><span class="pl-kos">)</span> <span class="pl-kos">{</span> <span class="pl-k">let</span> <span class="pl-s1">container</span> <span class="pl-c1">=</span> <span class="pl-smi">document</span><span class="pl-kos">.</span><span class="pl-en">querySelector</span><span class="pl-kos">(</span><span c… | <Binary: 82,230 bytes> | 2021-04-20T12:06:55-07:00 | 2021-04-20T19:06:55+00:00 | 2021-04-21T09:48:50-07:00 | 2021-04-21T16:48:50+00:00 | a0304657cacaf66cbb241ccaf0671d50 | django-admin-horizontal-scroll |
| django_efficient-bulk-deletions-in-django.md | django | Efficient bulk deletions in Django | https://github.com/simonw/til/blob/main/django/efficient-bulk-deletions-in-django.md | I needed to bulk-delete a large number of objects today. Django deletions are relatively inefficient by default, because Django implements its own version of cascading deletions and fires signals for each deleted object. I knew that I wanted to avoid both of these and run a bulk `DELETE` SQL operation. Django has an undocumented `queryset._raw_delete(db_connection)` method that can do this: ```python reports_qs = Report.objects.filter(public_id__in=report_ids) reports_qs._raw_delete(reports_qs.db) ``` But this failed for me, because my `Report` object has a many-to-many relationship with another table - and those records were not deleted. I could have hand-crafted a PostgreSQL cascading delete here, but I instead decided to manually delete those many-to-many records first. Here's what that looked like: ```python report_availability_tag_qs = ( Report.availability_tags.through.objects.filter( report__public_id__in=report_ids ) ) report_availability_tag_qs._raw_delete(report_availability_tag_qs.db) ``` This didn't quite work either, because I have another model `Location` with foreign key references to those reports. So I added this: ```python Location.objects.filter(latest_report__public_id__in=report_ids).update( latest_report=None ) ``` That combination worked! The Django debug toolbar confirmed that this executed one `UPDATE` followed by two efficient bulk `DELETE` operations. | <p>I needed to bulk-delete a large number of objects today. Django deletions are relatively inefficient by default, because Django implements its own version of cascading deletions and fires signals for each deleted object.</p> <p>I knew that I wanted to avoid both of these and run a bulk <code>DELETE</code> SQL operation.</p> <p>Django has an undocumented <code>queryset._raw_delete(db_connection)</code> method that can do this:</p> <div class="highlight highlight-source-python"><pre><span class="pl-s1">reports_qs</span> <span class="pl-c1">=</span> <span class="pl-v">Report</span>.<span class="pl-s1">objects</span>.<span class="pl-en">filter</span>(<span class="pl-s1">public_id__in</span><span class="pl-c1">=</span><span class="pl-s1">report_ids</span>) <span class="pl-s1">reports_qs</span>.<span class="pl-en">_raw_delete</span>(<span class="pl-s1">reports_qs</span>.<span class="pl-s1">db</span>)</pre></div> <p>But this failed for me, because my <code>Report</code> object has a many-to-many relationship with another table - and those records were not deleted.</p> <p>I could have hand-crafted a PostgreSQL cascading delete here, but I instead decided to manually delete those many-to-many records first. Here's what that looked like:</p> <div class="highlight highlight-source-python"><pre><span class="pl-s1">report_availability_tag_qs</span> <span class="pl-c1">=</span> ( <span class="pl-v">Report</span>.<span class="pl-s1">availability_tags</span>.<span class="pl-s1">through</span>.<span class="pl-s1">objects</span>.<span class="pl-en">filter</span>( <span class="pl-s1">report__public_id__in</span><span class="pl-c1">=</span><span class="pl-s1">report_ids</span> ) ) <span class="pl-s1">report_availability_tag_qs</span>.<span class="pl-en">_raw_delete</span>(<span class="pl-s1">report_availability_tag_qs</span>.<span class="pl-s1">db</span>)</pre></div> <p>This didn't quite work either, because I have another model <code>Location</code> with foreign key references to those reports. So I added this:</… | <Binary: 74,244 bytes> | 2021-04-09T10:58:37-07:00 | 2021-04-09T17:58:37+00:00 | 2022-03-20T21:56:38-07:00 | 2022-03-21T04:56:38+00:00 | 0b7d65f4eb063315a8e8369790c1f432 | efficient-bulk-deletions-in-django |
| django_enabling-gin-index.md | django | Enabling a gin index for faster LIKE queries | https://github.com/simonw/til/blob/main/django/enabling-gin-index.md | I tried using a gin index to speed up `LIKE '%term%'` queries against a column. [PostgreSQL: More performance for LIKE and ILIKE statements](https://www.cybertec-postgresql.com/en/postgresql-more-performance-for-like-and-ilike-statements/) provided useful background. The raw-SQL way to do this is to install the extension like so: ```sql CREATE EXTENSION pg_trgm; ``` And then create an index like this: ```sql CREATE INDEX idx_gin ON mytable USING gin (mycolumn gin_trgm_ops); ``` This translates to two migrations in Django. The first, to enable the extension, looks like this: ```python from django.contrib.postgres.operations import TrigramExtension from django.db import migrations class Migration(migrations.Migration): dependencies = [ ("blog", "0014_entry_custom_template"), ] operations = [TrigramExtension()] ``` Then to configure the index for a model you can add this to the model's `Meta` class: ```python class Entry(models.Model): title = models.CharField(max_length=255) body = models.TextField() class Meta: indexes = [ GinIndex( name="idx_blog_entry_body_gin", fields=["body"], opclasses=["gin_trgm_ops"], ), ] ``` The `opclasses=["gin_trgm_ops"]` line is necessary to have the same efect as the `CREATE INDEX` statement shown above. The `name=` option is required if you specify `opclasses`. Run `./manage.py makemigrations` and Django will automatically create the correct migration to add the new index. I ended up not shipping this for my blog because with less than 10,000 rows in the table it made no difference at all to my query performance. | <p>I tried using a gin index to speed up <code>LIKE '%term%'</code> queries against a column.</p> <p><a href="https://www.cybertec-postgresql.com/en/postgresql-more-performance-for-like-and-ilike-statements/" rel="nofollow">PostgreSQL: More performance for LIKE and ILIKE statements</a> provided useful background. The raw-SQL way to do this is to install the extension like so:</p> <div class="highlight highlight-source-sql"><pre>CREATE EXTENSION pg_trgm;</pre></div> <p>And then create an index like this:</p> <div class="highlight highlight-source-sql"><pre><span class="pl-k">CREATE</span> <span class="pl-k">INDEX</span> <span class="pl-en">idx_gin</span> <span class="pl-k">ON</span> mytable USING gin (mycolumn gin_trgm_ops);</pre></div> <p>This translates to two migrations in Django. The first, to enable the extension, looks like this:</p> <div class="highlight highlight-source-python"><pre><span class="pl-k">from</span> <span class="pl-s1">django</span>.<span class="pl-s1">contrib</span>.<span class="pl-s1">postgres</span>.<span class="pl-s1">operations</span> <span class="pl-k">import</span> <span class="pl-v">TrigramExtension</span> <span class="pl-k">from</span> <span class="pl-s1">django</span>.<span class="pl-s1">db</span> <span class="pl-k">import</span> <span class="pl-s1">migrations</span> <span class="pl-k">class</span> <span class="pl-v">Migration</span>(<span class="pl-s1">migrations</span>.<span class="pl-v">Migration</span>): <span class="pl-s1">dependencies</span> <span class="pl-c1">=</span> [ (<span class="pl-s">"blog"</span>, <span class="pl-s">"0014_entry_custom_template"</span>), ] <span class="pl-s1">operations</span> <span class="pl-c1">=</span> [<span class="pl-v">TrigramExtension</span>()]</pre></div> <p>Then to configure the index for a model you can add this to the model's <code>Meta</code> class:</p> <div class="highlight highlight-source-python"><pre><span class="pl-k">class</span> <span class="pl-v">Entry</span>(<span class="pl-s1">models</span>.<span class="pl-… | <Binary: 62,932 bytes> | 2021-05-16T17:59:05-07:00 | 2021-05-17T00:59:05+00:00 | 2021-05-16T17:59:05-07:00 | 2021-05-17T00:59:05+00:00 | ab4106d1cd70b2fabb2cb63117d18edd | enabling-gin-index |
| django_export-csv-from-django-admin.md | django | Django Admin action for exporting selected rows as CSV | https://github.com/simonw/til/blob/main/django/export-csv-from-django-admin.md | I wanted to add an action option to the Django Admin for exporting the currently selected set of rows (or every row in the table) as a CSV file. I ended up using a pattern inspired by [this Django Snippet](https://djangosnippets.org/snippets/10767/), but with an added touch for more efficient exports. In order to avoid using up too much memory for the export, I use keyset pagination to fetch 500 rows at a time. The `keyset_pagination_iterator()` helper function accepts any queryset, orders it by the primary key and then repeatedly fetches 500 items. It then modifies the queryset to add a `WHERE id > $last_seen_id` clause. This is a relatively inexpensive way to paginate, so having an endpoint perform that query dozens or even hundreds of times should hopefully avoid adding too much load to the database. The action itself uses a pattern that combines `StringIO` and `csv.writer()` to stream out the results as a CSV file. Django's `StreamingHttpResponse` mechanism is really neat: it accepts a Python iterator or generator and returns a streaming response derived from that sequence. The Django documentation says "Streaming responses will tie a worker process for the entire duration of the response. This may result in poor performance" - this particular project runs on Google Cloud Run so I'm less concerned about tying up a worker than I would be normally, plus the export option is only available to trusted staff users with access to the Django Admin interface. To add the CSV export option to a `ModelAdmin` subclass, do the following: ```python from .admin_actions import export_as_csv_action @admin.register(County) class CountyAdmin(admin.ModelAdmin): actions = [export_as_csv_action()] ``` Here's `admin_actions.py`: ```python import csv from io import StringIO from django.http import StreamingHttpResponse def keyset_pagination_iterator(input_queryset, batch_size=500): all_queryset = input_queryset.order_by("pk") last_pk = None while True: queryset = all_queryset if last_pk is … | <p>I wanted to add an action option to the Django Admin for exporting the currently selected set of rows (or every row in the table) as a CSV file.</p> <p>I ended up using a pattern inspired by <a href="https://djangosnippets.org/snippets/10767/" rel="nofollow">this Django Snippet</a>, but with an added touch for more efficient exports. In order to avoid using up too much memory for the export, I use keyset pagination to fetch 500 rows at a time.</p> <p>The <code>keyset_pagination_iterator()</code> helper function accepts any queryset, orders it by the primary key and then repeatedly fetches 500 items. It then modifies the queryset to add a <code>WHERE id > $last_seen_id</code> clause. This is a relatively inexpensive way to paginate, so having an endpoint perform that query dozens or even hundreds of times should hopefully avoid adding too much load to the database.</p> <p>The action itself uses a pattern that combines <code>StringIO</code> and <code>csv.writer()</code> to stream out the results as a CSV file.</p> <p>Django's <code>StreamingHttpResponse</code> mechanism is really neat: it accepts a Python iterator or generator and returns a streaming response derived from that sequence.</p> <p>The Django documentation says "Streaming responses will tie a worker process for the entire duration of the response. This may result in poor performance" - this particular project runs on Google Cloud Run so I'm less concerned about tying up a worker than I would be normally, plus the export option is only available to trusted staff users with access to the Django Admin interface.</p> <p>To add the CSV export option to a <code>ModelAdmin</code> subclass, do the following:</p> <div class="highlight highlight-source-python"><pre><span class="pl-k">from</span> .<span class="pl-s1">admin_actions</span> <span class="pl-k">import</span> <span class="pl-s1">export_as_csv_action</span> <span class="pl-en">@<span class="pl-s1">admin</span>.<span class="pl-en">register</span>(<span class="pl-v">County</span>)</span> <span class… | <Binary: 91,616 bytes> | 2021-04-25T17:38:06-07:00 | 2021-04-26T00:38:06+00:00 | 2021-04-25T17:38:06-07:00 | 2021-04-26T00:38:06+00:00 | da3a8857be8af5bfa07a3e637e9929cc | export-csv-from-django-admin |
| django_extra-read-only-admin-information.md | django | Adding extra read-only information to a Django admin change page | https://github.com/simonw/til/blob/main/django/extra-read-only-admin-information.md | I figured out this pattern today for adding templated extra blocks of information to the Django admin change page for an object. It's really simply and incredibly useful. I can see myself using this a lot in the future. ```python from django.contrib import admin from django.template.loader import render_to_string from django.utils.safestring import mark_safe from .models import Reporter @admin.register(Reporter) class ReporterAdmin(admin.ModelAdmin): # ... readonly_fields = ("recent_calls",) def recent_calls(self, instance): return mark_safe( render_to_string( "admin/_reporter_recent_calls.html", { "reporter": instance, "recent_calls": instance.call_reports.order_by("-created_at")[:20], "call_count": instance.call_reports.count(), }, ) ) ``` That's it! `recent_calls` is marked as a read-only field, then implemented as a method which returns HTML. That method passes the instance to a template using `render_to_string`. That template looks like this: ```html+jinja <h2>{{ reporter }} has made {{ call_count }} call{{ call_count|pluralize }}</h2> <p><strong>Recent calls</strong> (<a href="/admin/core/callreport/?reported_by__exact={{ reporter.id }}">view all</a>)</p> {% for call in recent_calls %} <p><a href="/admin/core/location/{{ call.location.id }}/change/">{{ call.location }}</a> on {{ call.created_at }}</p> {% endfor %} ``` | <p>I figured out this pattern today for adding templated extra blocks of information to the Django admin change page for an object.</p> <p>It's really simply and incredibly useful. I can see myself using this a lot in the future.</p> <div class="highlight highlight-source-python"><pre><span class="pl-k">from</span> <span class="pl-s1">django</span>.<span class="pl-s1">contrib</span> <span class="pl-k">import</span> <span class="pl-s1">admin</span> <span class="pl-k">from</span> <span class="pl-s1">django</span>.<span class="pl-s1">template</span>.<span class="pl-s1">loader</span> <span class="pl-k">import</span> <span class="pl-s1">render_to_string</span> <span class="pl-k">from</span> <span class="pl-s1">django</span>.<span class="pl-s1">utils</span>.<span class="pl-s1">safestring</span> <span class="pl-k">import</span> <span class="pl-s1">mark_safe</span> <span class="pl-k">from</span> .<span class="pl-s1">models</span> <span class="pl-k">import</span> <span class="pl-v">Reporter</span> <span class="pl-en">@<span class="pl-s1">admin</span>.<span class="pl-s1">register</span>(<span class="pl-v">Reporter</span>)</span> <span class="pl-k">class</span> <span class="pl-v">ReporterAdmin</span>(<span class="pl-s1">admin</span>.<span class="pl-v">ModelAdmin</span>): <span class="pl-c"># ...</span> <span class="pl-s1">readonly_fields</span> <span class="pl-c1">=</span> (<span class="pl-s">"recent_calls"</span>,) <span class="pl-k">def</span> <span class="pl-en">recent_calls</span>(<span class="pl-s1">self</span>, <span class="pl-s1">instance</span>): <span class="pl-k">return</span> <span class="pl-en">mark_safe</span>( <span class="pl-en">render_to_string</span>( <span class="pl-s">"admin/_reporter_recent_calls.html"</span>, { <span class="pl-s">"reporter"</span>: <span class="pl-s1">instance</span>, <span class="pl-s">"recent_calls"</span>: <span class="pl-s1">instance</span>.<span class="pl-s1">call_reports</spa… | <Binary: 54,400 bytes> | 2021-02-25T17:49:17-08:00 | 2021-02-26T01:49:17+00:00 | 2021-02-27T12:34:46-08:00 | 2021-02-27T20:34:46+00:00 | 4f6dce09e12d1b504c5bcac65757c888 | extra-read-only-admin-information |
| django_filter-by-comma-separated-values.md | django | Filter by comma-separated values in the Django admin | https://github.com/simonw/til/blob/main/django/filter-by-comma-separated-values.md | I have a text column which contains comma-separated values - inherited from an older database schema. I should refactor this into a many-to-many field (or maybe even a PostgreSQL array field), but I haven't done that yet. And I wanted to be able to filter by those values in the Django admin. Since I'm using PostgreSQL, I decided to figure out how to do this using the PostgreSQL `regexp_split_to_array()` function. There are two necessary SQL queries here: one to figure out all of the unique distinct values that are represented across all of those comma-separated lists, and one to filter for rows that include a specific value. Here's what I came up with for the first: ```sql select distinct unnest( regexp_split_to_array(my_column, ',\s*') ) from my_table ``` This uses `unnest()`, see [this TIL](https://til.simonwillison.net/postgresql/unnest-csv). For filtering down to rows that contain a specific value in their comma-separated list, I figured out this: ```sql select * from my_table where array_position( regexp_split_to_array( my_column, ',\s*' ), 'MyValue' ) is not null ``` That second one, translated into the Django ORM, looks like this: ```python from django.contrib.postgres.fields import ArrayField from django.db.models import F, IntegerField, TextField, Value from django.db.models.expressions import Func queryset.annotate( value_array_position=Func( Func( F(my_column), Value(",\\s*"), function="regexp_split_to_array", output_field=ArrayField(TextField()), ), Value(my_value), function="array_position", output_field=IntegerField() ) ).filter(value_array_position__isnull=False) ``` I didn't bother figuring out the ORM equivalent of that first `unnest()` SQL. Here's the reusable admin filter factory I came up with using these: ```python from django.contrib.admin import SimpleListFilter from django.contrib.postgres.fields import ArrayField from django.db import connection from django… | <p>I have a text column which contains comma-separated values - inherited from an older database schema.</p> <p>I should refactor this into a many-to-many field (or maybe even a PostgreSQL array field), but I haven't done that yet. And I wanted to be able to filter by those values in the Django admin.</p> <p>Since I'm using PostgreSQL, I decided to figure out how to do this using the PostgreSQL <code>regexp_split_to_array()</code> function.</p> <p>There are two necessary SQL queries here: one to figure out all of the unique distinct values that are represented across all of those comma-separated lists, and one to filter for rows that include a specific value.</p> <p>Here's what I came up with for the first:</p> <div class="highlight highlight-source-sql"><pre><span class="pl-k">select distinct</span> unnest( regexp_split_to_array(my_column, <span class="pl-s"><span class="pl-pds">'</span>,<span class="pl-cce">\s</span>*<span class="pl-pds">'</span></span>) ) <span class="pl-k">from</span> my_table</pre></div> <p>This uses <code>unnest()</code>, see <a href="https://til.simonwillison.net/postgresql/unnest-csv" rel="nofollow">this TIL</a>.</p> <p>For filtering down to rows that contain a specific value in their comma-separated list, I figured out this:</p> <div class="highlight highlight-source-sql"><pre><span class="pl-k">select</span> <span class="pl-k">*</span> <span class="pl-k">from</span> my_table <span class="pl-k">where</span> array_position( regexp_split_to_array( my_column, <span class="pl-s"><span class="pl-pds">'</span>,<span class="pl-cce">\s</span>*<span class="pl-pds">'</span></span> ), <span class="pl-s"><span class="pl-pds">'</span>MyValue<span class="pl-pds">'</span></span> ) <span class="pl-k">is not null</span></pre></div> <p>That second one, translated into the Django ORM, looks like this:</p> <div class="highlight highlight-source-python"><pre><span class="pl-k">from</span> <span class="pl-s1">django</span>.<span class="pl-s1">contrib</span>.<span class="pl-s1">post… | <Binary: 69,259 bytes> | 2021-04-21T09:31:55-07:00 | 2021-04-21T16:31:55+00:00 | 2021-04-28T16:23:10-07:00 | 2021-04-28T23:23:10+00:00 | b908bf07608a7730778650f861b6fb75 | filter-by-comma-separated-values |
| django_just-with-django.md | django | Using just with Django | https://github.com/simonw/til/blob/main/django/just-with-django.md | Jeff Triplett [convinced me](https://twitter.com/webology/status/1532860591307726851) to take a look at [just](https://github.com/casey/just) as a command automation tool - sort of an alternative to Make, except with a focus on commands rather than managing build dependencies. I really like it, and I've started using it for my own Django projects. ## Installing with Homebrew Installing just on my Mac was easy: brew install just The tool is written in Rust and provides binaries for basically everything - there are [plenty more ways](https://github.com/casey/just/blob/master/README.md#installation) to install it. ## Writing a Justfile The `Justfile` defines which commands `just` makes available. When you run `just` it looks for a `Justfile` in the current or any parent directory. Commands in that file are run as if the working directory was the directory containing the `Justfile`. Here's the file I've built so far for my current Django project. The project already uses `pipenv` and has some slightly convoluted environment requirements - just is a perfect tool for patching over those so I don't have to think about them any more. I added some comments to help explain what's going on: ``` # Using export here causes this DATABASE_URL to be made available as an # environment variable for any command run by Just export DATABASE_URL := "postgresql://localhost/myproject" # The first command is the default if you run "just" with no options. # I used *options to allow this to accept options, which means I can run: # # just test -k auth --pdb # # To pass the "-k auth --pdb" options to pytest @test *options: pipenv run pytest {{options}} # This starts the Django development server with an extra environment variable # I also print out a URL to the console so I can click on it without # remembering which extra item I configured in /etc/hosts for this project @server: echo "Starting http://myapp.local:8000/" DJANGO_SETTINGS_MODULE="config.localhost" pipenv run ./manage.py runserver # I added this so I… | <p>Jeff Triplett <a href="https://twitter.com/webology/status/1532860591307726851" rel="nofollow">convinced me</a> to take a look at <a href="https://github.com/casey/just">just</a> as a command automation tool - sort of an alternative to Make, except with a focus on commands rather than managing build dependencies.</p> <p>I really like it, and I've started using it for my own Django projects.</p> <h2> <a id="user-content-installing-with-homebrew" class="anchor" href="#installing-with-homebrew" aria-hidden="true"><span aria-hidden="true" class="octicon octicon-link"></span></a>Installing with Homebrew</h2> <p>Installing just on my Mac was easy:</p> <pre><code>brew install just </code></pre> <p>The tool is written in Rust and provides binaries for basically everything - there are <a href="https://github.com/casey/just/blob/master/README.md#installation">plenty more ways</a> to install it.</p> <h2> <a id="user-content-writing-a-justfile" class="anchor" href="#writing-a-justfile" aria-hidden="true"><span aria-hidden="true" class="octicon octicon-link"></span></a>Writing a Justfile</h2> <p>The <code>Justfile</code> defines which commands <code>just</code> makes available. When you run <code>just</code> it looks for a <code>Justfile</code> in the current or any parent directory.</p> <p>Commands in that file are run as if the working directory was the directory containing the <code>Justfile</code>.</p> <p>Here's the file I've built so far for my current Django project. The project already uses <code>pipenv</code> and has some slightly convoluted environment requirements - just is a perfect tool for patching over those so I don't have to think about them any more.</p> <p>I added some comments to help explain what's going on:</p> <pre><code># Using export here causes this DATABASE_URL to be made available as an # environment variable for any command run by Just export DATABASE_URL := "postgresql://localhost/myproject" # The first command is the default if you run "just" with no options. # I used *options to allow this t… | <Binary: 55,591 bytes> | 2022-06-06T14:24:37-07:00 | 2022-06-06T21:24:37+00:00 | 2022-06-06T14:24:37-07:00 | 2022-06-06T21:24:37+00:00 | 27d773c9510b97c00f6ed94bbc061e52 | just-with-django |
| django_migration-postgresql-fuzzystrmatch.md | django | Enabling the fuzzystrmatch extension in PostgreSQL with a Django migration | https://github.com/simonw/til/blob/main/django/migration-postgresql-fuzzystrmatch.md | The PostgreSQL [fuzzystrmatch extension](https://www.postgresql.org/docs/13/fuzzystrmatch.html) enables several functions for fuzzy string matching: `soundex()`, `difference()`, `levenshtein()`, `levenshtein_less_equal()`, `metaphone()`, `dmetaphone()` and `dmetaphone_alt()`. Enabling them for use with Django turns out to be really easy - it just takes a migration that looks something like this: ```python from django.contrib.postgres.operations import CreateExtension from django.db import migrations class Migration(migrations.Migration): dependencies = [ ("core", "0089_importrun_sourcelocation"), ] operations = [ CreateExtension(name="fuzzystrmatch"), ] ``` | <p>The PostgreSQL <a href="https://www.postgresql.org/docs/13/fuzzystrmatch.html" rel="nofollow">fuzzystrmatch extension</a> enables several functions for fuzzy string matching: <code>soundex()</code>, <code>difference()</code>, <code>levenshtein()</code>, <code>levenshtein_less_equal()</code>, <code>metaphone()</code>, <code>dmetaphone()</code> and <code>dmetaphone_alt()</code>.</p> <p>Enabling them for use with Django turns out to be really easy - it just takes a migration that looks something like this:</p> <div class="highlight highlight-source-python"><pre><span class="pl-k">from</span> <span class="pl-s1">django</span>.<span class="pl-s1">contrib</span>.<span class="pl-s1">postgres</span>.<span class="pl-s1">operations</span> <span class="pl-k">import</span> <span class="pl-v">CreateExtension</span> <span class="pl-k">from</span> <span class="pl-s1">django</span>.<span class="pl-s1">db</span> <span class="pl-k">import</span> <span class="pl-s1">migrations</span> <span class="pl-k">class</span> <span class="pl-v">Migration</span>(<span class="pl-s1">migrations</span>.<span class="pl-v">Migration</span>): <span class="pl-s1">dependencies</span> <span class="pl-c1">=</span> [ (<span class="pl-s">"core"</span>, <span class="pl-s">"0089_importrun_sourcelocation"</span>), ] <span class="pl-s1">operations</span> <span class="pl-c1">=</span> [ <span class="pl-v">CreateExtension</span>(<span class="pl-s1">name</span><span class="pl-c1">=</span><span class="pl-s">"fuzzystrmatch"</span>), ]</pre></div> | <Binary: 58,747 bytes> | 2021-04-18T12:32:58-07:00 | 2021-04-18T19:32:58+00:00 | 2021-04-18T12:32:58-07:00 | 2021-04-18T19:32:58+00:00 | a95d79750b014c729ca6aca5db4665ee | migration-postgresql-fuzzystrmatch |
| django_migration-using-cte.md | django | Django data migration using a PostgreSQL CTE | https://github.com/simonw/til/blob/main/django/migration-using-cte.md | I figured out how to use a PostgreSQL CTE as part of an update statement in a Django data migration. The trick here is mainly understanding how to combine CTEs with a PostgreSQL update - here's the pattern for that: ```sql with something as ( select id, created_at from ... ) update mytable set created_at = something.created_at from something where mytable.id = something.id ``` Here's the full migration I wrote: ```python from django.db import migrations SQL = """ with created_at_by_reversion as ( select location.id as id, min(date_created) as created_at from location join reversion_version on (location.id = reversion_version.object_id::integer and reversion_version.content_type_id = 18) join reversion_revision on reversion_revision.id = reversion_version.revision_id group by location.id ), created_at_by_source_location as ( select location.id as id, min(source_location.created_at) as created_at from source_location join location on source_location.matched_location_id = location.id group by location.id ), new_created_at_for_locations as ( select location.id, created_at_by_reversion.created_at as created_at_by_reversion, created_at_by_source_location.created_at as created_at_by_source_location, coalesce(created_at_by_reversion.created_at, created_at_by_source_location.created_at) as new_created_at from location left join created_at_by_source_location on created_at_by_source_location.id = location.id left join created_at_by_reversion on created_at_by_reversion.id = location.id ) update location set created_at = new_created_at_for_locations.new_created_at from new_created_at_for_locations where location.id = new_created_at_for_locations.id """ class Migration(migrations.Migration): dependencies = [ ("core", "0132_location_created_at_created_by"), ] operations = [ migrations.RunSQL( sql=SQL, reverse_sql=migrations.RunSQL.noop, ), ] ``` | <p>I figured out how to use a PostgreSQL CTE as part of an update statement in a Django data migration. The trick here is mainly understanding how to combine CTEs with a PostgreSQL update - here's the pattern for that:</p> <div class="highlight highlight-source-sql"><pre>with something <span class="pl-k">as</span> ( <span class="pl-k">select</span> id, created_at <span class="pl-k">from</span> ... ) <span class="pl-k">update</span> mytable <span class="pl-k">set</span> created_at <span class="pl-k">=</span> <span class="pl-c1">something</span>.<span class="pl-c1">created_at</span> <span class="pl-k">from</span> something <span class="pl-k">where</span> <span class="pl-c1">mytable</span>.<span class="pl-c1">id</span> <span class="pl-k">=</span> <span class="pl-c1">something</span>.<span class="pl-c1">id</span></pre></div> <p>Here's the full migration I wrote:</p> <div class="highlight highlight-source-python"><pre><span class="pl-k">from</span> <span class="pl-s1">django</span>.<span class="pl-s1">db</span> <span class="pl-k">import</span> <span class="pl-s1">migrations</span> <span class="pl-v">SQL</span> <span class="pl-c1">=</span> <span class="pl-s">"""</span> <span class="pl-s">with created_at_by_reversion as (</span> <span class="pl-s"> select</span> <span class="pl-s"> location.id as id, min(date_created) as created_at</span> <span class="pl-s"> from location</span> <span class="pl-s"> join reversion_version on (location.id = reversion_version.object_id::integer and reversion_version.content_type_id = 18)</span> <span class="pl-s"> join reversion_revision on reversion_revision.id = reversion_version.revision_id</span> <span class="pl-s"> group by location.id</span> <span class="pl-s">),</span> <span class="pl-s">created_at_by_source_location as (</span> <span class="pl-s"> select</span> <span class="pl-s"> location.id as id, min(source_location.created_at) as created_at</span> <span class="pl-s"> from source_location</span> <span class="pl-s"> join location on source… | <Binary: 48,166 bytes> | 2021-05-17T17:04:29-07:00 | 2021-05-18T00:04:29+00:00 | 2021-05-17T17:04:29-07:00 | 2021-05-18T00:04:29+00:00 | 4f4a982442ef5d9b9bb40127c0d7949e | migration-using-cte |
| django_migrations-runsql-noop.md | django | migrations.RunSQL.noop for reversible SQL migrations | https://github.com/simonw/til/blob/main/django/migrations-runsql-noop.md | `migrations.RunSQL.noop` provides an easy way to create "reversible" Django SQL migrations, where the reverse operation does nothing (but keeps it possible to reverse back to a previous migration state without being blocked by an irreversible migration). ```python from django.db import migrations class Migration(migrations.Migration): dependencies = [ ("app", "0114_last_migration"), ] operations = [ migrations.RunSQL( sql=""" update concordance_identifier set authority = replace(authority, ':', '_') where authority like '%:%' """, reverse_sql=migrations.RunSQL.noop, ) ] ``` | <p><code>migrations.RunSQL.noop</code> provides an easy way to create "reversible" Django SQL migrations, where the reverse operation does nothing (but keeps it possible to reverse back to a previous migration state without being blocked by an irreversible migration).</p> <div class="highlight highlight-source-python"><pre><span class="pl-k">from</span> <span class="pl-s1">django</span>.<span class="pl-s1">db</span> <span class="pl-k">import</span> <span class="pl-s1">migrations</span> <span class="pl-k">class</span> <span class="pl-v">Migration</span>(<span class="pl-s1">migrations</span>.<span class="pl-v">Migration</span>): <span class="pl-s1">dependencies</span> <span class="pl-c1">=</span> [ (<span class="pl-s">"app"</span>, <span class="pl-s">"0114_last_migration"</span>), ] <span class="pl-s1">operations</span> <span class="pl-c1">=</span> [ <span class="pl-s1">migrations</span>.<span class="pl-v">RunSQL</span>( <span class="pl-s1">sql</span><span class="pl-c1">=</span><span class="pl-s">"""</span> <span class="pl-s"> update concordance_identifier</span> <span class="pl-s"> set authority = replace(authority, ':', '_')</span> <span class="pl-s"> where authority like '%:%'</span> <span class="pl-s"> """</span>, <span class="pl-s1">reverse_sql</span><span class="pl-c1">=</span><span class="pl-s1">migrations</span>.<span class="pl-v">RunSQL</span>.<span class="pl-s1">noop</span>, ) ]</pre></div> | <Binary: 51,466 bytes> | 2021-05-02T10:48:46-07:00 | 2021-05-02T17:48:46+00:00 | 2021-05-02T10:48:46-07:00 | 2021-05-02T17:48:46+00:00 | 03f66f89626893e5a1a0374109ec84e8 | migrations-runsql-noop |
| django_postgresql-full-text-search-admin.md | django | PostgreSQL full-text search in the Django Admin | https://github.com/simonw/til/blob/main/django/postgresql-full-text-search-admin.md | Django 3.1 introduces PostgreSQL `search_type="websearch"` - which gives you search with advanced operators like `"phrase search" -excluding`. James Turk [wrote about this here](https://jamesturk.net/posts/websearch-in-django-31/), and it's also in [my weeknotes](https://simonwillison.net/2020/Jul/23/datasette-copyable-datasette-insert-api/). I decided to add it to my Django Admin interface. It was _really easy_ using the `get_search_results()` model admin method, [documented here](https://docs.djangoproject.com/en/3.0/ref/contrib/admin/#django.contrib.admin.ModelAdmin.get_search_results). My models already have a `search_document` full-text search column, as described in [Implementing faceted search with Django and PostgreSQL](https://simonwillison.net/2017/Oct/5/django-postgresql-faceted-search/). So all I needed to add to my `ModelAdmin` subclasses was this: ```python def get_search_results(self, request, queryset, search_term): if not search_term: return super().get_search_results( request, queryset, search_term ) query = SearchQuery(search_term, search_type="websearch") rank = SearchRank(F("search_document"), query) queryset = ( queryset .annotate(rank=rank) .filter(search_document=query) .order_by("-rank") ) return queryset, False ``` Here's [the full implementation](https://github.com/simonw/simonwillisonblog/blob/6c0de9f9976ef831fe92106be662d77dfe80b32a/blog/admin.py) for my personal blog. | <p>Django 3.1 introduces PostgreSQL <code>search_type="websearch"</code> - which gives you search with advanced operators like <code>"phrase search" -excluding</code>. James Turk <a href="https://jamesturk.net/posts/websearch-in-django-31/" rel="nofollow">wrote about this here</a>, and it's also in <a href="https://simonwillison.net/2020/Jul/23/datasette-copyable-datasette-insert-api/" rel="nofollow">my weeknotes</a>.</p> <p>I decided to add it to my Django Admin interface. It was <em>really easy</em> using the <code>get_search_results()</code> model admin method, <a href="https://docs.djangoproject.com/en/3.0/ref/contrib/admin/#django.contrib.admin.ModelAdmin.get_search_results" rel="nofollow">documented here</a>.</p> <p>My models already have a <code>search_document</code> full-text search column, as described in <a href="https://simonwillison.net/2017/Oct/5/django-postgresql-faceted-search/" rel="nofollow">Implementing faceted search with Django and PostgreSQL</a>. So all I needed to add to my <code>ModelAdmin</code> subclasses was this:</p> <div class="highlight highlight-source-python"><pre> <span class="pl-k">def</span> <span class="pl-en">get_search_results</span>(<span class="pl-s1">self</span>, <span class="pl-s1">request</span>, <span class="pl-s1">queryset</span>, <span class="pl-s1">search_term</span>): <span class="pl-k">if</span> <span class="pl-c1">not</span> <span class="pl-s1">search_term</span>: <span class="pl-k">return</span> <span class="pl-en">super</span>().<span class="pl-en">get_search_results</span>( <span class="pl-s1">request</span>, <span class="pl-s1">queryset</span>, <span class="pl-s1">search_term</span> ) <span class="pl-s1">query</span> <span class="pl-c1">=</span> <span class="pl-v">SearchQuery</span>(<span class="pl-s1">search_term</span>, <span class="pl-s1">search_type</span><span class="pl-c1">=</span><span class="pl-s">"websearch"</span>) <span class="pl-s1">rank</span> <span class="pl-c1">=</span> <span cla… | <Binary: 81,294 bytes> | 2020-07-25T15:36:17-07:00 | 2020-07-25T22:36:17+00:00 | 2020-07-25T15:36:17-07:00 | 2020-07-25T22:36:17+00:00 | 8239440a6854c5c8b57e7d7f3ca75098 | postgresql-full-text-search-admin |
| django_pretty-print-json-admin.md | django | Pretty-printing all read-only JSON in the Django admin | https://github.com/simonw/til/blob/main/django/pretty-print-json-admin.md | I have a bunch of models with JSON fields that are marked as read-only in the Django admin - usually because they're recording the raw JSON that was imported from an API somewhere to create an object, for debugging purposes. Here's a pattern I found for pretty-printing ANY JSON value that is displayed in a read-only field in the admin. Create a template called `admin/change_form.html` and populate it with the following: ```html+django {% extends "admin/change_form.html" %} {% block admin_change_form_document_ready %} {{ block.super }} <script> Array.from(document.querySelectorAll('div.readonly')).forEach(div => { let data; try { data = JSON.parse(div.innerText); } catch { // Not valid JSON return; } div.style.whiteSpace = 'pre-wrap'; div.style.fontFamily = 'courier'; div.style.fontSize = '0.9em'; div.innerText = JSON.stringify(data, null, 2); }); </script> {% endblock %} ``` This JavaScript will execute on every Django change form page, scanning for `div.readonly`, checking to see if the div contains a valid JSON value and pretty-printing it using JavaScript if it does. It's a cheap hack and it works great. | <p>I have a bunch of models with JSON fields that are marked as read-only in the Django admin - usually because they're recording the raw JSON that was imported from an API somewhere to create an object, for debugging purposes.</p> <p>Here's a pattern I found for pretty-printing ANY JSON value that is displayed in a read-only field in the admin. Create a template called <code>admin/change_form.html</code> and populate it with the following:</p> <div class="highlight highlight-text-html-django"><pre><span class="pl-e">{%</span> <span class="pl-k">extends</span> <span class="pl-s">"admin/change_form.html"</span> <span class="pl-e">%}</span> <span class="pl-e">{%</span> <span class="pl-k">block</span> <span class="pl-s">admin_change_form_document_ready</span> <span class="pl-e">%}</span> {{ block.super }} <<span class="pl-ent">script</span>><span class="pl-s1"></span> <span class="pl-s1"><span class="pl-c1">Array</span>.<span class="pl-en">from</span>(<span class="pl-c1">document</span>.<span class="pl-c1">querySelectorAll</span>(<span class="pl-s"><span class="pl-pds">'</span>div.readonly<span class="pl-pds">'</span></span>)).<span class="pl-c1">forEach</span>(<span class="pl-smi">div</span> <span class="pl-k">=></span> {</span> <span class="pl-s1"> <span class="pl-k">let</span> data;</span> <span class="pl-s1"> <span class="pl-k">try</span> {</span> <span class="pl-s1"> data <span class="pl-k">=</span> <span class="pl-c1">JSON</span>.<span class="pl-c1">parse</span>(<span class="pl-smi">div</span>.<span class="pl-smi">innerText</span>);</span> <span class="pl-s1"> } <span class="pl-k">catch</span> {</span> <span class="pl-s1"> <span class="pl-c"><span class="pl-c">//</span> Not valid JSON</span></span> <span class="pl-s1"> <span class="pl-k">return</span>;</span> <span class="pl-s1"> }</span> <span class="pl-s1"> <span class="pl-smi">div</span>.<span class="pl-c1">style</span>.<span class="pl-c1">whiteSpace</span> <span class="pl-k">=</span> <span class="pl-s"><span cla… | <Binary: 73,754 bytes> | 2021-03-07T23:02:09-08:00 | 2021-03-08T07:02:09+00:00 | 2021-03-07T23:02:09-08:00 | 2021-03-08T07:02:09+00:00 | 1d4911dda034b51c8bcb108131578df4 | pretty-print-json-admin |
| django_show-timezone-in-django-admin.md | django | Show the timezone for datetimes in the Django admin | https://github.com/simonw/til/blob/main/django/show-timezone-in-django-admin.md | Django supports storing dates in a database as UTC but displaying them in some other timezone - which is good. But... by default datetimes are shown in the Django admin interface without any clue as to what timezone they are being displayed in. This is really confusing. A time may be stored as UTC in the database but in the admin interface it's displaying in PST, without any visual indication as to what is going on. I found a pattern today for improving this. You can use `django.conf.locale.en.formats` to specify a custom date format for a specific locale (thanks, [Stack Overflow](https://stackoverflow.com/a/32355642)). Then you can use the `e` date format option to include a string indicating the timezone that is being displayed, as [documented here](https://docs.djangoproject.com/en/3.1/ref/templates/builtins/#date). In `settings.py` do this: ```python from django.conf.locale.en import formats as en_formats en_formats.DATETIME_FORMAT = "jS M Y fA e" ``` I added a middleware to force the displayed timezone for every page on my site to `America/Los_Angeles` like so: ```python from django.utils import timezone import pytz class TimezoneMiddleware: def __init__(self, get_response): self.get_response = get_response def __call__(self, request): timezone.activate(pytz.timezone("America/Los_Angeles")) return self.get_response(request) ``` I put this in a file called `core/timezone_middleware.py` and added it to my `MIDDLEWARE` setting in `settings.py` like so: ``` MIDDLEWARE = [ # ... "core.timezone_middleware.TimezoneMiddleware", ] ``` Now datetimes show up in my admin interface looking like this, with a `PST` suffix: <img width="593" alt="Select_report_to_change___Django_site_admin" src="https://user-images.githubusercontent.com/9599/109755937-c4fd1600-7b9b-11eb-9c65-f84bbb84ed21.png"> ## Showing UTC too I decided I'd like to see the UTC time too, just to help me truly understand what had been stored. I did that by adding the following method to my Django model clas… | <p>Django supports storing dates in a database as UTC but displaying them in some other timezone - which is good. But... by default datetimes are shown in the Django admin interface without any clue as to what timezone they are being displayed in.</p> <p>This is really confusing. A time may be stored as UTC in the database but in the admin interface it's displaying in PST, without any visual indication as to what is going on.</p> <p>I found a pattern today for improving this. You can use <code>django.conf.locale.en.formats</code> to specify a custom date format for a specific locale (thanks, <a href="https://stackoverflow.com/a/32355642" rel="nofollow">Stack Overflow</a>). Then you can use the <code>e</code> date format option to include a string indicating the timezone that is being displayed, as <a href="https://docs.djangoproject.com/en/3.1/ref/templates/builtins/#date" rel="nofollow">documented here</a>.</p> <p>In <code>settings.py</code> do this:</p> <div class="highlight highlight-source-python"><pre><span class="pl-k">from</span> <span class="pl-s1">django</span>.<span class="pl-s1">conf</span>.<span class="pl-s1">locale</span>.<span class="pl-s1">en</span> <span class="pl-k">import</span> <span class="pl-s1">formats</span> <span class="pl-k">as</span> <span class="pl-s1">en_formats</span> <span class="pl-s1">en_formats</span>.<span class="pl-v">DATETIME_FORMAT</span> <span class="pl-c1">=</span> <span class="pl-s">"jS M Y fA e"</span></pre></div> <p>I added a middleware to force the displayed timezone for every page on my site to <code>America/Los_Angeles</code> like so:</p> <div class="highlight highlight-source-python"><pre><span class="pl-k">from</span> <span class="pl-s1">django</span>.<span class="pl-s1">utils</span> <span class="pl-k">import</span> <span class="pl-s1">timezone</span> <span class="pl-k">import</span> <span class="pl-s1">pytz</span> <span class="pl-k">class</span> <span class="pl-v">TimezoneMiddleware</span>: <span class="pl-k">def</span> <span class="pl-en">__init__</span>(<spa… | <Binary: 83,093 bytes> | 2021-03-02T21:17:45-08:00 | 2021-03-03T05:17:45+00:00 | 2021-03-02T21:17:45-08:00 | 2021-03-03T05:17:45+00:00 | 76244473ec3e74804200af70034ecce8 | show-timezone-in-django-admin |
| django_testing-django-admin-with-pytest.md | django | Writing tests for the Django admin with pytest-django | https://github.com/simonw/til/blob/main/django/testing-django-admin-with-pytest.md | I'm using [pytest-django](https://pytest-django.readthedocs.io/) on a project and I wanted to write a test for a Django admin create form submission. Here's the pattern I came up with: ```python from .models import Location import pytest def test_admin_create_location_sets_public_id(client, admin_user): client.force_login(admin_user) assert Location.objects.count() == 0 response = client.post( "/admin/core/location/add/", { "name": "hello", "state": "13", "location_type": "1", "latitude": "0", "longitude": "0", "_save": "Save", }, ) # 200 means the form is being re-displayed with errors assert response.status_code == 302 location = Location.objects.order_by("-id")[0] assert location.name == "hello" assert location.public_id == "lc" ``` The trick here is to use the `client` and `admin_user` pytest-django fixtures ([documented here](https://pytest-django.readthedocs.io/en/latest/helpers.html#fixtures)) to get a configured test client and admin user object, then use `client.force_login(admin_user)` to obtain a session where that user is signed-in to the admin. Then write tests as normal. ## Using the admin_client fixture Even better: use the `admin_client` fixture provided by `pytest-django ` which is already signed into the admin: ```python def test_admin_create_location_sets_public_id(admin_client): response = admin_client.post( "/admin/core/location/add/", # ... ``` Before finding out that this was included I implemented my own version of it: ```python import pytest @pytest.fixture() def admin_client(client, admin_user): client.force_login(admin_user) return client # Then write tests like this: def test_admin_create_location_sets_public_id(admin_client): response = admin_client.post( "/admin/core/location/add/", # ... ``` | <p>I'm using <a href="https://pytest-django.readthedocs.io/" rel="nofollow">pytest-django</a> on a project and I wanted to write a test for a Django admin create form submission. Here's the pattern I came up with:</p> <div class="highlight highlight-source-python"><pre><span class="pl-k">from</span> .<span class="pl-s1">models</span> <span class="pl-k">import</span> <span class="pl-v">Location</span> <span class="pl-k">import</span> <span class="pl-s1">pytest</span> <span class="pl-k">def</span> <span class="pl-en">test_admin_create_location_sets_public_id</span>(<span class="pl-s1">client</span>, <span class="pl-s1">admin_user</span>): <span class="pl-s1">client</span>.<span class="pl-en">force_login</span>(<span class="pl-s1">admin_user</span>) <span class="pl-k">assert</span> <span class="pl-v">Location</span>.<span class="pl-s1">objects</span>.<span class="pl-en">count</span>() <span class="pl-c1">==</span> <span class="pl-c1">0</span> <span class="pl-s1">response</span> <span class="pl-c1">=</span> <span class="pl-s1">client</span>.<span class="pl-en">post</span>( <span class="pl-s">"/admin/core/location/add/"</span>, { <span class="pl-s">"name"</span>: <span class="pl-s">"hello"</span>, <span class="pl-s">"state"</span>: <span class="pl-s">"13"</span>, <span class="pl-s">"location_type"</span>: <span class="pl-s">"1"</span>, <span class="pl-s">"latitude"</span>: <span class="pl-s">"0"</span>, <span class="pl-s">"longitude"</span>: <span class="pl-s">"0"</span>, <span class="pl-s">"_save"</span>: <span class="pl-s">"Save"</span>, }, ) <span class="pl-c"># 200 means the form is being re-displayed with errors</span> <span class="pl-k">assert</span> <span class="pl-s1">response</span>.<span class="pl-s1">status_code</span> <span class="pl-c1">==</span> <span class="pl-c1">302</span> <span class="pl-s1">location</span> <span class="pl-c1">=</span> <span class="pl-v">Location</span>.<span … | <Binary: 51,138 bytes> | 2021-03-02T13:08:34-08:00 | 2021-03-02T21:08:34+00:00 | 2021-03-02T23:37:18-08:00 | 2021-03-03T07:37:18+00:00 | 9b8d9be51081f4bffc50faf2d80e3d9e | testing-django-admin-with-pytest |
| docker_attach-bash-to-running-container.md | docker | Attaching a bash shell to a running Docker container | https://github.com/simonw/til/blob/main/docker/attach-bash-to-running-container.md | Use `docker ps` to find the container ID: $ docker ps CONTAINER ID IMAGE COMMAND CREATED STATUS PORTS NAMES 81b2ad3194cb alexdebrie/livegrep-base:1 "/livegrep-github-re…" 2 minutes ago Up 2 minutes compassionate_yalow Run `docker exec -it ID bash` to start a bash session in that container: $ docker exec -it 81b2ad3194cb bash I made the mistake of using `docker attach 81b2ad3194cb` first, which attaches you to the command running as CMD in that conatiner, and means that if you hit `Ctrl+C` you exit that command and terminate the container! | <p>Use <code>docker ps</code> to find the container ID:</p> <pre><code>$ docker ps CONTAINER ID IMAGE COMMAND CREATED STATUS PORTS NAMES 81b2ad3194cb alexdebrie/livegrep-base:1 "/livegrep-github-re…" 2 minutes ago Up 2 minutes compassionate_yalow </code></pre> <p>Run <code>docker exec -it ID bash</code> to start a bash session in that container:</p> <pre><code>$ docker exec -it 81b2ad3194cb bash </code></pre> <p>I made the mistake of using <code>docker attach 81b2ad3194cb</code> first, which attaches you to the command running as CMD in that conatiner, and means that if you hit <code>Ctrl+C</code> you exit that command and terminate the container!</p> | <Binary: 61,636 bytes> | 2020-08-10T08:41:01-07:00 | 2020-08-10T15:41:01+00:00 | 2020-08-10T08:41:01-07:00 | 2020-08-10T15:41:01+00:00 | 2bd34a112abf7858d6a88c4da46c3bda | attach-bash-to-running-container |
| docker_debian-unstable-packages.md | docker | Installing packages from Debian unstable in a Docker image based on stable | https://github.com/simonw/til/blob/main/docker/debian-unstable-packages.md | For [Datasette #1249](https://github.com/simonw/datasette/issues/1249) I wanted to build a Docker image from the `python:3.9.2-slim-buster` base image ("buster" is the current stable release of Debian) but include a single package from "sid", the unstable Debian distribution. I needed to do this because the latest version of SpatiaLite, version 5, was available in `sid` but not in `buster` (which only has 4.3.0a): https://packages.debian.org/search?keywords=spatialite <img width="923" alt="Package libsqlite3-mod-spatialite stretch (oldstable) (libs): Geospatial extension for SQLite - loadable module 4.3.0a-5+b1: amd64 arm64 armel armhf i386 mips mips64el mipsel ppc64el s390x buster (stable) (libs): Geospatial extension for SQLite - loadable module 4.3.0a-5+b2: amd64 arm64 armel armhf i386 mips mips64el mipsel ppc64el s390x bullseye (testing) (libs): Geospatial extension for SQLite - loadable module 5.0.1-2: amd64 arm64 armel armhf i386 mips64el mipsel ppc64el s390x sid (unstable) (libs): Geospatial extension for SQLite - loadable module 5.0.1-2: alpha amd64 arm64 armel armhf hppa i386 m68k mips64el mipsel ppc64 ppc64el riscv64 s390x sh4 sparc64 x32 experimental (libs): Geospatial extension for SQLite - loadable module 5.0.0~beta0-1~exp2 [debports]: powerpcspe" src="https://user-images.githubusercontent.com/9599/112061886-5cf77b00-8b1c-11eb-8f4c-91dce388dc33.png"> The recipe that ended up working for me was to install `software-properties-common` to get the `apt-get-repository` command, then use that to install a package from `sid`: ```dockerfile RUN apt-get update && \ apt-get -y --no-install-recommends install software-properties-common && \ add-apt-repository "deb http://httpredir.debian.org/debian sid main" && \ apt-get update && \ apt-get -t sid install -y --no-install-recommends libsqlite3-mod-spatialite ``` Here's the full Dockerfile I used: ```dockerfile FROM python:3.9.2-slim-buster as build # software… | <p>For <a href="https://github.com/simonw/datasette/issues/1249">Datasette #1249</a> I wanted to build a Docker image from the <code>python:3.9.2-slim-buster</code> base image ("buster" is the current stable release of Debian) but include a single package from "sid", the unstable Debian distribution.</p> <p>I needed to do this because the latest version of SpatiaLite, version 5, was available in <code>sid</code> but not in <code>buster</code> (which only has 4.3.0a):</p> <p><a href="https://packages.debian.org/search?keywords=spatialite" rel="nofollow">https://packages.debian.org/search?keywords=spatialite</a></p> <p><a href="https://user-images.githubusercontent.com/9599/112061886-5cf77b00-8b1c-11eb-8f4c-91dce388dc33.png" target="_blank" rel="nofollow"><img width="923" alt="Package libsqlite3-mod-spatialite stretch (oldstable) (libs): Geospatial extension for SQLite - loadable module 4.3.0a-5+b1: amd64 arm64 armel armhf i386 mips mips64el mipsel ppc64el s390x buster (stable) (libs): Geospatial extension for SQLite - loadable module 4.3.0a-5+b2: amd64 arm64 armel armhf i386 mips mips64el mipsel ppc64el s390x bullseye (testing) (libs): Geospatial extension for SQLite - loadable module 5.0.1-2: amd64 arm64 armel armhf i386 mips64el mipsel ppc64el s390x sid (unstable) (libs): Geospatial extension for SQLite - loadable module 5.0.1-2: alpha amd64 arm64 armel armhf hppa i386 m68k mips64el mipsel ppc64 ppc64el riscv64 s390x sh4 sparc64 x32 experimental (libs): Geospatial extension for SQLite - loadable module 5.0.0~beta0-1~exp2 [debports]: powerpcspe" src="https://user-images.githubusercontent.com/9599/112061886-5cf77b00-8b1c-11eb-8f4c-91dce388dc33.png" style="max-width:100%;"></a></p> <p>The recipe that ended up working for me was to install <code>software-properties-common</code> to get the <code>apt-get-repository</code> command, then use that to install a package from <code>sid</code>:</p> <div class="highlight highlight-source-dockerfile"><pre><span class="pl-k">RUN</span> apt-… | <Binary: 88,963 bytes> | 2021-03-22T14:42:43-07:00 | 2021-03-22T21:42:43+00:00 | 2021-03-22T14:42:43-07:00 | 2021-03-22T21:42:43+00:00 | 1fb78a85967e7d8fb6cab2c7bb53b67f | debian-unstable-packages |
| docker_docker-compose-for-django-development.md | docker | Docker Compose for Django development | https://github.com/simonw/til/blob/main/docker/docker-compose-for-django-development.md | I had to get Docker Compose working for a Django project, primarily to make it easier for other developers to get a working development environment. Some features of this project: - Uses GeoDjango, so needs GDAL etc for the Django app plus a PostgreSQL server running PostGIS - Already has a `Dockerfile` used for the production deployment, but needed a separate one for the development environment - Makes extensive use of Django migrations (over 100 and counting) I ended up with this `docker-compose.yml` file in the root of the project: ```yaml version: "3.1" volumes: postgresql-data: services: database: image: postgis/postgis:13-3.1 restart: always expose: - "5432" ports: - "5432:5432" volumes: - postgresql-data:/var/lib/postgresql/data environment: POSTGRES_USER: postgres POSTGRES_DB: mydb POSTGRES_PASSWORD: postgres web: container_name: myapp platform: linux/amd64 build: context: . dockerfile: Dockerfile.dev command: python manage.py runserver 0.0.0.0:3000 environment: DATABASE_URL: postgres://postgres:postgres@database:5432/mydb DEBUG: 1 volumes: - .:/app ports: - "3000:3000" depends_on: - migrations - database migrations: platform: linux/amd64 build: context: . dockerfile: Dockerfile.dev command: python manage.py migrate --noinput environment: DATABASE_URL: postgres://postgres:postgres@database:5432/mydb volumes: - .:/app depends_on: - database ``` The `db` container runs PostGIS. It uses a named volume to persist PostgreSQL data in between container restarts. The `web` container runs the Django development server, built using the custom `Dockerfile.dev` Dockerfile. The `migrations` container simply runs the apps migrations and then terminates - with `depends_on` used to ensure that migrations run after the hdatabase server starts and before the web server. Both `web` and `migrations` include a `platform… | <p>I had to get Docker Compose working for a Django project, primarily to make it easier for other developers to get a working development environment.</p> <p>Some features of this project:</p> <ul> <li>Uses GeoDjango, so needs GDAL etc for the Django app plus a PostgreSQL server running PostGIS</li> <li>Already has a <code>Dockerfile</code> used for the production deployment, but needed a separate one for the development environment</li> <li>Makes extensive use of Django migrations (over 100 and counting)</li> </ul> <p>I ended up with this <code>docker-compose.yml</code> file in the root of the project:</p> <div class="highlight highlight-source-yaml"><pre><span class="pl-ent">version</span>: <span class="pl-s"><span class="pl-pds">"</span>3.1<span class="pl-pds">"</span></span> <span class="pl-ent">volumes</span>: <span class="pl-ent">postgresql-data</span>: <span class="pl-ent">services</span>: <span class="pl-ent">database</span>: <span class="pl-ent">image</span>: <span class="pl-s">postgis/postgis:13-3.1</span> <span class="pl-ent">restart</span>: <span class="pl-s">always</span> <span class="pl-ent">expose</span>: - <span class="pl-s"><span class="pl-pds">"</span>5432<span class="pl-pds">"</span></span> <span class="pl-ent">ports</span>: - <span class="pl-s"><span class="pl-pds">"</span>5432:5432<span class="pl-pds">"</span></span> <span class="pl-ent">volumes</span>: - <span class="pl-s">postgresql-data:/var/lib/postgresql/data</span> <span class="pl-ent">environment</span>: <span class="pl-ent">POSTGRES_USER</span>: <span class="pl-s">postgres</span> <span class="pl-ent">POSTGRES_DB</span>: <span class="pl-s">mydb</span> <span class="pl-ent">POSTGRES_PASSWORD</span>: <span class="pl-s">postgres</span> <span class="pl-ent">web</span>: <span class="pl-ent">container_name</span>: <span class="pl-s">myapp</span> <span class="pl-ent">platform</span>: <span class="pl-s">linux/amd64</span> <span class="pl-ent">build</span>: <sp… | <Binary: 64,804 bytes> | 2021-05-24T22:08:23-07:00 | 2021-05-25T05:08:23+00:00 | 2021-05-26T11:32:27-07:00 | 2021-05-26T18:32:27+00:00 | 52bf5cb1337977b903d48ff3d30949df | docker-compose-for-django-development |
| docker_docker-for-mac-container-to-postgresql-on-host.md | docker | Allowing a container in Docker Desktop for Mac to talk to a PostgreSQL server on the host machine | https://github.com/simonw/til/blob/main/docker/docker-for-mac-container-to-postgresql-on-host.md | I like using [Postgres.app](https://postgresapp.com/) to run PostgreSQL on my macOS laptop. I use it for a bunch of different projects. When I deploy applications to Fly.io I build them as Docker containers and inject the Fly PostgreSQL database details as a `DATABASE_URL` environment variable. In order to test those containers on my laptop, I needed to figure out a way to set a `DATABASE_URL` that would point to the PostgreSQL I have running on my own laptop - so that I didn't need to spin up another PostgreSQL Docker container just for testing purposes. ## host.docker.internal The first thing to know is that Docker for Desktop sets `host.docker.internal` as a magic hostname inside the container that refers back to the IP address of the host machine. So ideally something like this should work: docker run --env DATABASE_URL="postgres://docker:docker-password@host.docker.internal:5432/pillarpointstewards" \ -p 8080:8000 pillarpointstewards I'm using `-p 8080:8000` here to set port 8080 on my laptop to forward to the Django application server running on port 8000 inside the container. ## Creating the account and granting permissions To create that PostgreSQL account with username `docker` and password `docker-password` (but pick a better password than that) I used Postico to open a connection to my `postgres` database and ran the following: create role docker login password 'docker-password'; Then I connected to my application database (in this case `pillarpointstewards`) and ran the following to grant permissions to that user: ```sql GRANT ALL ON ALL TABLES IN SCHEMA "public" TO docker; ``` Having done this, the container run with the above `DATABASE_URL` environment variable was able to both connect to the server and run Django migrations too. | <p>I like using <a href="https://postgresapp.com/" rel="nofollow">Postgres.app</a> to run PostgreSQL on my macOS laptop. I use it for a bunch of different projects.</p> <p>When I deploy applications to Fly.io I build them as Docker containers and inject the Fly PostgreSQL database details as a <code>DATABASE_URL</code> environment variable.</p> <p>In order to test those containers on my laptop, I needed to figure out a way to set a <code>DATABASE_URL</code> that would point to the PostgreSQL I have running on my own laptop - so that I didn't need to spin up another PostgreSQL Docker container just for testing purposes.</p> <h2> <a id="user-content-hostdockerinternal" class="anchor" href="#hostdockerinternal" aria-hidden="true"><span aria-hidden="true" class="octicon octicon-link"></span></a>host.docker.internal</h2> <p>The first thing to know is that Docker for Desktop sets <code>host.docker.internal</code> as a magic hostname inside the container that refers back to the IP address of the host machine.</p> <p>So ideally something like this should work:</p> <pre><code>docker run --env DATABASE_URL="postgres://docker:docker-password@host.docker.internal:5432/pillarpointstewards" \ -p 8080:8000 pillarpointstewards </code></pre> <p>I'm using <code>-p 8080:8000</code> here to set port 8080 on my laptop to forward to the Django application server running on port 8000 inside the container.</p> <h2> <a id="user-content-creating-the-account-and-granting-permissions" class="anchor" href="#creating-the-account-and-granting-permissions" aria-hidden="true"><span aria-hidden="true" class="octicon octicon-link"></span></a>Creating the account and granting permissions</h2> <p>To create that PostgreSQL account with username <code>docker</code> and password <code>docker-password</code> (but pick a better password than that) I used Postico to open a connection to my <code>postgres</code> database and ran the following:</p> <pre><code>create role docker login password 'docker-password'; </code></pre> <p>Then I connected to my app… | <Binary: 72,938 bytes> | 2022-03-31T22:48:17-07:00 | 2022-04-01T05:48:17+00:00 | 2022-03-31T22:48:17-07:00 | 2022-04-01T05:48:17+00:00 | 9ea725043c83df0d505051bd25506766 | docker-for-mac-container-to-postgresql-on-host |
| docker_emulate-s390x-with-qemu.md | docker | Emulating a big-endian s390x with QEMU | https://github.com/simonw/til/blob/main/docker/emulate-s390x-with-qemu.md | I got [a bug report](https://github.com/simonw/sqlite-fts4/issues/6) concerning my [sqlite-fts4](https://github.com/simonw/sqlite-fts4) project running on PPC64 and s390x architectures. The s390x is an [IBM mainframe architecture](https://en.wikipedia.org/wiki/Linux_on_IBM_Z), which I found glamorous! The bug related to those machines being big-endian v.s. my software being tested on little-endian machines. My first attempt at fixing it (see [this TIL](https://til.simonwillison.net/python/struct-endianness)) turned out not to be correct. I really needed a way to test agaist an emulated s390x machine with big-endian byte order. I figured out how to do that using Docker for Mac and QEMU. ## multiarch/qemu-user-static:register This is the first command to run. It does something magical to your Docker installation: docker run --rm --privileged multiarch/qemu-user-static:register --reset The [qemu-user-static README](https://github.com/multiarch/qemu-user-static/blob/master/README.md) says: > `multiarch/qemu-user-static` and `multiarch/qemu-user-static:register` images execute the register script that registers below kind of `/proc/sys/fs/binfmt_misc/qemu-$arch` files for all supported processors except the current one in it when running the container. It continues: > The `--reset` option is implemented at the register script that executes find `/proc/sys/fs/binfmt_misc -type f -name 'qemu-*' -exec sh -c 'echo -1 > {}' \;` to remove `binfmt_misc` entry files before register the entry. I don't understand what this means. But running this command was essential for the next command to work. ## multiarch/ubuntu-core:s390x-focal Having run that command, the following command drops you into a shell in an emulated s390x machine running Ubuntu Focal: docker run -it multiarch/ubuntu-core:s390x-focal /bin/bash Using `-focal` gives you Python 3.8. I previously tried `s390x-bionic` but that gave me Python 3.6. You don't actually get Python until you install it, like so: apt-get -y update && apt-get -y… | <p>I got <a href="https://github.com/simonw/sqlite-fts4/issues/6">a bug report</a> concerning my <a href="https://github.com/simonw/sqlite-fts4">sqlite-fts4</a> project running on PPC64 and s390x architectures.</p> <p>The s390x is an <a href="https://en.wikipedia.org/wiki/Linux_on_IBM_Z" rel="nofollow">IBM mainframe architecture</a>, which I found glamorous!</p> <p>The bug related to those machines being big-endian v.s. my software being tested on little-endian machines. My first attempt at fixing it (see <a href="https://til.simonwillison.net/python/struct-endianness" rel="nofollow">this TIL</a>) turned out not to be correct. I really needed a way to test agaist an emulated s390x machine with big-endian byte order.</p> <p>I figured out how to do that using Docker for Mac and QEMU.</p> <h2> <a id="user-content-multiarchqemu-user-staticregister" class="anchor" href="#multiarchqemu-user-staticregister" aria-hidden="true"><span aria-hidden="true" class="octicon octicon-link"></span></a>multiarch/qemu-user-static:register</h2> <p>This is the first command to run. It does something magical to your Docker installation:</p> <pre><code>docker run --rm --privileged multiarch/qemu-user-static:register --reset </code></pre> <p>The <a href="https://github.com/multiarch/qemu-user-static/blob/master/README.md">qemu-user-static README</a> says:</p> <blockquote> <p><code>multiarch/qemu-user-static</code> and <code>multiarch/qemu-user-static:register</code> images execute the register script that registers below kind of <code>/proc/sys/fs/binfmt_misc/qemu-$arch</code> files for all supported processors except the current one in it when running the container.</p> </blockquote> <p>It continues:</p> <blockquote> <p>The <code>--reset</code> option is implemented at the register script that executes find <code>/proc/sys/fs/binfmt_misc -type f -name 'qemu-*' -exec sh -c 'echo -1 > {}' \;</code> to remove <code>binfmt_misc</code> entry files before register the entry.</p> </blockquote> <p>I don't understand what this means. But runni… | <Binary: 75,331 bytes> | 2022-07-29T19:44:50-07:00 | 2022-07-30T02:44:50+00:00 | 2022-07-29T19:44:50-07:00 | 2022-07-30T02:44:50+00:00 | 6069203118a27e680e662ef1f051a50c | emulate-s390x-with-qemu |
| docker_gdb-python-docker.md | docker | Running gdb against a Python process in a running Docker container | https://github.com/simonw/til/blob/main/docker/gdb-python-docker.md | While investigating [Datasette issue #1268](https://github.com/simonw/datasette/issues/1268) I found myself with a Python process that was hanging, and I decided to try running `gdb` against it based on tips in [Debugging of CPython processes with gdb](https://www.podoliaka.org/2016/04/10/debugging-cpython-gdb/) Here's the recipe that worked: 1. Find the Docker container ID using `docker ps` - in my case it was `16197781a7b5` 2. Attach a new bash shell to that process in privileged mode (needed to get `gdb` to work): `docker exec --privileged -it 16197781a7b5 bash` 3. Install `gdb` and the Python tooling for using it: `apt-get install gdb python3-dbg` 4. Use `top` to find the pid of the running Python process that was hanging. It was `20` for me. 5. Run `gdb /usr/bin/python3 -p 20` to launch `gdb` against that process 6. In the `(gdb)` prompt run `py-bt` to see a backtrace. I'm sure there's lots more that can be done in `gdb` at this point, but that's how I got to a place where I could interact with the Python process that was running in the Docker container. | <p>While investigating <a href="https://github.com/simonw/datasette/issues/1268">Datasette issue #1268</a> I found myself with a Python process that was hanging, and I decided to try running <code>gdb</code> against it based on tips in <a href="https://www.podoliaka.org/2016/04/10/debugging-cpython-gdb/" rel="nofollow">Debugging of CPython processes with gdb</a></p> <p>Here's the recipe that worked:</p> <ol> <li>Find the Docker container ID using <code>docker ps</code> - in my case it was <code>16197781a7b5</code> </li> <li>Attach a new bash shell to that process in privileged mode (needed to get <code>gdb</code> to work): <code>docker exec --privileged -it 16197781a7b5 bash</code> </li> <li>Install <code>gdb</code> and the Python tooling for using it: <code>apt-get install gdb python3-dbg</code> </li> <li>Use <code>top</code> to find the pid of the running Python process that was hanging. It was <code>20</code> for me.</li> <li>Run <code>gdb /usr/bin/python3 -p 20</code> to launch <code>gdb</code> against that process</li> <li>In the <code>(gdb)</code> prompt run <code>py-bt</code> to see a backtrace.</li> </ol> <p>I'm sure there's lots more that can be done in <code>gdb</code> at this point, but that's how I got to a place where I could interact with the Python process that was running in the Docker container.</p> | <Binary: 96,623 bytes> | 2021-03-21T22:48:21-07:00 | 2021-03-22T05:48:21+00:00 | 2021-03-21T22:48:21-07:00 | 2021-03-22T05:48:21+00:00 | 7b9f40a0c261e3d630b151d72313cabc | gdb-python-docker |
| docker_pytest-docker.md | docker | Run pytest against a specific Python version using Docker | https://github.com/simonw/til/blob/main/docker/pytest-docker.md | For [datasette issue #1802](https://github.com/simonw/datasette/issues/1802) I needed to run my `pytest` test suite using a specific version of Python 3.7. I decided to do this using Docker, using the official [python:3.7-buster](https://hub.docker.com/_/python/tags?page=1&name=3.7-buster) image. Here's the recipe that worked for me: ```bash docker run --rm -it -v `pwd`:/code \ python:3.7-buster \ bash -c "cd /code && pip install -e '.[test]' && pytest" ``` This command runs interactively so I can see the output (the `-it` option). It mounts the current directory (with my testable application in it - I ran this in the root of a `datasette` checkout) as the `/code` volume inside the container. The `--rm` option ensures that the container used for the test will be deleted once the test has completed (not just stopped). It then runs the following using `bash -c`: cd /code && pip install -e '.[test]' && pytest This installs my project's dependencies and test dependencies and then runs `pytest`. The truncated output looks like this: ``` % docker run -it -v `pwd`:/code \ python:3.7-buster \ bash -c "cd /code && pip install -e '.[test]' && pytest" Obtaining file:///code Preparing metadata (setup.py) ... done Collecting asgiref>=3.2.10 Downloading asgiref-3.5.2-py3-none-any.whl (22 kB) ... Installing collected packages: rfc3986, mypy-extensions, iniconfig, zipp, typing-extensions, typed-ast, tomli, soupsieve, sniffio, six, PyYAML, pyparsing, pycparser, py, platformdirs, pathspec, mergedeep, MarkupSafe, itsdangerous, idna, hupper, h11, execnet, cogapp, certifi, attrs, aiofiles, python-multipart, packaging, Jinja2, janus, importlib-metadata, cffi, beautifulsoup4, asgiref, anyio, pluggy, pint, httpcore, cryptography, click, asgi-csrf, uvicorn, trustme, pytest, httpx, click-default-group-wheel, black, pytest-timeout, pytest-forked, pytest-asyncio, datasette, blacken-docs, pytest-xdist Running setup.py develop for datasette ... ========================================================= test session s… | <p>For <a href="https://github.com/simonw/datasette/issues/1802">datasette issue #1802</a> I needed to run my <code>pytest</code> test suite using a specific version of Python 3.7.</p> <p>I decided to do this using Docker, using the official <a href="https://hub.docker.com/_/python/tags?page=1&name=3.7-buster" rel="nofollow">python:3.7-buster</a> image.</p> <p>Here's the recipe that worked for me:</p> <div class="highlight highlight-source-shell"><pre>docker run --rm -it -v <span class="pl-s"><span class="pl-pds">`</span>pwd<span class="pl-pds">`</span></span>:/code \ python:3.7-buster \ bash -c <span class="pl-s"><span class="pl-pds">"</span>cd /code && pip install -e '.[test]' && pytest<span class="pl-pds">"</span></span></pre></div> <p>This command runs interactively so I can see the output (the <code>-it</code> option).</p> <p>It mounts the current directory (with my testable application in it - I ran this in the root of a <code>datasette</code> checkout) as the <code>/code</code> volume inside the container.</p> <p>The <code>--rm</code> option ensures that the container used for the test will be deleted once the test has completed (not just stopped).</p> <p>It then runs the following using <code>bash -c</code>:</p> <pre><code>cd /code && pip install -e '.[test]' && pytest </code></pre> <p>This installs my project's dependencies and test dependencies and then runs <code>pytest</code>.</p> <p>The truncated output looks like this:</p> <pre><code>% docker run -it -v `pwd`:/code \ python:3.7-buster \ bash -c "cd /code && pip install -e '.[test]' && pytest" Obtaining file:///code Preparing metadata (setup.py) ... done Collecting asgiref>=3.2.10 Downloading asgiref-3.5.2-py3-none-any.whl (22 kB) ... Installing collected packages: rfc3986, mypy-extensions, iniconfig, zipp, typing-extensions, typed-ast, tomli, soupsieve, sniffio, six, PyYAML, pyparsing, pycparser, py, platformdirs, pathspec, mergedeep, MarkupSafe, itsdangerous, idna, hupper, h11, exec… | <Binary: 67,170 bytes> | 2022-09-05T16:23:06-07:00 | 2022-09-05T23:23:06+00:00 | 2022-09-06T10:51:25-07:00 | 2022-09-06T17:51:25+00:00 | 7b5c417fbdee6e3968459b3d0db5c6a9 | pytest-docker |
| docker_test-fedora-in-docker.md | docker | Testing things in Fedora using Docker | https://github.com/simonw/til/blob/main/docker/test-fedora-in-docker.md | I got [a report](https://twitter.com/peterjanes/status/1552407491819884544) of a bug with my [s3-ocr tool](https://simonwillison.net/2022/Jun/30/s3-ocr/) running on Fedora. I attempted to replicate the bug in a Fedora container using Docker, by running this command: ``` docker run -it fedora:latest /bin/bash ``` This downloaded [the official image](https://hub.docker.com/_/fedora) and dropped me into a Bash shell. It turns out Fedora won't let you run `pip install` with its default Python 3 without first creating a virtual environment: ``` [root@d1146e0061d1 /]# python3 -m pip install s3-ocr /usr/bin/python3: No module named pip [root@d1146e0061d1 /]# python3 -m venv project_venv [root@d1146e0061d1 /]# source project_venv/bin/activate (project_venv) [root@d1146e0061d1 /]# python -m pip install s3-ocr Collecting s3-ocr Downloading s3_ocr-0.5-py3-none-any.whl (14 kB) Collecting sqlite-utils ... ``` Having done that I could test out my `s3-ocr` command like so: ``` (project_venv) [root@d1146e0061d1 /]# s3-ocr start --help Usage: s3-ocr start [OPTIONS] BUCKET [KEYS]... Start OCR tasks for PDF files in an S3 bucket s3-ocr start name-of-bucket path/to/one.pdf path/to/two.pdf ... ``` | <p>I got <a href="https://twitter.com/peterjanes/status/1552407491819884544" rel="nofollow">a report</a> of a bug with my <a href="https://simonwillison.net/2022/Jun/30/s3-ocr/" rel="nofollow">s3-ocr tool</a> running on Fedora.</p> <p>I attempted to replicate the bug in a Fedora container using Docker, by running this command:</p> <pre><code>docker run -it fedora:latest /bin/bash </code></pre> <p>This downloaded <a href="https://hub.docker.com/_/fedora" rel="nofollow">the official image</a> and dropped me into a Bash shell.</p> <p>It turns out Fedora won't let you run <code>pip install</code> with its default Python 3 without first creating a virtual environment:</p> <pre><code>[root@d1146e0061d1 /]# python3 -m pip install s3-ocr /usr/bin/python3: No module named pip [root@d1146e0061d1 /]# python3 -m venv project_venv [root@d1146e0061d1 /]# source project_venv/bin/activate (project_venv) [root@d1146e0061d1 /]# python -m pip install s3-ocr Collecting s3-ocr Downloading s3_ocr-0.5-py3-none-any.whl (14 kB) Collecting sqlite-utils ... </code></pre> <p>Having done that I could test out my <code>s3-ocr</code> command like so:</p> <pre><code>(project_venv) [root@d1146e0061d1 /]# s3-ocr start --help Usage: s3-ocr start [OPTIONS] BUCKET [KEYS]... Start OCR tasks for PDF files in an S3 bucket s3-ocr start name-of-bucket path/to/one.pdf path/to/two.pdf ... </code></pre> | <Binary: 69,527 bytes> | 2022-07-27T15:41:43-07:00 | 2022-07-27T22:41:43+00:00 | 2022-07-27T15:41:43-07:00 | 2022-07-27T22:41:43+00:00 | 5a2832241e5fe9b2ff76ad09099e73ae | test-fedora-in-docker |
| duckdb_parquet.md | duckdb | Using DuckDB in Python to access Parquet data | https://github.com/simonw/til/blob/main/duckdb/parquet.md | Did a quick experiment with [DuckDB](https://duckdb.org/) today, inspired by the [bmschmidt/hathi-binary](https://github.com/bmschmidt/hathi-binary) repo. That repo includes 3GB of data in 68 parquet files. Those files are 45MB each. DuckDB can run queries against Parquet data _really fast_. I checked out the repo like this: cd /tmp git clone https://github.com/bmschmidt/hathi-binary cd hathi-binary To install it: pip install duckdb Then in a Python console: ```pycon >>> import duckdb >>> db = duckdb.connect() # No need to pass a file name, we will use a VIEW >>> db.execute("CREATE VIEW hamming AS SELECT * FROM parquet_scan('parquet/*.parquet')") <duckdb.DuckDBPyConnection object at 0x110eab530> >>> db.execute("select count(*) from hamming").fetchall() [(17123746,)] >>> db.execute("select sum(A), sum(B), sum(C) from hamming").fetchall() [(19478990546114240096822710, 16303362475198894881395004, 43191807707832192976154883)] ``` There are 17,123,746 records in the 3GB of Parquet data. I switched to iPython so I could time a query. First I ran a query to see what a record looks like, using `.df().to_dict()` to convert the result into a DataFrame and then a Python dictionary: ``` In [17]: db.execute("select * from hamming limit 1").df().to_dict() Out[17]: {'htid': {0: 'uc1.b3209520'}, 'A': {0: -3968610387004385723}, 'B': {0: 7528965001168362882}, 'C': {0: 5017761927246436345}, 'D': {0: 2866021664979717155}, 'E': {0: -8718458467632335109}, 'F': {0: 3783827906913154091}, 'G': {0: -883843087282811188}, 'H': {0: 4045142741717613284}, 'I': {0: -9144138405661797607}, 'J': {0: 3285280333149952194}, 'K': {0: -3352555231043531556}, 'L': {0: 2071206943103704211}, 'M': {0: -5859914591541496612}, 'N': {0: -4209182319449999971}, 'O': {0: 2040176595216801886}, 'P': {0: 860910514658882647}, 'Q': {0: 3505065119653024843}, 'R': {0: -3110594979418944378}, 'S': {0: -8591743965043807123}, 'T': {0: -3262129165685658773}} ``` Then I timed an aggregate query using `%time`: ``` In [18]: %time db… | <p>Did a quick experiment with <a href="https://duckdb.org/" rel="nofollow">DuckDB</a> today, inspired by the <a href="https://github.com/bmschmidt/hathi-binary">bmschmidt/hathi-binary</a> repo.</p> <p>That repo includes 3GB of data in 68 parquet files. Those files are 45MB each.</p> <p>DuckDB can run queries against Parquet data <em>really fast</em>.</p> <p>I checked out the repo like this:</p> <pre><code>cd /tmp git clone https://github.com/bmschmidt/hathi-binary cd hathi-binary </code></pre> <p>To install it:</p> <pre><code>pip install duckdb </code></pre> <p>Then in a Python console:</p> <div class="highlight highlight-text-python-console"><pre>>>> <span class="pl-k">import</span> duckdb >>> db <span class="pl-k">=</span> duckdb.connect() <span class="pl-c"><span class="pl-c">#</span> No need to pass a file name, we will use a VIEW</span> >>> db.execute(<span class="pl-s"><span class="pl-pds">"</span>CREATE VIEW hamming AS SELECT * FROM parquet_scan('parquet/*.parquet')<span class="pl-pds">"</span></span>) <duckdb.DuckDBPyConnection object at 0x110eab530> >>> db.execute(<span class="pl-s"><span class="pl-pds">"</span>select count(*) from hamming<span class="pl-pds">"</span></span>).fetchall() [(17123746,)] >>> db.execute(<span class="pl-s"><span class="pl-pds">"</span>select sum(A), sum(B), sum(C) from hamming<span class="pl-pds">"</span></span>).fetchall() [(19478990546114240096822710, 16303362475198894881395004, 43191807707832192976154883)]</pre></div> <p>There are 17,123,746 records in the 3GB of Parquet data.</p> <p>I switched to iPython so I could time a query. First I ran a query to see what a record looks like, using <code>.df().to_dict()</code> to convert the result into a DataFrame and then a Python dictionary:</p> <pre><code>In [17]: db.execute("select * from hamming limit 1").df().to_dict() Out[17]: {'htid': {0: 'uc1.b3209520'}, 'A': {0: -3968610387004385723}, 'B': {0: 7528965001168362882}, 'C': {0: 5017761927246436345}, 'D': {0: 2866021664979… | <Binary: 50,946 bytes> | 2022-09-16T19:47:28-07:00 | 2022-09-17T02:47:28+00:00 | 2022-09-16T19:47:28-07:00 | 2022-09-17T02:47:28+00:00 | d353e1d0386aa26d77be763d6400c173 | parquet |
| electron_electrion-auto-update.md | electron | Configuring auto-update for an Electron app | https://github.com/simonw/til/blob/main/electron/electrion-auto-update.md | This is _almost_ really simple. I used [electron/update-electron-app](https://github.com/electron/update-electron-app) for it, the instructions for which are: - Add it to `packages.json` with `npm i update-electron-app` - Make sure your `"repository"` field in that file points to your GitHub repository - Use GitHub releases to release signed versions of your application - Add `require('update-electron-app')()` somewhere in your `main.js` I added this... and it didn't work ([#106](https://github.com/simonw/datasette-app/issues/106)). Then I spotted [this recipe](https://github.com/electron/update.electronjs.org#manual-setup) in the manual setup instructions for the `update.electronjs.org` server that it uses: ```javascript const server = 'https://update.electronjs.org' const feed = `${server}/OWNER/REPO/${process.platform}-${process.arch}/${app.getVersion()}` ``` I ran that in the Electron debugger, swapping in `simonw/datasette-app` as the `OWNER/REPO` and got this URL: `https://update.electronjs.org/simonw/datasette-app/darwin-x64/0.2.0` Which returned this: > `No updates found (needs asset matching *{mac,darwin,osx}*.zip in public repository)` It turns out your asset filename needs to match that pattern! I renamed the asset I was attaching to the release to `Datasette-mac.app.zip` and the auto-update mechanism started working instantly. ## How it works That update URL is interesting. If you hit it with the most recent version of the software (`0.2.1` at time of writing) you get this: ``` ~ % curl -i 'https://update.electronjs.org/simonw/datasette-app/darwin-x64/0.2.1' HTTP/1.1 204 No Content Server: Cowboy Content-Length: 0 Connection: keep-alive Date: Tue, 14 Sep 2021 03:54:47 GMT Via: 1.1 vegur ``` But if you tell it you are running a previous version you get this instead: ``` ~ % curl -i 'https://update.electronjs.org/simonw/datasette-app/darwin-x64/0.2.0' HTTP/1.1 200 OK Server: Cowboy Connection: keep-alive Content-Type: application/json Date: Tue, 14 Sep 2021 03:55:19 GMT Content-Length: 740 … | <p>This is <em>almost</em> really simple. I used <a href="https://github.com/electron/update-electron-app">electron/update-electron-app</a> for it, the instructions for which are:</p> <ul> <li>Add it to <code>packages.json</code> with <code>npm i update-electron-app</code> </li> <li>Make sure your <code>"repository"</code> field in that file points to your GitHub repository</li> <li>Use GitHub releases to release signed versions of your application</li> <li>Add <code>require('update-electron-app')()</code> somewhere in your <code>main.js</code> </li> </ul> <p>I added this... and it didn't work (<a href="https://github.com/simonw/datasette-app/issues/106">#106</a>).</p> <p>Then I spotted <a href="https://github.com/electron/update.electronjs.org#manual-setup">this recipe</a> in the manual setup instructions for the <code>update.electronjs.org</code> server that it uses:</p> <div class="highlight highlight-source-js"><pre><span class="pl-k">const</span> <span class="pl-s1">server</span> <span class="pl-c1">=</span> <span class="pl-s">'https://update.electronjs.org'</span> <span class="pl-k">const</span> <span class="pl-s1">feed</span> <span class="pl-c1">=</span> <span class="pl-s">`<span class="pl-s1"><span class="pl-kos">${</span><span class="pl-s1">server</span><span class="pl-kos">}</span></span>/OWNER/REPO/<span class="pl-s1"><span class="pl-kos">${</span><span class="pl-s1">process</span><span class="pl-kos">.</span><span class="pl-c1">platform</span><span class="pl-kos">}</span></span>-<span class="pl-s1"><span class="pl-kos">${</span><span class="pl-s1">process</span><span class="pl-kos">.</span><span class="pl-c1">arch</span><span class="pl-kos">}</span></span>/<span class="pl-s1"><span class="pl-kos">${</span><span class="pl-s1">app</span><span class="pl-kos">.</span><span class="pl-en">getVersion</span><span class="pl-kos">(</span><span class="pl-kos">)</span><span class="pl-kos">}</span></span>`</span></pre></div> <p>I ran that in the Electron debugger, swapping in <code>simonw/datasette-app</code> as t… | <Binary: 73,758 bytes> | 2021-09-13T20:57:03-07:00 | 2021-09-14T03:57:03+00:00 | 2021-09-13T21:11:18-07:00 | 2021-09-14T04:11:18+00:00 | b3d1f989fac8930682b18b7c984199ea | electrion-auto-update |
| electron_electron-debugger-console.md | electron | Using the Chrome DevTools console as a REPL for an Electron app | https://github.com/simonw/til/blob/main/electron/electron-debugger-console.md | I figured out how to use the Chrome DevTools to execute JavaScript interactively inside the Electron main process. I always like having a REPL for exploring APIs, and this means I can explore the Electron and Node.js APIs interactively. <img width="945" alt="Simon_Willison’s_Weblog_and_DevTools_-_Node_js_and_Inspect_with_Chrome_Developer_Tools" src="https://user-images.githubusercontent.com/9599/131575749-a509c528-6746-42b0-8efd-03cd77f6dc2d.png"> https://www.electronjs.org/docs/tutorial/debugging-main-process#--inspectport says you need to run: electron --inspect=5858 your/app I start Electron by running `npm start`, so I modified my `package.json` to include this: ```json "scripts": { "start": "electron --inspect=5858 ." ``` Then I ran `npm start`. To connect the debugger, open Google Chrome and visit `chrome://inspect/` - then click the "Open dedicated DevTools for Node" link. In that window, select the "Connection" tab and add a connection to `localhost:5858`: <img width="901" alt="8_31_21__2_08_PM" src="https://user-images.githubusercontent.com/9599/131576143-03b28fd7-fab4-495a-8060-662b0247eabd.png"> Switch back to the "Console" tab and you can start interacting with the Electron environment. I tried this and it worked: ```javascript const { app, Menu, BrowserWindow, dialog } = require("electron"); new BrowserWindow({height: 100, width: 100}).loadURL("https://simonwillison.net/"); ``` | <p>I figured out how to use the Chrome DevTools to execute JavaScript interactively inside the Electron main process. I always like having a REPL for exploring APIs, and this means I can explore the Electron and Node.js APIs interactively.</p> <p><a href="https://user-images.githubusercontent.com/9599/131575749-a509c528-6746-42b0-8efd-03cd77f6dc2d.png" target="_blank" rel="nofollow"><img width="945" alt="Simon_Willison’s_Weblog_and_DevTools_-_Node_js_and_Inspect_with_Chrome_Developer_Tools" src="https://user-images.githubusercontent.com/9599/131575749-a509c528-6746-42b0-8efd-03cd77f6dc2d.png" style="max-width:100%;"></a></p> <p><a href="https://www.electronjs.org/docs/tutorial/debugging-main-process#--inspectport" rel="nofollow">https://www.electronjs.org/docs/tutorial/debugging-main-process#--inspectport</a> says you need to run:</p> <pre><code>electron --inspect=5858 your/app </code></pre> <p>I start Electron by running <code>npm start</code>, so I modified my <code>package.json</code> to include this:</p> <div class="highlight highlight-source-json"><pre> <span class="pl-s"><span class="pl-pds">"</span>scripts<span class="pl-pds">"</span></span>: { <span class="pl-s"><span class="pl-pds">"</span>start<span class="pl-pds">"</span></span>: <span class="pl-s"><span class="pl-pds">"</span>electron --inspect=5858 .<span class="pl-pds">"</span></span></pre></div> <p>Then I ran <code>npm start</code>.</p> <p>To connect the debugger, open Google Chrome and visit <code>chrome://inspect/</code> - then click the "Open dedicated DevTools for Node" link.</p> <p>In that window, select the "Connection" tab and add a connection to <code>localhost:5858</code>:</p> <p><a href="https://user-images.githubusercontent.com/9599/131576143-03b28fd7-fab4-495a-8060-662b0247eabd.png" target="_blank" rel="nofollow"><img width="901" alt="8_31_21__2_08_PM" src="https://user-images.githubusercontent.com/9599/131576143-03b28fd7-fab4-495a-8060-662b0247eabd.png" style="max-width:100%;"></a></p> <p>Switch back to the "Console" tab and you c… | <Binary: 110,854 bytes> | 2021-08-31T14:09:41-07:00 | 2021-08-31T21:09:41+00:00 | 2021-08-31T14:09:41-07:00 | 2021-08-31T21:09:41+00:00 | a7c80b899e1517f7958dcac1820cbeca | electron-debugger-console |
| electron_electron-external-links-system-browser.md | electron | Open external links in an Electron app using the system browser | https://github.com/simonw/til/blob/main/electron/electron-external-links-system-browser.md | For [Datasette.app](https://github.com/simonw/datasette-app) I wanted to ensure that links to external URLs would [open in the system browser](https://github.com/simonw/datasette-app/issues/34). This recipe works: ```javascript function postConfigure(window) { window.webContents.on("will-navigate", function (event, reqUrl) { let requestedHost = new URL(reqUrl).host; let currentHost = new URL(window.webContents.getURL()).host; if (requestedHost && requestedHost != currentHost) { event.preventDefault(); shell.openExternal(reqUrl); } }); } ``` The `will-navigate` event fires before any in-browser navigations, which means they can be intercepted and cancelled if necessary. I use the `URL()` class to extract the `.host` so I can check if the host being navigated to differs from the host that the application is running against (which is probably `localhost:$port`). Initially I was using `require('url').URL` for this but that doesn't appear to be necessary - Node.js ships with `URL` as a top-level class these days. `event.preventDefault()` cancels the navigation and `shell.openExternal(reqUrl)` opens the URL using the system default browsner. I call this function on any new window I create using `new BrowserWindow` - for example: ```javascript mainWindow = new BrowserWindow({ width: 800, height: 600, show: false, }); mainWindow.loadFile("loading.html"); mainWindow.once("ready-to-show", () => { mainWindow.show(); }); postConfigure(mainWindow); ``` | <p>For <a href="https://github.com/simonw/datasette-app">Datasette.app</a> I wanted to ensure that links to external URLs would <a href="https://github.com/simonw/datasette-app/issues/34">open in the system browser</a>.</p> <p>This recipe works:</p> <div class="highlight highlight-source-js"><pre><span class="pl-k">function</span> <span class="pl-en">postConfigure</span><span class="pl-kos">(</span><span class="pl-s1">window</span><span class="pl-kos">)</span> <span class="pl-kos">{</span> <span class="pl-s1">window</span><span class="pl-kos">.</span><span class="pl-c1">webContents</span><span class="pl-kos">.</span><span class="pl-en">on</span><span class="pl-kos">(</span><span class="pl-s">"will-navigate"</span><span class="pl-kos">,</span> <span class="pl-k">function</span> <span class="pl-kos">(</span><span class="pl-s1">event</span><span class="pl-kos">,</span> <span class="pl-s1">reqUrl</span><span class="pl-kos">)</span> <span class="pl-kos">{</span> <span class="pl-k">let</span> <span class="pl-s1">requestedHost</span> <span class="pl-c1">=</span> <span class="pl-k">new</span> <span class="pl-c1">URL</span><span class="pl-kos">(</span><span class="pl-s1">reqUrl</span><span class="pl-kos">)</span><span class="pl-kos">.</span><span class="pl-c1">host</span><span class="pl-kos">;</span> <span class="pl-k">let</span> <span class="pl-s1">currentHost</span> <span class="pl-c1">=</span> <span class="pl-k">new</span> <span class="pl-c1">URL</span><span class="pl-kos">(</span><span class="pl-s1">window</span><span class="pl-kos">.</span><span class="pl-c1">webContents</span><span class="pl-kos">.</span><span class="pl-en">getURL</span><span class="pl-kos">(</span><span class="pl-kos">)</span><span class="pl-kos">)</span><span class="pl-kos">.</span><span class="pl-c1">host</span><span class="pl-kos">;</span> <span class="pl-k">if</span> <span class="pl-kos">(</span><span class="pl-s1">requestedHost</span> <span class="pl-c1">&&</span> <span class="pl-s1">requestedHost</span> <span class="pl-c… | <Binary: 63,282 bytes> | 2021-09-02T14:15:19-07:00 | 2021-09-02T21:15:19+00:00 | 2021-09-02T14:15:19-07:00 | 2021-09-02T21:15:19+00:00 | 5d14045ddef5563541eefa461db1f283 | electron-external-links-system-browser |
| electron_python-inside-electron.md | electron | Bundling Python inside an Electron app | https://github.com/simonw/til/blob/main/electron/python-inside-electron.md | For [Datasette Desktop](https://datasette.io/desktop) I chose to bundle a full version of Python 3.9 inside my `Datasette.app` application. I did this in order to support installation of plugins via `pip install` - you can read more about my reasoning in [Datasette Desktop—a macOS desktop application for Datasette](https://simonwillison.net/2021/Sep/8/datasette-desktop/). I used [python-build-standalone](https://github.com/indygreg/python-build-standalone) for this, which provides a version of Python that is designed for easy of bundling - it's also used by [PyOxidize](https://github.com/indygreg/PyOxidizer). Both projects are created and maintained by Gregory Szorc. ## In development mode In my Electron app's root folder I ran the following: ``` wget https://github.com/indygreg/python-build-standalone/releases/download/20210724/cpython-3.9.6-x86_64-apple-darwin-install_only-20210724T1424.tar.gz tar -xzvf cpython-3.9.6-x86_64-apple-darwin-install_only-20210724T1424.tar.gz ``` This gave me a `python/` subfolder containing a full standalone Python, ready to run on my Mac. Running `python/bin/python3.9 --version` confirms that this is working correctly. ## Calling Python from Electron I used the Node.js `child_process.execFile()` function to execute Python scripts from inside Electron, like this: ```javascript const cp = require("child_process"); const util = require("util"); const execFile = util.promisify(cp.execFile); await execFile(path_to_python, ["-m", "random"]); ``` `path_to_python` needs to be the path to that `python3.9` executable. I wrote a `findPython()` function to find that, like so: ```javascript const fs = require("fs"); function findPython() { const possibilities = [ // In packaged app path.join(process.resourcesPath, "python", "bin", "python3.9"), // In development path.join(__dirname, "python", "bin", "python3.9"), ]; for (const path of possibilities) { if (fs.existsSync(path)) { re… | <p>For <a href="https://datasette.io/desktop" rel="nofollow">Datasette Desktop</a> I chose to bundle a full version of Python 3.9 inside my <code>Datasette.app</code> application. I did this in order to support installation of plugins via <code>pip install</code> - you can read more about my reasoning in <a href="https://simonwillison.net/2021/Sep/8/datasette-desktop/" rel="nofollow">Datasette Desktop—a macOS desktop application for Datasette</a>.</p> <p>I used <a href="https://github.com/indygreg/python-build-standalone">python-build-standalone</a> for this, which provides a version of Python that is designed for easy of bundling - it's also used by <a href="https://github.com/indygreg/PyOxidizer">PyOxidize</a>. Both projects are created and maintained by Gregory Szorc.</p> <h2> <a id="user-content-in-development-mode" class="anchor" href="#in-development-mode" aria-hidden="true"><span aria-hidden="true" class="octicon octicon-link"></span></a>In development mode</h2> <p>In my Electron app's root folder I ran the following:</p> <pre><code>wget https://github.com/indygreg/python-build-standalone/releases/download/20210724/cpython-3.9.6-x86_64-apple-darwin-install_only-20210724T1424.tar.gz tar -xzvf cpython-3.9.6-x86_64-apple-darwin-install_only-20210724T1424.tar.gz </code></pre> <p>This gave me a <code>python/</code> subfolder containing a full standalone Python, ready to run on my Mac.</p> <p>Running <code>python/bin/python3.9 --version</code> confirms that this is working correctly.</p> <h2> <a id="user-content-calling-python-from-electron" class="anchor" href="#calling-python-from-electron" aria-hidden="true"><span aria-hidden="true" class="octicon octicon-link"></span></a>Calling Python from Electron</h2> <p>I used the Node.js <code>child_process.execFile()</code> function to execute Python scripts from inside Electron, like this:</p> <div class="highlight highlight-source-js"><pre><span class="pl-k">const</span> <span class="pl-s1">cp<… | <Binary: 87,046 bytes> | 2021-09-08T16:38:57-07:00 | 2021-09-08T23:38:57+00:00 | 2021-09-08T16:38:57-07:00 | 2021-09-08T23:38:57+00:00 | 8490359447794f9b8a23fb242946a61c | python-inside-electron |
| electron_sign-notarize-electron-macos.md | electron | Signing and notarizing an Electron app for distribution using GitHub Actions | https://github.com/simonw/til/blob/main/electron/sign-notarize-electron-macos.md | I had to figure this out for [Datasette Desktop](https://github.com/simonw/datasette-app). ## Pay for an Apple Developer account First step is to pay $99/year for an [Apple Developer](https://developer.apple.com/) account. I had a previous (expired) account with a UK address, and changing to a USA address required a support ticket - so instead I created a brand new Apple ID specifically for the developer account. Since a later stage here involves storing the account password in a GitHub repository secret, I think this is a better way to go: I don't like the idea of my personal Apple ID account password being needed by anyone else who should be able to sign my application. ## Generate a Certificate Signing Request First you need to generate a Certificate Signing Request using Keychain Access on a Mac - I was unable to figure out how to do this on the command-line. Quoting https://help.apple.com/developer-account/#/devbfa00fef7: > 1. Launch Keychain Access located in `/Applications/Utilities`. > 2. Choose Keychain Access > Certificate Assistant > Request a Certificate from a Certificate Authority. > 3. In the Certificate Assistant dialog, enter an email address in the User Email Address field. > 4. In the Common Name field, enter a name for the key (for example, Gita Kumar Dev Key). > 5. Leave the CA Email Address field empty. > 6. Choose "Saved to disk", and click Continue. This produces a `CertificateSigningRequest.certSigningRequest` file. Save that somewhere sensible. ## Creating a Developer ID Application certificate The certificate needed is for a "Developer ID Application" - so select that option from the list of options on https://developer.apple.com/account/resources/certificates/add Upload the `CertificateSigningRequest.certSigningRequest` file, and Apple should provide you a `developerID_application.cer` to download. ## Export it as a .p12 file The final signing step requires a `.p12` file. It took me quite a while to figure out how to create this - in the end what worked for me was t… | <p>I had to figure this out for <a href="https://github.com/simonw/datasette-app">Datasette Desktop</a>.</p> <h2> <a id="user-content-pay-for-an-apple-developer-account" class="anchor" href="#pay-for-an-apple-developer-account" aria-hidden="true"><span aria-hidden="true" class="octicon octicon-link"></span></a>Pay for an Apple Developer account</h2> <p>First step is to pay $99/year for an <a href="https://developer.apple.com/" rel="nofollow">Apple Developer</a> account.</p> <p>I had a previous (expired) account with a UK address, and changing to a USA address required a support ticket - so instead I created a brand new Apple ID specifically for the developer account.</p> <p>Since a later stage here involves storing the account password in a GitHub repository secret, I think this is a better way to go: I don't like the idea of my personal Apple ID account password being needed by anyone else who should be able to sign my application.</p> <h2> <a id="user-content-generate-a-certificate-signing-request" class="anchor" href="#generate-a-certificate-signing-request" aria-hidden="true"><span aria-hidden="true" class="octicon octicon-link"></span></a>Generate a Certificate Signing Request</h2> <p>First you need to generate a Certificate Signing Request using Keychain Access on a Mac - I was unable to figure out how to do this on the command-line.</p> <p>Quoting <a href="https://help.apple.com/developer-account/#/devbfa00fef7" rel="nofollow">https://help.apple.com/developer-account/#/devbfa00fef7</a>:</p> <blockquote> <ol> <li>Launch Keychain Access located in <code>/Applications/Utilities</code>.</li> <li>Choose Keychain Access > Certificate Assistant > Request a Certificate from a Certificate Authority.</li> <li>In the Certificate Assistant dialog, enter an email address in the User Email Address field.</li> <li>In the Common Name field, enter a name for the key (for example, Gita Kumar Dev Key).</li> <li>Leave the CA Email Address field empty.</li> <li>Choose "Saved to disk", and click Continue.</li> </ol> </blo… | <Binary: 74,298 bytes> | 2021-09-08T10:41:46-07:00 | 2021-09-08T17:41:46+00:00 | 2021-09-08T10:41:46-07:00 | 2021-09-08T17:41:46+00:00 | 6882184d2acaa5b137e3e52a7f9feda2 | sign-notarize-electron-macos |
| electron_testing-electron-playwright.md | electron | Testing Electron apps with Playwright and GitHub Actions | https://github.com/simonw/til/blob/main/electron/testing-electron-playwright.md | Yesterday [I figured out (issue 133)](https://github.com/simonw/datasette-app/issues/133) how to use Playwright to run tests against my Electron app, and then execute those tests in CI using GitHub Actions, for my [datasett-app](https://github.com/simonw/datasette-app) repo for my [Datasette Desktop](https://datasette.io/desktop) macOS application. ## Installing @playwright/test You need to install the `@playwright/test` package. You can do that like so: npm i -D @playwright/test This adds it to `devDependencies` in your `package.json`, something like this: ``` "devDependencies": { "@playwright/test": "^1.23.2", ``` ## Writing a test I dropped the following into a `test/spec.mjs` file: ```javascript import { test, expect } from '@playwright/test'; import { _electron } from 'playwright'; test('App launches and quits', async () => { const app = await _electron.launch({args: ['main.js']); const window = await app.firstWindow(); await expect(await window.title()).toContain('Loading'); await app.close(); }); ``` The `.mjs` extension is necessary in order to use `import`, since it lets Node.js know that this file is a JavaScript module. The test can be run using `playwright test`. I later added it to my `package.json` section like this: ```json "scripts": { "test": "playwright test" } ``` Now I can run the Playwright tests using `npm test`. ## Recording video of the tests Recording videos of the test runs turns out to be easy: change the `_electron.launch()` line to look like this: ```javascript const app = await _electron.launch({ args: ['main.js'], recordVideo: {dir: 'test-videos'} }); ``` This creates the videos as `.webm` files in the `test-videos` directory. These videos can be opened in Chrome, or can be converted to `mp4` using `ffmpeg` (available on macOS via `brew install ffmpeg`): ffmpeg -i bc74c2a51bd91fe6f6cb815e6b99b6c7.webm bc74c2a51bd91fe6f6cb815e6b99b6c7.mp4 Converting to `.mp4` means you can drag and drop them onto a GitHub Issues thread and ge… | <p>Yesterday <a href="https://github.com/simonw/datasette-app/issues/133">I figured out (issue 133)</a> how to use Playwright to run tests against my Electron app, and then execute those tests in CI using GitHub Actions, for my <a href="https://github.com/simonw/datasette-app">datasett-app</a> repo for my <a href="https://datasette.io/desktop" rel="nofollow">Datasette Desktop</a> macOS application.</p> <h2> <a id="user-content-installing-playwrighttest" class="anchor" href="#installing-playwrighttest" aria-hidden="true"><span aria-hidden="true" class="octicon octicon-link"></span></a>Installing @playwright/test</h2> <p>You need to install the <code>@playwright/test</code> package. You can do that like so:</p> <pre><code>npm i -D @playwright/test </code></pre> <p>This adds it to <code>devDependencies</code> in your <code>package.json</code>, something like this:</p> <pre><code> "devDependencies": { "@playwright/test": "^1.23.2", </code></pre> <h2> <a id="user-content-writing-a-test" class="anchor" href="#writing-a-test" aria-hidden="true"><span aria-hidden="true" class="octicon octicon-link"></span></a>Writing a test</h2> <p>I dropped the following into a <code>test/spec.mjs</code> file:</p> <div class="highlight highlight-source-js"><pre><span class="pl-k">import</span> <span class="pl-kos">{</span> <span class="pl-s1">test</span><span class="pl-kos">,</span> <span class="pl-s1">expect</span> <span class="pl-kos">}</span> <span class="pl-k">from</span> <span class="pl-s">'@playwright/test'</span><span class="pl-kos">;</span> <span class="pl-k">import</span> <span class="pl-kos">{</span> <span class="pl-s1">_electron</span> <span class="pl-kos">}</span> <span class="pl-k">from</span> <span class="pl-s">'playwright'</span><span class="pl-kos">;</span> <span class="pl-en">test</span><span class="pl-kos">(</span><span class="pl-s">'App launches and quits'</span><span class="pl-kos">,</span> <span class="pl-k">async</span> <span class="pl-kos">(</span><span class="pl-kos">)</span> <span class="pl-c1">=></span… | <Binary: 66,234 bytes> | 2022-07-13T15:29:19-07:00 | 2022-07-13T22:29:19+00:00 | 2022-07-13T15:29:19-07:00 | 2022-07-13T22:29:19+00:00 | b6eb2943ffaec25569035cc04383de7d | testing-electron-playwright |
| firefox_search-across-all-resources.md | firefox | Search across all loaded resources in Firefox | https://github.com/simonw/til/blob/main/firefox/search-across-all-resources.md | You can search for a string in any resource loaded by a page (including across HTML, JavaScript and CSS) in the Debugger pane by hitting Command+Shift+F. <img alt="Screenshot of search interface" src="https://raw.githubusercontent.com/simonw/til/main/firefox/search-across-all-resources.jpg" width="600"> This view doesn't search the body of any JSON assets that were fetched by code, presumably because JSON isn't automatically loaded into memory by the browser. But ([thanks, @digitarald](https://twitter.com/digitarald/status/1257748744352567296)) the Network pane DOES let you search for content in assets fetched via Ajax/fetch() etc - though you do have to run the search before you trigger the requests that the search should cover. Again, the shortcut is Command+Shift+F. <img alt="Screenshot of search interface" src="https://raw.githubusercontent.com/simonw/til/main/firefox/search-across-all-resources-2.jpg" width="600"> | <p>You can search for a string in any resource loaded by a page (including across HTML, JavaScript and CSS) in the Debugger pane by hitting Command+Shift+F.</p> <p><a href="https://raw.githubusercontent.com/simonw/til/main/firefox/search-across-all-resources.jpg" target="_blank" rel="nofollow"><img alt="Screenshot of search interface" src="https://raw.githubusercontent.com/simonw/til/main/firefox/search-across-all-resources.jpg" width="600" style="max-width:100%;"></a></p> <p>This view doesn't search the body of any JSON assets that were fetched by code, presumably because JSON isn't automatically loaded into memory by the browser.</p> <p>But (<a href="https://twitter.com/digitarald/status/1257748744352567296" rel="nofollow">thanks, @digitarald</a>) the Network pane DOES let you search for content in assets fetched via Ajax/fetch() etc - though you do have to run the search before you trigger the requests that the search should cover. Again, the shortcut is Command+Shift+F.</p> <p><a href="https://raw.githubusercontent.com/simonw/til/main/firefox/search-across-all-resources-2.jpg" target="_blank" rel="nofollow"><img alt="Screenshot of search interface" src="https://raw.githubusercontent.com/simonw/til/main/firefox/search-across-all-resources-2.jpg" width="600" style="max-width:100%;"></a></p> | <Binary: 90,852 bytes> | 2020-05-05T11:38:56-07:00 | 2020-05-05T18:38:56+00:00 | 2020-09-20T21:43:17-07:00 | 2020-09-21T04:43:17+00:00 | 0cf1e455f161435a4aea07480c27da89 | search-across-all-resources |
| fly_custom-subdomain-fly.md | fly | Assigning a custom subdomain to a Fly app | https://github.com/simonw/til/blob/main/fly/custom-subdomain-fly.md | I deployed an app to [Fly](https://fly.io/) and decided to point a custom subdomain to it. My fly app is https://datasette-apache-proxy-demo.fly.dev/ I wanted the URL to be https://datasette-apache-proxy-demo.datasette.io/ (see [issue #1524](https://github.com/simonw/datasette/issues/1524)). Relevant documentation: [SSL for Custom Domains](https://fly.io/docs/app-guides/custom-domains-with-fly/). ## Assign a CNAME First step was to add a CNAME to my `datasette.io` domain. I pointed `CNAME` of `datasette-apache-proxy-demo.datasette.io` at `datasette-apache-proxy-demo.fly.dev.` using Vercel DNS: <img width="586" alt="image" src="https://user-images.githubusercontent.com/9599/142740008-942f180b-bedb-4a44-b6ef-1b0e7fd32416.png"> ## Issuing a certificate Fly started serving from `http://datasette-apache-proxy-demo.datasette.io/` as soon as the DNS change propagated. To get `https://` to work I had to run this: ``` % flyctl certs create datasette-apache-proxy-demo.datasette.io Your certificate for datasette-apache-proxy-demo.datasette.io is being issued. Status is Awaiting certificates. ``` I could then run this command periodically to see if it had been issued, which happened about 53 seconds later: ``` apache-proxy % flyctl certs show datasette-apache-proxy-demo.datasette.io The certificate for datasette-apache-proxy-demo.datasette.io has been issued. Hostname = datasette-apache-proxy-demo.datasette.io DNS Provider = constellix Certificate Authority = Let's Encrypt Issued = ecdsa,rsa Added to App = 53 seconds ago Source = fly ``` | <p>I deployed an app to <a href="https://fly.io/" rel="nofollow">Fly</a> and decided to point a custom subdomain to it.</p> <p>My fly app is <a href="https://datasette-apache-proxy-demo.fly.dev/" rel="nofollow">https://datasette-apache-proxy-demo.fly.dev/</a></p> <p>I wanted the URL to be <a href="https://datasette-apache-proxy-demo.datasette.io/" rel="nofollow">https://datasette-apache-proxy-demo.datasette.io/</a> (see <a href="https://github.com/simonw/datasette/issues/1524">issue #1524</a>).</p> <p>Relevant documentation: <a href="https://fly.io/docs/app-guides/custom-domains-with-fly/" rel="nofollow">SSL for Custom Domains</a>.</p> <h2> <a id="user-content-assign-a-cname" class="anchor" href="#assign-a-cname" aria-hidden="true"><span aria-hidden="true" class="octicon octicon-link"></span></a>Assign a CNAME</h2> <p>First step was to add a CNAME to my <code>datasette.io</code> domain.</p> <p>I pointed <code>CNAME</code> of <code>datasette-apache-proxy-demo.datasette.io</code> at <code>datasette-apache-proxy-demo.fly.dev.</code> using Vercel DNS:</p> <p><a href="https://user-images.githubusercontent.com/9599/142740008-942f180b-bedb-4a44-b6ef-1b0e7fd32416.png" target="_blank" rel="nofollow"><img width="586" alt="image" src="https://user-images.githubusercontent.com/9599/142740008-942f180b-bedb-4a44-b6ef-1b0e7fd32416.png" style="max-width:100%;"></a></p> <h2> <a id="user-content-issuing-a-certificate" class="anchor" href="#issuing-a-certificate" aria-hidden="true"><span aria-hidden="true" class="octicon octicon-link"></span></a>Issuing a certificate</h2> <p>Fly started serving from <code>http://datasette-apache-proxy-demo.datasette.io/</code> as soon as the DNS change propagated. To get <code>https://</code> to work I had to run this:</p> <pre><code>% flyctl certs create datasette-apache-proxy-demo.datasette.io Your certificate for datasette-apache-proxy-demo.datasette.io is being issued. Status is Awaiting certificates. </code></pre> <p>I could then run this command periodically to see if it had been issued, whi… | <Binary: 65,055 bytes> | 2021-11-20T12:46:43-08:00 | 2021-11-20T20:46:43+00:00 | 2021-11-20T12:46:43-08:00 | 2021-11-20T20:46:43+00:00 | f70fecfe6cfda21a079a753a1b96d491 | custom-subdomain-fly |
| fly_fly-docker-registry.md | fly | Using the Fly Docker registry | https://github.com/simonw/til/blob/main/fly/fly-docker-registry.md | [Fly.io](https://fly.io/) lets you deploy Docker containers that will be compiled as a Firecracker VM and run in locations around the world. Fly offer [a number of ways](https://fly.io/docs/reference/builders/) to build and deploy apps. For many frameworks you can run `fly launch` and it will detect the framework and configure a container for you. For others you can pass it a `Dockerfile` which will be built and deployed. But you can also push your own images to a Docker registry and deploy them to Fly. Today I figured out how to use Fly's own registry to deploy an app. ## Tagging images for the Fly registry Fly's registry is called `registry.fly.io`. To use it, you need to tag your Docker images with a tag that begins with that string. Every Fly app gets its own registry subdomain. You can create apps in a number of ways, but the easiest is to use the Fly CLI: flyctl apps create datasette-demo Fly app names must be globally unique across all of Fly - you will get an error if the app name is already taken. You can create an app with a random, freely available name using the `--generate-name` option: ``` ~ % flyctl apps create --generate-name ? Select Organization: Simon Willison (personal) New app created: rough-dew-1296 ``` Now that you have an app name, you can tag your Docker image using: registry.fly.io/your-app-name:unique-tag-for-your-image If you are building an image using Docker on your machine, you can run this command in the same directory as your `Dockerfile`: docker build -t registry.fly.io/datasette-demo:datasette-demo-v0 . ## Pushing images to the registry In order to push your image to Fly, you will first need to [authenticate](https://fly.io/docs/flyctl/auth-docker/). The `flyctl auth docker` command will do this for you: ``` ~ % flyctl auth docker Authentication successful. You can now tag and push images to registry.fly.io/{your-app} ``` This works by hooking into Docker's own authentication mechanism. You can see what it has done by looking at your `~/.docker/config… | <p><a href="https://fly.io/" rel="nofollow">Fly.io</a> lets you deploy Docker containers that will be compiled as a Firecracker VM and run in locations around the world.</p> <p>Fly offer <a href="https://fly.io/docs/reference/builders/" rel="nofollow">a number of ways</a> to build and deploy apps. For many frameworks you can run <code>fly launch</code> and it will detect the framework and configure a container for you. For others you can pass it a <code>Dockerfile</code> which will be built and deployed. But you can also push your own images to a Docker registry and deploy them to Fly.</p> <p>Today I figured out how to use Fly's own registry to deploy an app.</p> <h2> <a id="user-content-tagging-images-for-the-fly-registry" class="anchor" href="#tagging-images-for-the-fly-registry" aria-hidden="true"><span aria-hidden="true" class="octicon octicon-link"></span></a>Tagging images for the Fly registry</h2> <p>Fly's registry is called <code>registry.fly.io</code>. To use it, you need to tag your Docker images with a tag that begins with that string.</p> <p>Every Fly app gets its own registry subdomain. You can create apps in a number of ways, but the easiest is to use the Fly CLI:</p> <pre><code>flyctl apps create datasette-demo </code></pre> <p>Fly app names must be globally unique across all of Fly - you will get an error if the app name is already taken.</p> <p>You can create an app with a random, freely available name using the <code>--generate-name</code> option:</p> <pre><code>~ % flyctl apps create --generate-name ? Select Organization: Simon Willison (personal) New app created: rough-dew-1296 </code></pre> <p>Now that you have an app name, you can tag your Docker image using:</p> <pre><code>registry.fly.io/your-app-name:unique-tag-for-your-image </code></pre> <p>If you are building an image using Docker on your machine, you can run this command in the same directory as your <code>Dockerfile</code>:</p> <pre><code>docker build -t registry.fly.io/datasette-demo:datasette-demo-v0 . </code></pre> <h2> <a id="use… | <Binary: 75,011 bytes> | 2022-05-21T19:33:19-07:00 | 2022-05-22T02:33:19+00:00 | 2022-05-21T19:33:19-07:00 | 2022-05-22T02:33:19+00:00 | 437f94106c0a14fe25514ad91ba6da7d | fly-docker-registry |
| fly_fly-logs-to-s3.md | fly | Writing Fly logs to S3 | https://github.com/simonw/til/blob/main/fly/fly-logs-to-s3.md | [Fly](https://fly.io/) offers [fly-log-shipper](https://github.com/superfly/fly-log-shipper) as a container you can run in a Fly application to send all of the logs from your other applications to a logging provider. Several providers are supported. I decided to write them to an S3 bucket. ## Bucket credentials I used my [s3-credentials](https://github.com/simonw/s3-credentials) tool to generate an access key and secret locked down to just one newly created bucket: ``` s3-credentials create my-project-fly-logs \ --format ini \ --bucket-region us-west-1 \ --create-bucket \ > logging-credentials.txt ``` I chose `us-west-1` or Northern California as the region, as it is closest to me. That command output the following: ``` Created bucket: my-project-fly-logs in region: us-west-1 Created user: 's3.read-write.my-project-fly-logs' with permissions boundary: 'arn:aws:iam::aws:policy/AmazonS3FullAccess' Attached policy s3.read-write.my-project-fly-logs to user s3.read-write.my-project-fly-logs Created access key for user: s3.read-write.my-project-fly-logs ``` The full set of configuration needed by `fly-log-shipper` for S3 is: - `ORG` - Fly organisation slug - `ACCESS_TOKEN` - Fly personal access token - `AWS_ACCESS_KEY_ID` - AWS Access key with access to the log bucket - `AWS_SECRET_ACCESS_KEY` - AWS secret access key - `AWS_BUCKET` - AWS S3 bucket to store logs in - `AWS_REGION` - Region for the bucket I created a personal access token at https://fly.io/user/personal_access_tokens ## Creating the app I created a new Fly application to run the container like so: fly apps create --name my-project-log-shipper --org my-project-org ## Setting the secrets I set all of the configuration variables as secrets in one go like this: ``` fly secrets set \ ORG="my-project-org" \ ACCESS_TOKEN="..." \ AWS_ACCESS_KEY_ID="AKIAWXFXAIOZIPTTHMBQ" \ AWS_SECRET_ACCESS_KEY="..." \ AWS_BUCKET="my-project-fly-logs" \ AWS_REGION="us-west-1" \ -a my-project-shipper ``` ## Deploying the app It turns out y… | <p><a href="https://fly.io/" rel="nofollow">Fly</a> offers <a href="https://github.com/superfly/fly-log-shipper">fly-log-shipper</a> as a container you can run in a Fly application to send all of the logs from your other applications to a logging provider.</p> <p>Several providers are supported. I decided to write them to an S3 bucket.</p> <h2><a id="user-content-bucket-credentials" class="anchor" aria-hidden="true" href="#bucket-credentials"><span aria-hidden="true" class="octicon octicon-link"></span></a>Bucket credentials</h2> <p>I used my <a href="https://github.com/simonw/s3-credentials">s3-credentials</a> tool to generate an access key and secret locked down to just one newly created bucket:</p> <pre><code>s3-credentials create my-project-fly-logs \ --format ini \ --bucket-region us-west-1 \ --create-bucket \ > logging-credentials.txt </code></pre> <p>I chose <code>us-west-1</code> or Northern California as the region, as it is closest to me.</p> <p>That command output the following:</p> <pre><code>Created bucket: my-project-fly-logs in region: us-west-1 Created user: 's3.read-write.my-project-fly-logs' with permissions boundary: 'arn:aws:iam::aws:policy/AmazonS3FullAccess' Attached policy s3.read-write.my-project-fly-logs to user s3.read-write.my-project-fly-logs Created access key for user: s3.read-write.my-project-fly-logs </code></pre> <p>The full set of configuration needed by <code>fly-log-shipper</code> for S3 is:</p> <ul> <li> <code>ORG</code> - Fly organisation slug</li> <li> <code>ACCESS_TOKEN</code> - Fly personal access token</li> <li> <code>AWS_ACCESS_KEY_ID</code> - AWS Access key with access to the log bucket</li> <li> <code>AWS_SECRET_ACCESS_KEY</code> - AWS secret access key</li> <li> <code>AWS_BUCKET</code> - AWS S3 bucket to store logs in</li> <li> <code>AWS_REGION</code> - Region for the bucket</li> </ul> <p>I created a personal access token at <a href="https://fly.io/user/personal_access_tokens" rel="nofollow">https://fly.io/user/personal_access_tokens</a></p> <h2><a id="use… | <Binary: 55,413 bytes> | 2022-05-25T12:47:40-07:00 | 2022-05-25T19:47:40+00:00 | 2022-09-27T20:59:18-07:00 | 2022-09-28T03:59:18+00:00 | 3ac2c543a1de8af7c9207aa5896ba423 | fly-logs-to-s3 |
| fly_redbean-on-fly.md | fly | Deploying a redbean app to Fly | https://github.com/simonw/til/blob/main/fly/redbean-on-fly.md | [redbean](https://redbean.dev/) is a fascinating project - it provides a web server in a self-contained executable which you can add assets (or dynamic Lua code) to just by zipping them into the same binary package. I decided to try running it on [Fly](https://fly.io). Here's the recipe that worked for me. ## The Dockerfile I copied this Dockerfile, unmodified, from https://github.com/kissgyorgy/redbean-docker/blob/master/Dockerfile-multistage by György Kiss: ```dockerfile FROM alpine:latest as build ARG DOWNLOAD_FILENAME=redbean-original-2.0.8.com RUN apk add --update zip bash RUN wget https://redbean.dev/${DOWNLOAD_FILENAME} -O redbean.com RUN chmod +x redbean.com # normalize the binary to ELF RUN sh /redbean.com --assimilate # Add your files here COPY assets /assets WORKDIR /assets RUN zip -r /redbean.com * # just for debugging purposes RUN ls -la /redbean.com RUN zip -sf /redbean.com FROM scratch COPY --from=build /redbean.com / CMD ["/redbean.com", "-vv", "-p", "80"] ``` It uses a multi-stage build to download redbean, copy in the contents of your `assets/` folder, zip those back up and then create a TINY container from `scratch` that copies in just that executable. I made an `assets/` folder with something fun in it (a copy of my [Datasette Lite](https://github.com/simonw/datasette-lite) app) like this: ``` mkdir assets cd assets wget https://lite.datasette.io/index.html wget https://lite.datasette.io/webworker.js ``` ## Deploying to Fly First I needed to create a new application. I ran this: fly apps create redbean-on-fly Then I needed a `fly.toml` file. I created this one (copied from a previous example, but I updated the internal server port and the name): ```toml app = "redbean-on-fly" kill_signal = "SIGINT" kill_timeout = 5 [[services]] internal_port = 80 protocol = "tcp" [services.concurrency] hard_limit = 25 soft_limit = 20 [[services.ports]] handlers = ["http"] port = "80" [[services.ports]] handlers = ["tls", "http"] port = "443" [[ser… | <p><a href="https://redbean.dev/" rel="nofollow">redbean</a> is a fascinating project - it provides a web server in a self-contained executable which you can add assets (or dynamic Lua code) to just by zipping them into the same binary package.</p> <p>I decided to try running it on <a href="https://fly.io" rel="nofollow">Fly</a>. Here's the recipe that worked for me.</p> <h2> <a id="user-content-the-dockerfile" class="anchor" href="#the-dockerfile" aria-hidden="true"><span aria-hidden="true" class="octicon octicon-link"></span></a>The Dockerfile</h2> <p>I copied this Dockerfile, unmodified, from <a href="https://github.com/kissgyorgy/redbean-docker/blob/master/Dockerfile-multistage">https://github.com/kissgyorgy/redbean-docker/blob/master/Dockerfile-multistage</a> by György Kiss:</p> <div class="highlight highlight-source-dockerfile"><pre><span class="pl-k">FROM</span> alpine:latest as build <span class="pl-k">ARG</span> DOWNLOAD_FILENAME=redbean-original-2.0.8.com <span class="pl-k">RUN</span> apk add --update zip bash <span class="pl-k">RUN</span> wget https://redbean.dev/${DOWNLOAD_FILENAME} -O redbean.com <span class="pl-k">RUN</span> chmod +x redbean.com <span class="pl-c"><span class="pl-c">#</span> normalize the binary to ELF</span> <span class="pl-k">RUN</span> sh /redbean.com --assimilate <span class="pl-c"><span class="pl-c">#</span> Add your files here</span> <span class="pl-k">COPY</span> assets /assets <span class="pl-k">WORKDIR</span> /assets <span class="pl-k">RUN</span> zip -r /redbean.com * <span class="pl-c"><span class="pl-c">#</span> just for debugging purposes</span> <span class="pl-k">RUN</span> ls -la /redbean.com <span class="pl-k">RUN</span> zip -sf /redbean.com <span class="pl-k">FROM</span> scratch <span class="pl-k">COPY</span> --from=build /redbean.com / <span class="pl-k">CMD</span> [<span class="pl-s">"/redbean.com"</span>, <span class="pl-s">"-vv"</span>, <span class="pl-s">"-p"</span>, <span class="pl-s">"80"</span>]</pre></div> <p>It uses a multi-stage build to download r… | <Binary: 60,876 bytes> | 2022-07-24T17:46:24-07:00 | 2022-07-25T00:46:24+00:00 | 2022-07-24T17:46:24-07:00 | 2022-07-25T00:46:24+00:00 | 89bed785f237c5f289ee7400beef1c18 | redbean-on-fly |
| fly_scp.md | fly | How to scp files to and from Fly | https://github.com/simonw/til/blob/main/fly/scp.md | I have a Fly instance with a 20GB volume, and I wanted to copy files to and from the instance from my computer using `scp`. Here's the process that worked for me. 1. Connect to Fly's WireGuard network. Fly have [step by step instructions](https://fly.io/docs/reference/private-networking/#step-by-step) for this - you need to install a WireGuard app (I used the [official WireGuard macOS app](https://www.wireguard.com/install/)) and use the `fly wireguard create` command to configure it. 2. Generate 24 hour limited SSH credentials for your Fly organization: Run `fly ssh issue`, follow the prompt to select your organization and then tell it where to put the credentials. I saved them to `/tmp/fly` since they will only work for 24 hours. 3. Find the IPv6 private address for the instance you want to connect to. My instance is in the `laion-aesthetic` application so I did this by running: `fly ips private -a laion-aesthetic` 4. If the image you used to build the instance doesn't have `scp` installed you'll need to install it. On Ubuntu or Debian machines you can do that by attaching using `fly ssh console -a name-of-app` and then running `apt-get update && install openssh-client -y`. Any time you restart the container you'll have to run this step again, so if you're going to do it often you should instead update the image you are using to include this package. 6. Run the `scp` like this: `scp -i /tmp/fly root@\[fdaa:0:4ef:a7b:ad0:1:9c23:2\]:/data/data.db /tmp` - note how the IPv6 address is enclosed in `\[...\]`. | <p>I have a Fly instance with a 20GB volume, and I wanted to copy files to and from the instance from my computer using <code>scp</code>.</p> <p>Here's the process that worked for me.</p> <ol> <li>Connect to Fly's WireGuard network. Fly have <a href="https://fly.io/docs/reference/private-networking/#step-by-step" rel="nofollow">step by step instructions</a> for this - you need to install a WireGuard app (I used the <a href="https://www.wireguard.com/install/" rel="nofollow">official WireGuard macOS app</a>) and use the <code>fly wireguard create</code> command to configure it.</li> <li>Generate 24 hour limited SSH credentials for your Fly organization: Run <code>fly ssh issue</code>, follow the prompt to select your organization and then tell it where to put the credentials. I saved them to <code>/tmp/fly</code> since they will only work for 24 hours.</li> <li>Find the IPv6 private address for the instance you want to connect to. My instance is in the <code>laion-aesthetic</code> application so I did this by running: <code>fly ips private -a laion-aesthetic</code> </li> <li>If the image you used to build the instance doesn't have <code>scp</code> installed you'll need to install it. On Ubuntu or Debian machines you can do that by attaching using <code>fly ssh console -a name-of-app</code> and then running <code>apt-get update && install openssh-client -y</code>. Any time you restart the container you'll have to run this step again, so if you're going to do it often you should instead update the image you are using to include this package.</li> <li>Run the <code>scp</code> like this: <code>scp -i /tmp/fly root@\[fdaa:0:4ef:a7b:ad0:1:9c23:2\]:/data/data.db /tmp</code> - note how the IPv6 address is enclosed in <code>\[...\]</code>.</li> </ol> | <Binary: 93,002 bytes> | 2022-09-02T15:39:04-07:00 | 2022-09-02T22:39:04+00:00 | 2022-09-02T15:39:04-07:00 | 2022-09-02T22:39:04+00:00 | 6f6d33491b25a9e67f82d62fc61ed9c9 | scp |
| fly_undocumented-graphql-api.md | fly | Using the undocumented Fly GraphQL API | https://github.com/simonw/til/blob/main/fly/undocumented-graphql-api.md | [Fly](https://fly.io/) has a GraphQL API which is used by some of their own tools - I found it while [browsing around their code](https://github.com/superfly/flyctl/blob/603b0adccf5416188eabaa7dc73f9c0ec88fa6ca/api/resource_volumes.go#L5-L40) on GitHub. It's very much undocumented, which means you would be very foolish to write any software against it and expect it to continue to work as Fly make changes. Only it is *kind of* documented, because GraphQL introspection provides decent documentation. (Also it's used [by example code](https://github.com/fly-apps/hostnamesapi) published by Fly, so maybe it's more supported than I initially thought.) The endpoint is `https://api.fly.io/graphql` - you need a `Authorization: Bearer xxx` HTTP header to access it, where you can get the `xxx` token by running `flyctl auth token`. Or, you can point your browser directly at https://api.fly.io/graphql - they are running a copy of [GraphiQL](https://github.com/graphql/graphiql) there which provides an interactive explorer plus documentation and schema tabs. And if you're signed in to the Fly web interface it will use your `.fly.io` cookies to authenticate your GraphQL requests - so no need to worry about that `Authorization` header. Here's a query I used to answer the question "what volumes do I have attached, across all of my instances?" ```graphql { apps { nodes { name volumes { nodes { name } } } } } ``` Here's a much more fun query: ```graphql { # Your user account: viewer { avatarUrl createdAt email # This returned the following for me: # ["backend_wordpress", "response_headers_middleware", "firecracker", "dashboard_logs"] featureFlags } nearestRegion { # This returned "sjc" code } personalOrganization { name creditBalance creditBalanceFormatted # Not sure what these are but they look interesting - I have 7 loggedCertificates { totalCount nodes { cert id root … | <p><a href="https://fly.io/" rel="nofollow">Fly</a> has a GraphQL API which is used by some of their own tools - I found it while <a href="https://github.com/superfly/flyctl/blob/603b0adccf5416188eabaa7dc73f9c0ec88fa6ca/api/resource_volumes.go#L5-L40">browsing around their code</a> on GitHub.</p> <p>It's very much undocumented, which means you would be very foolish to write any software against it and expect it to continue to work as Fly make changes.</p> <p>Only it is <em>kind of</em> documented, because GraphQL introspection provides decent documentation.</p> <p>(Also it's used <a href="https://github.com/fly-apps/hostnamesapi">by example code</a> published by Fly, so maybe it's more supported than I initially thought.)</p> <p>The endpoint is <code>https://api.fly.io/graphql</code> - you need a <code>Authorization: Bearer xxx</code> HTTP header to access it, where you can get the <code>xxx</code> token by running <code>flyctl auth token</code>.</p> <p>Or, you can point your browser directly at <a href="https://api.fly.io/graphql" rel="nofollow">https://api.fly.io/graphql</a> - they are running a copy of <a href="https://github.com/graphql/graphiql">GraphiQL</a> there which provides an interactive explorer plus documentation and schema tabs.</p> <p>And if you're signed in to the Fly web interface it will use your <code>.fly.io</code> cookies to authenticate your GraphQL requests - so no need to worry about that <code>Authorization</code> header.</p> <p>Here's a query I used to answer the question "what volumes do I have attached, across all of my instances?"</p> <div class="highlight highlight-source-graphql"><pre>{ <span class="pl-v">apps</span> { <span class="pl-v">nodes</span> { <span class="pl-v">name</span> <span class="pl-v">volumes</span> { <span class="pl-v">nodes</span> { <span class="pl-v">name</span> } } } } }</pre></div> <p>Here's a much more fun query:</p> <div class="highlight highlight-source-graphql"><pre>{ <span class="pl-c"> # Your user a… | <Binary: 89,644 bytes> | 2022-01-21T14:59:35-08:00 | 2022-01-21T22:59:35+00:00 | 2022-02-01T15:07:06-08:00 | 2022-02-01T23:07:06+00:00 | 74a5e0005a6e44d69b773fef0a2b0928 | undocumented-graphql-api |
| fly_wildcard-dns-ssl.md | fly | Wildcard DNS and SSL on Fly | https://github.com/simonw/til/blob/main/fly/wildcard-dns-ssl.md | [Fly](https://fly.io/) makes it surprisingly easy to configure wildcard DNS, such that `anything.your-new-domain.dev` is served by a single Fly application (which can include multiple instances in multiple regions with global load-balancing). Their documentation is at [SSL for Custom Domains](https://fly.io/docs/app-guides/custom-domains-with-fly). Here's how I set it up. ## Register the domain I'm using `your-new-domain.dev` in this example, which is not a domain I have registered. `.dev` is interesting here because it requires SSL (or TLS if you want to be pedantic about it). ## Create an application with an IPv4 and IPv6 IP address First, create an application: fly apps create --name your-wildcard-dns-app Then create both an IPv4 and an IPv6 address for the application: ``` fly ips allocate-v4 -a your-wildcard-dns-app TYPE ADDRESS REGION CREATED AT v4 37.16.10.138 global 7s ago fly ips allocate-v6 -a your-wildcard-dns-app TYPE ADDRESS REGION CREATED AT v6 2a09:8280:1::1:3e99 global 4s ago ``` The IPv4 address is so you can serve traffic. The IPv6 address is needed as part of Fly's scheme to protect against subdomain takeover - see [How CDNs Generate Certificates: A Note About a Related Problem](https://fly.io/blog/how-cdns-generate-certificates/#a-note-about-a-related-problem) for details. ## Configuring DNS Now setup the following DNS records: ``` your-new-domain.dev A: 37.16.10.138 your-new-domain.dev AAAA: 2a09:8280:1::1:3e99 *.your-new-domain.dev CNAME: your-wildcard-dns-app.fly.dev. ``` That `CNAME` record does the real magic here. ## Issue the certificate You can ask Fly to issue the certificate (which uses LetsEncrypt under the hood) by running this: ``` fly certs create "*.your-new-domain.dev" \ -a your-wildcard-dns-app ``` ## Verifying the certificate There's one last step: you need ta add an additional DNS record to verify the certificate. Instructions for doing this can be found at: https://fly.io/apps/your-wildcard-dns-app/certificate… | <p><a href="https://fly.io/" rel="nofollow">Fly</a> makes it surprisingly easy to configure wildcard DNS, such that <code>anything.your-new-domain.dev</code> is served by a single Fly application (which can include multiple instances in multiple regions with global load-balancing).</p> <p>Their documentation is at <a href="https://fly.io/docs/app-guides/custom-domains-with-fly" rel="nofollow">SSL for Custom Domains</a>. Here's how I set it up.</p> <h2> <a id="user-content-register-the-domain" class="anchor" href="#register-the-domain" aria-hidden="true"><span aria-hidden="true" class="octicon octicon-link"></span></a>Register the domain</h2> <p>I'm using <code>your-new-domain.dev</code> in this example, which is not a domain I have registered. <code>.dev</code> is interesting here because it requires SSL (or TLS if you want to be pedantic about it).</p> <h2> <a id="user-content-create-an-application-with-an-ipv4-and-ipv6-ip-address" class="anchor" href="#create-an-application-with-an-ipv4-and-ipv6-ip-address" aria-hidden="true"><span aria-hidden="true" class="octicon octicon-link"></span></a>Create an application with an IPv4 and IPv6 IP address</h2> <p>First, create an application:</p> <pre><code>fly apps create --name your-wildcard-dns-app </code></pre> <p>Then create both an IPv4 and an IPv6 address for the application:</p> <pre><code>fly ips allocate-v4 -a your-wildcard-dns-app TYPE ADDRESS REGION CREATED AT v4 37.16.10.138 global 7s ago fly ips allocate-v6 -a your-wildcard-dns-app TYPE ADDRESS REGION CREATED AT v6 2a09:8280:1::1:3e99 global 4s ago </code></pre> <p>The IPv4 address is so you can serve traffic.</p> <p>The IPv6 address is needed as part of Fly's scheme to protect against subdomain takeover - see <a href="https://fly.io/blog/how-cdns-generate-certificates/#a-note-about-a-related-problem" rel="nofollow">How CDNs Generate Certificates: A Note About a Related Problem</a> for details.</p> <h2> <a id="user-content-configuring-dns" class="anchor" href="#configuring-dn… | <Binary: 67,897 bytes> | 2022-05-25T19:46:47-07:00 | 2022-05-26T02:46:47+00:00 | 2022-05-25T19:52:07-07:00 | 2022-05-26T02:52:07+00:00 | ebbaa42f14cb55fd6009d8707f2d482d | wildcard-dns-ssl |
| gis_mapzen-elevation-tiles.md | gis | Downloading MapZen elevation tiles | https://github.com/simonw/til/blob/main/gis/mapzen-elevation-tiles.md | [Via Tony Hirst](https://twitter.com/psychemedia/status/1357280624319553537) I found out about [MapZen's elevation tiles](https://www.mapzen.com/blog/terrain-tile-service/), which encode elevation data in PNG and other formats. These days they live at https://registry.opendata.aws/terrain-tiles/ I managed to download a subset of them using [download-tiles](https://datasette.io/tools/download-tiles) like so: ``` download-tiles elevation.mbtiles -z 0-4 \ --tiles-url='https://s3.amazonaws.com/elevation-tiles-prod/terrarium/{z}/{x}/{y}.png' ``` I'm worried I may have got the x and y the wrong way round though, see comments on https://github.com/simonw/datasette-tiles/issues/15 | <p><a href="https://twitter.com/psychemedia/status/1357280624319553537" rel="nofollow">Via Tony Hirst</a> I found out about <a href="https://www.mapzen.com/blog/terrain-tile-service/" rel="nofollow">MapZen's elevation tiles</a>, which encode elevation data in PNG and other formats.</p> <p>These days they live at <a href="https://registry.opendata.aws/terrain-tiles/" rel="nofollow">https://registry.opendata.aws/terrain-tiles/</a></p> <p>I managed to download a subset of them using <a href="https://datasette.io/tools/download-tiles" rel="nofollow">download-tiles</a> like so:</p> <pre><code>download-tiles elevation.mbtiles -z 0-4 \ --tiles-url='https://s3.amazonaws.com/elevation-tiles-prod/terrarium/{z}/{x}/{y}.png' </code></pre> <p>I'm worried I may have got the x and y the wrong way round though, see comments on <a href="https://github.com/simonw/datasette-tiles/issues/15">https://github.com/simonw/datasette-tiles/issues/15</a></p> | <Binary: 64,118 bytes> | 2021-02-04T10:48:48-08:00 | 2021-02-04T18:48:48+00:00 | 2021-02-04T10:48:48-08:00 | 2021-02-04T18:48:48+00:00 | eac3531e08b6e6ded4c323148bf26b69 | mapzen-elevation-tiles |
| gis_natural-earth-in-spatialite-and-datasette.md | gis | Natural Earth in SpatiaLite and Datasette | https://github.com/simonw/til/blob/main/gis/natural-earth-in-spatialite-and-datasette.md | Natural Earth ([website](https://www.naturalearthdata.com/), [Wikipedia](https://en.wikipedia.org/wiki/Natural_Earth)) is a a public domain map dataset. It's distributed in a bunch of different formats - one of them is a SQLite database file. http://naciscdn.org/naturalearth/packages/natural_earth_vector.sqlite.zip - this is a 423MB file which decompresses to provide a 791MB `packages/natural_earth_vector.sqlite` file. I opened it in Datasette like this: datasette --load-extension spatialite \ ~/Downloads/natural_earth_vector.sqlite/packages/natural_earth_vector.sqlite I had previously installed Datasette and SpatiaLite using Homebrew: brew install datasette spatialite-tools ## Database format The database contains 181 tables, for different layers at different scales. Those tables are listed below. Each table has a bunch of columns and a `GEOMETRY` column. That geometry column contains data stored in WKB - Well-Known Binary format. If you have SpatiaLite you can convert that column to GeoJSON like so: AsGeoJSON(GeomFromWKB(GEOMETRY)) For example, here are the largest "urban areas" at 50m scale: ```sql select AsGeoJSON(GeomFromWKB(GEOMETRY)) from ne_50m_urban_areas order by area_sqkm desc ``` Every country at 50m scale (a good balance between detail and overall size): ```sql select AsGeoJSON(GeomFromWKB(GEOMETRY)), * from ne_50m_admin_0_countries ``` This query draws a coloured map of countries using the `datasette-geojson-map` and `sqlite-colorbrewer` plugins: ```sql select ogc_fid, GeomFromWKB(GEOMETRY) as geometry, colorbrewer('Paired', 9, MAPCOLOR9 - 1) as fill from ne_10m_admin_0_countries ``` <img width="1098" alt="Screenshot of a map showing different countries in random colours" src="https://user-images.githubusercontent.com/9599/156858327-08f99300-29fd-4ca8-a268-f8c2ec659349.png"> The `ne_10m_admin_1_states_provinces` table is useful: it has subdivisions for a bunch of different countries. Here's the UK divided into counties: ```sql select ogc_fid, G… | <p>Natural Earth (<a href="https://www.naturalearthdata.com/" rel="nofollow">website</a>, <a href="https://en.wikipedia.org/wiki/Natural_Earth" rel="nofollow">Wikipedia</a>) is a a public domain map dataset.</p> <p>It's distributed in a bunch of different formats - one of them is a SQLite database file.</p> <p><a href="http://naciscdn.org/naturalearth/packages/natural_earth_vector.sqlite.zip" rel="nofollow">http://naciscdn.org/naturalearth/packages/natural_earth_vector.sqlite.zip</a> - this is a 423MB file which decompresses to provide a 791MB <code>packages/natural_earth_vector.sqlite</code> file.</p> <p>I opened it in Datasette like this:</p> <pre><code>datasette --load-extension spatialite \ ~/Downloads/natural_earth_vector.sqlite/packages/natural_earth_vector.sqlite </code></pre> <p>I had previously installed Datasette and SpatiaLite using Homebrew:</p> <pre><code>brew install datasette spatialite-tools </code></pre> <h2> <a id="user-content-database-format" class="anchor" href="#database-format" aria-hidden="true"><span aria-hidden="true" class="octicon octicon-link"></span></a>Database format</h2> <p>The database contains 181 tables, for different layers at different scales. Those tables are listed below.</p> <p>Each table has a bunch of columns and a <code>GEOMETRY</code> column. That geometry column contains data stored in WKB - Well-Known Binary format.</p> <p>If you have SpatiaLite you can convert that column to GeoJSON like so:</p> <pre><code>AsGeoJSON(GeomFromWKB(GEOMETRY)) </code></pre> <p>For example, here are the largest "urban areas" at 50m scale:</p> <div class="highlight highlight-source-sql"><pre><span class="pl-k">select</span> AsGeoJSON(GeomFromWKB(GEOMETRY)) <span class="pl-k">from</span> ne_50m_urban_areas <span class="pl-k">order by</span> area_sqkm <span class="pl-k">desc</span></pre></div> <p>Every country at 50m scale (a good balance between detail and overall size):</p> <div class="highlight highlight-source-sql"><pre><span class="pl-k">select</span> AsGeoJSON(GeomFromWKB(GEOME… | <Binary: 67,288 bytes> | 2022-03-04T11:11:55-08:00 | 2022-03-04T19:11:55+00:00 | 2022-03-04T16:10:50-08:00 | 2022-03-05T00:10:50+00:00 | 5d119fc759211694df235623daa93943 | natural-earth-in-spatialite-and-datasette |
| git_remove-commit-and-force-push.md | git | Removing a git commit and force pushing to remove it from history | https://github.com/simonw/til/blob/main/git/remove-commit-and-force-push.md | I accidentally triggered a commit which added a big chunk of unwanted data to my repository. I didn't want this to stick around in the history forever, and no-one else was pulling from the repo, so I decided to use force push to remove the rogue commit entirely. I figured out the commit hash of the previous version that I wanted to restore and ran: git reset --hard 1909f93 Then I ran the force push like this: git push --force origin main See https://github.com/simonw/sf-tree-history/issues/1 | <p>I accidentally triggered a commit which added a big chunk of unwanted data to my repository. I didn't want this to stick around in the history forever, and no-one else was pulling from the repo, so I decided to use force push to remove the rogue commit entirely.</p> <p>I figured out the commit hash of the previous version that I wanted to restore and ran:</p> <pre><code>git reset --hard 1909f93 </code></pre> <p>Then I ran the force push like this:</p> <pre><code>git push --force origin main </code></pre> <p>See <a href="https://github.com/simonw/sf-tree-history/issues/1">https://github.com/simonw/sf-tree-history/issues/1</a></p> | <Binary: 58,327 bytes> | 2021-10-22T12:25:57-07:00 | 2021-10-22T19:25:57+00:00 | 2021-10-22T12:25:57-07:00 | 2021-10-22T19:25:57+00:00 | 0885470afde1e0e022cfd0757da982a4 | remove-commit-and-force-push |
| git_rewrite-repo-specific-files.md | git | Rewriting a repo to contain the history of just specific files | https://github.com/simonw/til/blob/main/git/rewrite-repo-specific-files.md | I wanted to start [a new git repository](https://github.com/simonw/graphql-scraper/tree/828a1efc4307cca6cd378c394c2d33eac2eceb52) containing just the history of two specific files from my [help-scraper repository](https://github.com/simonw/help-scraper). I started out planning to use `git filter-branch` for this, but got put off when [this StackOverflow thread](https://stackoverflow.com/questions/2982055/detach-many-subdirectories-into-a-new-separate-git-repository) started talking about the need to understand the differences between macOS `sed` and regular GNU `sed`. That thread also pointed me to [git-filter-repo](https://github.com/newren/git-filter-repo), a really neat Python script that makes this *so much easier*. ## Installing git-filter-repo `git-filter-repo` is written in Python but has zero dependencies on anything else - all you need to do is place the script somewhere on your path. I ran `echo $PATH` to check which directories were on my path - one of them is `.local/bin` - so I decided to put it there: cd ~/.local/bin wget https://raw.githubusercontent.com/newren/git-filter-repo/main/git-filter-repo chmod 755 git-filter-repo It didn't work until I ran `chmod 755` on it. Now I can run this: % git filter-repo No arguments specified. Confirming the new command is installed! ## Rewriting my repository The `--path` option can be used to preserve just the history of specified paths. I ran this: cd /tmp git clone https://github.com/simonw/help-scraper cd help-scraper git filter-repo --path flyctl/fly.graphql --path github/github.graphql The command output was: Parsed 132 commits New history written in 0.33 seconds; now repacking/cleaning... Repacking your repo and cleaning out old unneeded objects HEAD is now at 828a1efc GitHub: Tue Mar 22 15:09:04 UTC 2022 Enumerating objects: 144, done. Counting objects: 100% (144/144), done. Delta compression using up to 12 threads Compressing objects: 100% (69/69), done. Writing objec… | <p>I wanted to start <a href="https://github.com/simonw/graphql-scraper/tree/828a1efc4307cca6cd378c394c2d33eac2eceb52">a new git repository</a> containing just the history of two specific files from my <a href="https://github.com/simonw/help-scraper">help-scraper repository</a>.</p> <p>I started out planning to use <code>git filter-branch</code> for this, but got put off when <a href="https://stackoverflow.com/questions/2982055/detach-many-subdirectories-into-a-new-separate-git-repository" rel="nofollow">this StackOverflow thread</a> started talking about the need to understand the differences between macOS <code>sed</code> and regular GNU <code>sed</code>.</p> <p>That thread also pointed me to <a href="https://github.com/newren/git-filter-repo">git-filter-repo</a>, a really neat Python script that makes this <em>so much easier</em>.</p> <h2> <a id="user-content-installing-git-filter-repo" class="anchor" href="#installing-git-filter-repo" aria-hidden="true"><span aria-hidden="true" class="octicon octicon-link"></span></a>Installing git-filter-repo</h2> <p><code>git-filter-repo</code> is written in Python but has zero dependencies on anything else - all you need to do is place the script somewhere on your path.</p> <p>I ran <code>echo $PATH</code> to check which directories were on my path - one of them is <code>.local/bin</code> - so I decided to put it there:</p> <pre><code>cd ~/.local/bin wget https://raw.githubusercontent.com/newren/git-filter-repo/main/git-filter-repo chmod 755 git-filter-repo </code></pre> <p>It didn't work until I ran <code>chmod 755</code> on it.</p> <p>Now I can run this:</p> <pre><code>% git filter-repo No arguments specified. </code></pre> <p>Confirming the new command is installed!</p> <h2> <a id="user-content-rewriting-my-repository" class="anchor" href="#rewriting-my-repository" aria-hidden="true"><span aria-hidden="true" class="octicon octicon-link"></span></a>Rewriting my repository</h2> <p>The <code>--path</code> option can be used to preserve just the history of specified paths. … | <Binary: 79,589 bytes> | 2022-03-22T16:11:45-07:00 | 2022-03-22T23:11:45+00:00 | 2022-03-22T16:21:51-07:00 | 2022-03-22T23:21:51+00:00 | 291f781770fee270d63e579044dee9c0 | rewrite-repo-specific-files |
| github-actions_attach-generated-file-to-release.md | github-actions | Attaching a generated file to a GitHub release using Actions | https://github.com/simonw/til/blob/main/github-actions/attach-generated-file-to-release.md | For [Datasette Desktop](https://github.com/simonw/datasette-app) I wanted to run an action which, when I created a release, would build an asset for that release and then upload and attach it. I triggered my action on the creation of a new release, like so: ```yaml on: release: types: [created] ``` Assuming previous steps that create a file called `app.zip` in the root of the checkout, here's the final action step which worked for me: ```yaml - name: Upload release attachment uses: actions/github-script@v4 with: script: | const fs = require('fs'); const tag = context.ref.replace("refs/tags/", ""); // Get release for this tag const release = await github.repos.getReleaseByTag({ owner: context.repo.owner, repo: context.repo.repo, tag }); // Upload the release asset await github.repos.uploadReleaseAsset({ owner: context.repo.owner, repo: context.repo.repo, release_id: release.data.id, name: "app.zip", data: await fs.readFileSync("app.zip") }); ``` It uses [actions/github-script](https://github.com/actions/github-script) which provides a pre-configured [octokit/rest.js](https://octokit.github.io/rest.js/) client object. The `uploadReleaseAsset()` method needs the `owner`, `repo`, `release_id`, `name` (filename) and the file data. These are mostly available, with the exception of `release_id`. That can be derived for the current release based on the `context.ref` value - strip that down to just the tag, then use `getReleaseByTag()` to get a release object. `release.data.id` will then be the numeric release ID. My full workflow is at https://github.com/simonw/datasette-app/blob/0.1.0/.github/workflows/release.yml | <p>For <a href="https://github.com/simonw/datasette-app">Datasette Desktop</a> I wanted to run an action which, when I created a release, would build an asset for that release and then upload and attach it.</p> <p>I triggered my action on the creation of a new release, like so:</p> <div class="highlight highlight-source-yaml"><pre><span class="pl-ent">on</span>: <span class="pl-ent">release</span>: <span class="pl-ent">types</span>: <span class="pl-s">[created]</span></pre></div> <p>Assuming previous steps that create a file called <code>app.zip</code> in the root of the checkout, here's the final action step which worked for me:</p> <div class="highlight highlight-source-yaml"><pre> - <span class="pl-ent">name</span>: <span class="pl-s">Upload release attachment</span> <span class="pl-ent">uses</span>: <span class="pl-s">actions/github-script@v4</span> <span class="pl-ent">with</span>: <span class="pl-ent">script</span>: <span class="pl-s">|</span> <span class="pl-s"> const fs = require('fs');</span> <span class="pl-s"> const tag = context.ref.replace("refs/tags/", "");</span> <span class="pl-s"> // Get release for this tag</span> <span class="pl-s"> const release = await github.repos.getReleaseByTag({</span> <span class="pl-s"> owner: context.repo.owner,</span> <span class="pl-s"> repo: context.repo.repo,</span> <span class="pl-s"> tag</span> <span class="pl-s"> });</span> <span class="pl-s"> // Upload the release asset</span> <span class="pl-s"> await github.repos.uploadReleaseAsset({</span> <span class="pl-s"> owner: context.repo.owner,</span> <span class="pl-s"> repo: context.repo.repo,</span> <span class="pl-s"> release_id: release.data.id,</span> <span class="pl-s"> name: "app.zip",</span> <span class="pl-s"> data: await fs.readFileSync("app.zip")</span> <span class="pl-s"> });</sp… | <Binary: 55,244 bytes> | 2021-09-07T22:04:28-07:00 | 2021-09-08T05:04:28+00:00 | 2021-09-07T22:04:28-07:00 | 2021-09-08T05:04:28+00:00 | d3d35e3e7c1982434b617edf7ebb8060 | attach-generated-file-to-release |
| github-actions_commit-if-file-changed.md | github-actions | Commit a file if it changed | https://github.com/simonw/til/blob/main/github-actions/commit-if-file-changed.md | This recipe runs a Python script to update a README, then commits it back to the parent repo but only if it has changed: ```yaml on: push: branches: - master # ... - name: Update README run: python update_readme.py --rewrite - name: Commit README back to the repo run: |- git config --global user.email "readme-bot@example.com" git config --global user.name "README-bot" git diff --quiet || (git add README.md && git commit -m "Updated README") git push ``` My first attempt threw an error if I tried o run `git commit -m ...` and the README had not changed. It turns out `git diff --quiet` exits with a 1 exit code if anything has changed, so this recipe adds the file and commits it only if something differs: ```bash git diff --quiet || (git add README.md && git commit -m "Updated README") ``` Mikeal Rogers has a [publish-to-github-action](https://github.com/mikeal/publish-to-github-action) which uses a [slightly different pattern](https://github.com/mikeal/publish-to-github-action/blob/000c8a4f43e2a7dd4aab81e3fdf8be36d4457ed8/entrypoint.sh#L21-L27): ```bash # publish any new files git checkout master git add -A timestamp=$(date -u) git commit -m "Automated publish: ${timestamp} ${GITHUB_SHA}" || exit 0 git pull --rebase publisher master git push publisher master ``` Cleanest example yet: https://github.com/simonw/coronavirus-data-gov-archive/blob/master/.github/workflows/scheduled.yml ```yaml name: Fetch latest data on: push: repository_dispatch: schedule: - cron: '25 * * * *' jobs: scheduled: runs-on: ubuntu-latest steps: - name: Check out this repo uses: actions/checkout@v2 - name: Fetch latest data run: |- curl https://c19downloads.azureedge.net/downloads/data/data_latest.json | jq . > data_latest.json curl https://c19pub.azureedge.net/utlas.geojson | gunzip | jq . > utlas.geojson curl https://c19pub.azureedge.net/countries.geojson | gunzip | jq . > countries.geojson curl ht… | <p>This recipe runs a Python script to update a README, then commits it back to the parent repo but only if it has changed:</p> <div class="highlight highlight-source-yaml"><pre><span class="pl-ent">on</span>: <span class="pl-ent">push</span>: <span class="pl-ent">branches</span>: - <span class="pl-s">master</span> <span class="pl-c"><span class="pl-c">#</span> ...</span> - <span class="pl-ent">name</span>: <span class="pl-s">Update README</span> <span class="pl-ent">run</span>: <span class="pl-s">python update_readme.py --rewrite</span> - <span class="pl-ent">name</span>: <span class="pl-s">Commit README back to the repo</span> <span class="pl-ent">run</span>: <span class="pl-s">|-</span> <span class="pl-s"> git config --global user.email "readme-bot@example.com"</span> <span class="pl-s"> git config --global user.name "README-bot"</span> <span class="pl-s"> git diff --quiet || (git add README.md && git commit -m "Updated README")</span> <span class="pl-s"> git push</span></pre></div> <p>My first attempt threw an error if I tried o run <code>git commit -m ...</code> and the README had not changed.</p> <p>It turns out <code>git diff --quiet</code> exits with a 1 exit code if anything has changed, so this recipe adds the file and commits it only if something differs:</p> <div class="highlight highlight-source-shell"><pre>git diff --quiet <span class="pl-k">||</span> (git add README.md <span class="pl-k">&&</span> git commit -m <span class="pl-s"><span class="pl-pds">"</span>Updated README<span class="pl-pds">"</span></span>)</pre></div> <p>Mikeal Rogers has a <a href="https://github.com/mikeal/publish-to-github-action">publish-to-github-action</a> which uses a <a href="https://github.com/mikeal/publish-to-github-action/blob/000c8a4f43e2a7dd4aab81e3fdf8be36d4457ed8/entrypoint.sh#L21-L27">slightly different pattern</a>:</p> <div class="highlight highlight-source-shell"><pre><span class="pl-c"><span class="pl-c">#</span> publish any new files</… | <Binary: 48,269 bytes> | 2020-04-19T10:27:46-07:00 | 2020-04-19T17:27:46+00:00 | 2020-04-28T12:33:00-07:00 | 2020-04-28T19:33:00+00:00 | 3b4a2012993962434fc8f5853cf5396b | commit-if-file-changed |
| github-actions_conditionally-run-a-second-job.md | github-actions | Conditionally running a second job in a GitHub Actions workflow | https://github.com/simonw/til/blob/main/github-actions/conditionally-run-a-second-job.md | My [simonwillisonblog-backup workflow](https://github.com/simonw/simonwillisonblog-backup/blob/main/.github/workflows/backup.yml) periodically creates a JSON backup of my blog's PostgreSQL database, using [db-to-sqlite](https://datasette.io/tools/db-to-sqlite) and [sqlite-diffable](https://datasette.io/tools/sqlite-diffable). It then commits any changes back to the repo using this pattern: ```yaml - name: Commit any changes run: |- git config user.name "Automated" git config user.email "actions@users.noreply.github.com" git add simonwillisonblog timestamp=$(date -u) git commit -m "Latest data: ${timestamp}" || exit 0 git push ``` I decided to upgrade it to also build and deploy a SQLite database of the content to [datasette.simonwillison.net](https://datasette.simonwillison.net/) - but only if a change had been detected. I figured out the following pattern for doing that. First, I added a line to the above block that set a `change_detected` [output variable](https://docs.github.com/en/actions/using-jobs/defining-outputs-for-jobs) for that step if it made it past the `|| exit 0`. I also added an `id` to the step so I could reference it later on: ```yaml - name: Commit any changes id: commit_and_push run: |- git config user.name "Automated" git config user.email "actions@users.noreply.github.com" git add simonwillisonblog timestamp=$(date -u) git commit -m "Latest data: ${timestamp}" || exit 0 git push echo "::set-output name=change_detected::1" ``` This next piece took me a while to figure out: I also had to declare that output variable at the top of the initial job, copying the result of the named step: ```yaml jobs: backup: runs-on: ubuntu-latest outputs: change_detected: ${{ steps.commit_and_push.outputs.change_detected }} ``` Without this, the output is not visible to the second job. My second job started like this: ```yaml build_and_deploy: runs-on: ubu… | <p>My <a href="https://github.com/simonw/simonwillisonblog-backup/blob/main/.github/workflows/backup.yml">simonwillisonblog-backup workflow</a> periodically creates a JSON backup of my blog's PostgreSQL database, using <a href="https://datasette.io/tools/db-to-sqlite" rel="nofollow">db-to-sqlite</a> and <a href="https://datasette.io/tools/sqlite-diffable" rel="nofollow">sqlite-diffable</a>. It then commits any changes back to the repo using this pattern:</p> <div class="highlight highlight-source-yaml"><pre> - <span class="pl-ent">name</span>: <span class="pl-s">Commit any changes</span> <span class="pl-ent">run</span>: <span class="pl-s">|-</span> <span class="pl-s"> git config user.name "Automated"</span> <span class="pl-s"> git config user.email "actions@users.noreply.github.com"</span> <span class="pl-s"> git add simonwillisonblog</span> <span class="pl-s"> timestamp=$(date -u)</span> <span class="pl-s"> git commit -m "Latest data: ${timestamp}" || exit 0</span> <span class="pl-s"> git push</span></pre></div> <p>I decided to upgrade it to also build and deploy a SQLite database of the content to <a href="https://datasette.simonwillison.net/" rel="nofollow">datasette.simonwillison.net</a> - but only if a change had been detected.</p> <p>I figured out the following pattern for doing that.</p> <p>First, I added a line to the above block that set a <code>change_detected</code> <a href="https://docs.github.com/en/actions/using-jobs/defining-outputs-for-jobs">output variable</a> for that step if it made it past the <code>|| exit 0</code>. I also added an <code>id</code> to the step so I could reference it later on:</p> <div class="highlight highlight-source-yaml"><pre> - <span class="pl-ent">name</span>: <span class="pl-s">Commit any changes</span> <span class="pl-ent">id</span>: <span class="pl-s">commit_and_push</span> <span class="pl-ent">run</span>: <span class="pl-s">|-</span> <span class="pl-s"> git config user.name "Automated"</span> <… | <Binary: 70,861 bytes> | 2022-07-11T13:39:01-07:00 | 2022-07-11T20:39:01+00:00 | 2022-07-11T17:05:01-07:00 | 2022-07-12T00:05:01+00:00 | 2c87c48078adb1b230e8e2e14af183e9 | conditionally-run-a-second-job |
| github-actions_continue-on-error.md | github-actions | Skipping a GitHub Actions step without failing | https://github.com/simonw/til/blob/main/github-actions/continue-on-error.md | I wanted to have a GitHub Action step run that might fail, but if it failed the rest of the steps should still execute and the overall run should be treated as a success. `continue-on-error: true` does exactly that: ```yaml - name: Download previous database run: curl --fail -o tils.db https://til.simonwillison.net/tils.db continue-on-error: true - name: Build database run: python build_database.py ``` [From this workflow](https://github.com/simonw/til/blob/7d799a24921f66e585b8a6b8756b7f8040c899df/.github/workflows/build.yml#L32-L36) I'm using `curl --fail` here which returns an error code if the file download files (without `--fail` it was writing out a two line error message to a file called `tils.db` which is not what I wanted). Then `continue-on-error: true` to keep on going even if the download failed. My `build_database.py` script updates the `tils.db` database file if it exists and creates it from scratch if it doesn't. | <p>I wanted to have a GitHub Action step run that might fail, but if it failed the rest of the steps should still execute and the overall run should be treated as a success.</p> <p><code>continue-on-error: true</code> does exactly that:</p> <div class="highlight highlight-source-yaml"><pre> - <span class="pl-ent">name</span>: <span class="pl-s">Download previous database</span> <span class="pl-ent">run</span>: <span class="pl-s">curl --fail -o tils.db https://til.simonwillison.net/tils.db</span> <span class="pl-ent">continue-on-error</span>: <span class="pl-c1">true</span> - <span class="pl-ent">name</span>: <span class="pl-s">Build database</span> <span class="pl-ent">run</span>: <span class="pl-s">python build_database.py</span></pre></div> <p><a href="https://github.com/simonw/til/blob/7d799a24921f66e585b8a6b8756b7f8040c899df/.github/workflows/build.yml#L32-L36">From this workflow</a></p> <p>I'm using <code>curl --fail</code> here which returns an error code if the file download files (without <code>--fail</code> it was writing out a two line error message to a file called <code>tils.db</code> which is not what I wanted). Then <code>continue-on-error: true</code> to keep on going even if the download failed.</p> <p>My <code>build_database.py</code> script updates the <code>tils.db</code> database file if it exists and creates it from scratch if it doesn't.</p> | <Binary: 64,343 bytes> | 2020-08-22T20:23:51-07:00 | 2020-08-23T03:23:51+00:00 | 2020-11-25T11:44:35-08:00 | 2020-11-25T19:44:35+00:00 | 30e610ad7045f1fa181666356c86d4a1 | continue-on-error |
| github-actions_debug-tmate.md | github-actions | Open a debugging shell in GitHub Actions with tmate | https://github.com/simonw/til/blob/main/github-actions/debug-tmate.md | > :warning: **17 Feb 2022: There have been reports of running tmate causing account suspensions**. See [this issue](https://github.com/mxschmitt/action-tmate/issues/104) for details. Continue with caution. Thanks to [this Twitter conversation](https://twitter.com/harrymarr/status/1304820879268950021) I found out about [mxschmitt/action-tmate](https://github.com/mxschmitt/action-tmate), which uses https://tmate.io/ to open an interactive shell session running inside the GitHub Actions environment. I created a `.github/workflows/tmate.yml` file in my repo containing the following: ```yaml name: tmate session on: workflow_dispatch: jobs: build: runs-on: ubuntu-latest steps: - uses: actions/checkout@v2 - name: Setup tmate session uses: mxschmitt/action-tmate@v3 ``` Clicking the "Run workflow" button in the GitHub Actions interface then gave me the following in the GitHub Actions log output: ``` WebURL: https://tmate.io/t/JA69KaB2avRPRZSkRb8JPa9Gd SSH: ssh JA69KaB2avRPRZSkRb8JPa9Gd@nyc1.tmate.io ``` I ran `ssh JA69KaB2avRPRZSkRb8JPa9Gd@nyc1.tmate.io` and got a direction connection to the Action, with my project files all available thanks to the `- uses: actions/checkout@v2` step. Once I'd finish testing things out in that environment, I typed `touch continue` and the session ended itself. ## Starting a shell just for test failures on manual runs I had a tricky test failure that I wanted to debug interactively. Here's a recipe for starting a tmate shell ONLY if the previous step failed, and only if the run was triggered manually (using `workflow_dispatch`) - because I don't want an accidental test opening up a shell and burning up my GitHub Actions minutes allowance. ```yaml steps: - name: Run tests run: pytest - name: tmate session if tests fail if: failure() && github.event_name == 'workflow_dispatch' uses: mxschmitt/action-tmate@v3 ``` | <blockquote> <p><g-emoji class="g-emoji" alias="warning" fallback-src="https://github.githubassets.com/images/icons/emoji/unicode/26a0.png">⚠️</g-emoji> <strong>17 Feb 2022: There have been reports of running tmate causing account suspensions</strong>. See <a href="https://github.com/mxschmitt/action-tmate/issues/104">this issue</a> for details. Continue with caution.</p> </blockquote> <p>Thanks to <a href="https://twitter.com/harrymarr/status/1304820879268950021" rel="nofollow">this Twitter conversation</a> I found out about <a href="https://github.com/mxschmitt/action-tmate">mxschmitt/action-tmate</a>, which uses <a href="https://tmate.io/" rel="nofollow">https://tmate.io/</a> to open an interactive shell session running inside the GitHub Actions environment.</p> <p>I created a <code>.github/workflows/tmate.yml</code> file in my repo containing the following:</p> <div class="highlight highlight-source-yaml"><pre><span class="pl-ent">name</span>: <span class="pl-s">tmate session</span> <span class="pl-ent">on</span>: <span class="pl-ent">workflow_dispatch</span>: <span class="pl-ent">jobs</span>: <span class="pl-ent">build</span>: <span class="pl-ent">runs-on</span>: <span class="pl-s">ubuntu-latest</span> <span class="pl-ent">steps</span>: - <span class="pl-ent">uses</span>: <span class="pl-s">actions/checkout@v2</span> - <span class="pl-ent">name</span>: <span class="pl-s">Setup tmate session</span> <span class="pl-ent">uses</span>: <span class="pl-s">mxschmitt/action-tmate@v3</span></pre></div> <p>Clicking the "Run workflow" button in the GitHub Actions interface then gave me the following in the GitHub Actions log output:</p> <pre><code>WebURL: https://tmate.io/t/JA69KaB2avRPRZSkRb8JPa9Gd SSH: ssh JA69KaB2avRPRZSkRb8JPa9Gd@nyc1.tmate.io </code></pre> <p>I ran <code>ssh JA69KaB2avRPRZSkRb8JPa9Gd@nyc1.tmate.io</code> and got a direction connection to the Action, with my project files all available thanks to the <code>- uses: actions/checkout@v2</code> step.</p> <p>Once I'd finish t… | <Binary: 58,103 bytes> | 2020-09-14T15:25:36-07:00 | 2020-09-14T22:25:36+00:00 | 2022-02-17T15:30:51-08:00 | 2022-02-17T23:30:51+00:00 | 64a5eae4fd60080f0d219ecc7b9ccd05 | debug-tmate |
| github-actions_deploy-live-demo-when-tests-pass.md | github-actions | Deploying a live Datasette demo when the tests pass | https://github.com/simonw/til/blob/main/github-actions/deploy-live-demo-when-tests-pass.md | I've implemented this pattern a bunch of times now - here's the version I've settled on for my [datasette-auth0 plugin](https://github.com/simonw/datasette-auth0) repository. For publishing to Cloud Run, it needs two GitHub Actions secrets to be configured: `GCP_SA_EMAIL` and `GCP_SA_KEY`. See below for publishing to Vercel. In `.github/workflows/test.yml`: ```yaml name: Test on: [push] jobs: test: runs-on: ubuntu-latest strategy: matrix: python-version: ["3.7", "3.8", "3.9", "3.10"] steps: - uses: actions/checkout@v2 - name: Set up Python ${{ matrix.python-version }} uses: actions/setup-python@v2 with: python-version: ${{ matrix.python-version }} - uses: actions/cache@v2 name: Configure pip caching with: path: ~/.cache/pip key: ${{ runner.os }}-pip-${{ hashFiles('**/setup.py') }} restore-keys: | ${{ runner.os }}-pip- - name: Install dependencies run: | pip install -e '.[test]' - name: Run tests run: | pytest deploy_demo: runs-on: ubuntu-latest needs: [test] if: github.ref == 'refs/heads/main' steps: - uses: actions/checkout@v2 - name: Set up Python 3.10 uses: actions/setup-python@v2 with: python-version: "3.10" cache: pip cache-dependency-path: "**/setup.py" - name: Install datasette run: pip install datasette - name: Set up Cloud Run uses: google-github-actions/setup-gcloud@v0 with: version: '275.0.0' service_account_email: ${{ secrets.GCP_SA_EMAIL }} service_account_key: ${{ secrets.GCP_SA_KEY }} - name: Deploy demo to Cloud Run env: CLIENT_SECRET: ${{ secrets.AUTH0_CLIENT_SECRET }} run: |- gcloud config set run/region us-central1 gcloud config set project datasette-222320 wget https://latest.datasette.io/fixtures.db datasette publish cloudrun fixtures.db \ --install https://github.com/simonw… | <p>I've implemented this pattern a bunch of times now - here's the version I've settled on for my <a href="https://github.com/simonw/datasette-auth0">datasette-auth0 plugin</a> repository.</p> <p>For publishing to Cloud Run, it needs two GitHub Actions secrets to be configured: <code>GCP_SA_EMAIL</code> and <code>GCP_SA_KEY</code>.</p> <p>See below for publishing to Vercel.</p> <p>In <code>.github/workflows/test.yml</code>:</p> <div class="highlight highlight-source-yaml"><pre><span class="pl-ent">name</span>: <span class="pl-s">Test</span> <span class="pl-ent">on</span>: <span class="pl-s">[push]</span> <span class="pl-ent">jobs</span>: <span class="pl-ent">test</span>: <span class="pl-ent">runs-on</span>: <span class="pl-s">ubuntu-latest</span> <span class="pl-ent">strategy</span>: <span class="pl-ent">matrix</span>: <span class="pl-ent">python-version</span>: <span class="pl-s">["3.7", "3.8", "3.9", "3.10"]</span> <span class="pl-ent">steps</span>: - <span class="pl-ent">uses</span>: <span class="pl-s">actions/checkout@v2</span> - <span class="pl-ent">name</span>: <span class="pl-s">Set up Python ${{ matrix.python-version }}</span> <span class="pl-ent">uses</span>: <span class="pl-s">actions/setup-python@v2</span> <span class="pl-ent">with</span>: <span class="pl-ent">python-version</span>: <span class="pl-s">${{ matrix.python-version }}</span> - <span class="pl-ent">uses</span>: <span class="pl-s">actions/cache@v2</span> <span class="pl-ent">name</span>: <span class="pl-s">Configure pip caching</span> <span class="pl-ent">with</span>: <span class="pl-ent">path</span>: <span class="pl-s">~/.cache/pip</span> <span class="pl-ent">key</span>: <span class="pl-s">${{ runner.os }}-pip-${{ hashFiles('**/setup.py') }}</span> <span class="pl-ent">restore-keys</span>: <span class="pl-s">|</span> <span class="pl-s"> ${{ runner.os }}-pip-</span> <span class="pl-s"></span> - <span class="pl-ent">name</span>: <span … | <Binary: 45,343 bytes> | 2022-03-27T20:16:50-07:00 | 2022-03-28T03:16:50+00:00 | 2022-03-27T20:16:50-07:00 | 2022-03-28T03:16:50+00:00 | 7512db1a0c8703bd517605a7eda793a8 | deploy-live-demo-when-tests-pass |
| github-actions_different-postgresql-versions.md | github-actions | Installing different PostgreSQL server versions in GitHub Actions | https://github.com/simonw/til/blob/main/github-actions/different-postgresql-versions.md | The GitHub Actions `ubuntu-latest` default runner currently includes an installation of PostgreSQL 13. The server is not running by default but you can interact with it like this: ``` $ /usr/lib/postgresql/13/bin/postgres --version postgres (PostgreSQL) 13.3 (Ubuntu 13.3-1.pgdg20.04+1) ``` You can install alternative PostgreSQL versions by following the [PostgreSQL Ubuntu instructions](https://www.postgresql.org/download/linux/ubuntu/) - like this: ``` sudo sh -c 'echo "deb http://apt.postgresql.org/pub/repos/apt $(lsb_release -cs)-pgdg main" > /etc/apt/sources.list.d/pgdg.list' wget --quiet -O - https://www.postgresql.org/media/keys/ACCC4CF8.asc | sudo apt-key add - sudo apt-get update sudo apt-get -y install postgresql-12 ``` This works with `postgresql-10` and `postgresql-11` as well as `postgresql-12`. I wanted to use a GitHub Actions matrix to run my tests against all four versions of PostgreSQL. Here's [my complete workflow](https://github.com/simonw/django-sql-dashboard/blob/1.0.1/.github/workflows/test.yml) - the relevant sections are below: ```yaml name: Test on: [push] jobs: test: runs-on: ubuntu-latest strategy: matrix: postgresql-version: [10, 11, 12, 13] steps: - name: Install PostgreSQL env: POSTGRESQL_VERSION: ${{ matrix.postgresql-version }} run: | sudo sh -c 'echo "deb http://apt.postgresql.org/pub/repos/apt $(lsb_release -cs)-pgdg main" > /etc/apt/sources.list.d/pgdg.list' wget --quiet -O - https://www.postgresql.org/media/keys/ACCC4CF8.asc | sudo apt-key add - sudo apt-get update sudo apt-get -y install "postgresql-$POSTGRESQL_VERSION" - name: Run tests env: POSTGRESQL_VERSION: ${{ matrix.postgresql-version }} run: | export POSTGRESQL_PATH="/usr/lib/postgresql/$POSTGRESQL_VERSION/bin/postgres" export INITDB_PATH="/usr/lib/postgresql/$POSTGRESQL_VERSION/bin/initdb" pytest ``` I modified my tests to call the `postgres` and `initdb` binaries specified by the `POSTG… | <p>The GitHub Actions <code>ubuntu-latest</code> default runner currently includes an installation of PostgreSQL 13. The server is not running by default but you can interact with it like this:</p> <pre><code>$ /usr/lib/postgresql/13/bin/postgres --version postgres (PostgreSQL) 13.3 (Ubuntu 13.3-1.pgdg20.04+1) </code></pre> <p>You can install alternative PostgreSQL versions by following the <a href="https://www.postgresql.org/download/linux/ubuntu/" rel="nofollow">PostgreSQL Ubuntu instructions</a> - like this:</p> <pre><code>sudo sh -c 'echo "deb http://apt.postgresql.org/pub/repos/apt $(lsb_release -cs)-pgdg main" > /etc/apt/sources.list.d/pgdg.list' wget --quiet -O - https://www.postgresql.org/media/keys/ACCC4CF8.asc | sudo apt-key add - sudo apt-get update sudo apt-get -y install postgresql-12 </code></pre> <p>This works with <code>postgresql-10</code> and <code>postgresql-11</code> as well as <code>postgresql-12</code>.</p> <p>I wanted to use a GitHub Actions matrix to run my tests against all four versions of PostgreSQL. Here's <a href="https://github.com/simonw/django-sql-dashboard/blob/1.0.1/.github/workflows/test.yml">my complete workflow</a> - the relevant sections are below:</p> <div class="highlight highlight-source-yaml"><pre><span class="pl-ent">name</span>: <span class="pl-s">Test</span> <span class="pl-ent">on</span>: <span class="pl-s">[push]</span> <span class="pl-ent">jobs</span>: <span class="pl-ent">test</span>: <span class="pl-ent">runs-on</span>: <span class="pl-s">ubuntu-latest</span> <span class="pl-ent">strategy</span>: <span class="pl-ent">matrix</span>: <span class="pl-ent">postgresql-version</span>: <span class="pl-s">[10, 11, 12, 13]</span> <span class="pl-ent">steps</span>: - <span class="pl-ent">name</span>: <span class="pl-s">Install PostgreSQL</span> <span class="pl-ent">env</span>: <span class="pl-ent">POSTGRESQL_VERSION</span>: <span class="pl-s">${{ matrix.postgresql-version }}</span> <span class="pl-ent">run</span>: <sp… | <Binary: 76,896 bytes> | 2021-07-05T17:43:13-07:00 | 2021-07-06T00:43:13+00:00 | 2021-07-05T17:43:13-07:00 | 2021-07-06T00:43:13+00:00 | 2001828a598aa0775483b5934c907bb8 | different-postgresql-versions |
| github-actions_different-steps-on-a-schedule.md | github-actions | Running different steps on a schedule | https://github.com/simonw/til/blob/main/github-actions/different-steps-on-a-schedule.md | Say you have a workflow that runs hourly, but once a day you want the workflow to run slightly differently - without duplicating the entire workflow. Thanks to @BrightRan, here's [the solution](https://github.community/t5/GitHub-Actions/Schedule-once-an-hour-but-do-something-different-once-a-day/m-p/54382/highlight/true#M9168). Use the following pattern in an `if:` condition for a step: github.event_name == 'schedule' && github.event.schedule == '20 17 * * *' Longer example: ```yaml name: Fetch updated data and deploy on: push: schedule: - cron: '5,35 * * * *' - cron: '20 17 * * *' jobs: build_and_deploy: runs-on: ubuntu-latest steps: # ... - name: Download existing .db files if: |- !(github.event_name == 'schedule' && github.event.schedule == '20 17 * * *') env: DATASETTE_TOKEN: ${{ secrets.DATASETTE_TOKEN }} run: |- datasette-clone https://biglocal.datasettes.com/ dbs -v --token=$DATASETTE_TOKEN ``` I used this [here](https://github.com/simonw/big-local-datasette/blob/35e1acd4d9859d3af2feb29d0744ce1550e5faec/.github/workflows/deploy.yml), see [#11](https://github.com/simonw/big-local-datasette/issues/11). | <p>Say you have a workflow that runs hourly, but once a day you want the workflow to run slightly differently - without duplicating the entire workflow.</p> <p>Thanks to @BrightRan, here's <a href="https://github.community/t5/GitHub-Actions/Schedule-once-an-hour-but-do-something-different-once-a-day/m-p/54382/highlight/true#M9168" rel="nofollow">the solution</a>. Use the following pattern in an <code>if:</code> condition for a step:</p> <pre><code>github.event_name == 'schedule' && github.event.schedule == '20 17 * * *' </code></pre> <p>Longer example:</p> <div class="highlight highlight-source-yaml"><pre><span class="pl-ent">name</span>: <span class="pl-s">Fetch updated data and deploy</span> <span class="pl-ent">on</span>: <span class="pl-ent">push</span>: <span class="pl-ent">schedule</span>: - <span class="pl-ent">cron</span>: <span class="pl-s"><span class="pl-pds">'</span>5,35 * * * *<span class="pl-pds">'</span></span> - <span class="pl-ent">cron</span>: <span class="pl-s"><span class="pl-pds">'</span>20 17 * * *<span class="pl-pds">'</span></span> <span class="pl-ent">jobs</span>: <span class="pl-ent">build_and_deploy</span>: <span class="pl-ent">runs-on</span>: <span class="pl-s">ubuntu-latest</span> <span class="pl-ent">steps</span>: <span class="pl-c"><span class="pl-c">#</span> ...</span> - <span class="pl-ent">name</span>: <span class="pl-s">Download existing .db files</span> <span class="pl-ent">if</span>: <span class="pl-s">|-</span> <span class="pl-s"> !(github.event_name == 'schedule' && github.event.schedule == '20 17 * * *')</span> <span class="pl-s"></span> <span class="pl-ent">env</span>: <span class="pl-ent">DATASETTE_TOKEN</span>: <span class="pl-s">${{ secrets.DATASETTE_TOKEN }}</span> <span class="pl-ent">run</span>: <span class="pl-s">|-</span> <span class="pl-s"> datasette-clone https://biglocal.datasettes.com/ dbs -v --token=$DATASETTE_TOKEN</span></pre></div> <p>I used this <a href="https://github.c… | <Binary: 50,020 bytes> | 2020-04-20T07:39:39-07:00 | 2020-04-20T14:39:39+00:00 | 2020-04-20T09:24:01-07:00 | 2020-04-20T16:24:01+00:00 | cc627abd8d10103171280dad5925be05 | different-steps-on-a-schedule |
| github-actions_dump-context.md | github-actions | Dump out all GitHub Actions context | https://github.com/simonw/til/blob/main/github-actions/dump-context.md | Useful for seeing what's available for `if: ` conditions (see [context and expression syntax](https://help.github.com/en/actions/reference/context-and-expression-syntax-for-github-actions)). I copied this example action [from here](https://help.github.com/en/actions/reference/context-and-expression-syntax-for-github-actions#example-printing-context-information-to-the-log-file) and deployed it [here](https://github.com/simonw/playing-with-actions/blob/master/.github/workflows/dump-context.yml). Here's an [example run](https://github.com/simonw/playing-with-actions/runs/599575180?check_suite_focus=true). ```yaml on: push jobs: one: runs-on: ubuntu-16.04 steps: - name: Dump GitHub context env: GITHUB_CONTEXT: ${{ toJson(github) }} run: echo "$GITHUB_CONTEXT" - name: Dump job context env: JOB_CONTEXT: ${{ toJson(job) }} run: echo "$JOB_CONTEXT" - name: Dump steps context env: STEPS_CONTEXT: ${{ toJson(steps) }} run: echo "$STEPS_CONTEXT" - name: Dump runner context env: RUNNER_CONTEXT: ${{ toJson(runner) }} run: echo "$RUNNER_CONTEXT" - name: Dump strategy context env: STRATEGY_CONTEXT: ${{ toJson(strategy) }} run: echo "$STRATEGY_CONTEXT" - name: Dump matrix context env: MATRIX_CONTEXT: ${{ toJson(matrix) }} run: echo "$MATRIX_CONTEXT" ``` | <p>Useful for seeing what's available for <code>if: </code> conditions (see <a href="https://help.github.com/en/actions/reference/context-and-expression-syntax-for-github-actions">context and expression syntax</a>).</p> <p>I copied this example action <a href="https://help.github.com/en/actions/reference/context-and-expression-syntax-for-github-actions#example-printing-context-information-to-the-log-file">from here</a> and deployed it <a href="https://github.com/simonw/playing-with-actions/blob/master/.github/workflows/dump-context.yml">here</a>. Here's an <a href="https://github.com/simonw/playing-with-actions/runs/599575180?check_suite_focus=true">example run</a>.</p> <div class="highlight highlight-source-yaml"><pre><span class="pl-ent">on</span>: <span class="pl-s">push</span> <span class="pl-ent">jobs</span>: <span class="pl-ent">one</span>: <span class="pl-ent">runs-on</span>: <span class="pl-s">ubuntu-16.04</span> <span class="pl-ent">steps</span>: - <span class="pl-ent">name</span>: <span class="pl-s">Dump GitHub context</span> <span class="pl-ent">env</span>: <span class="pl-ent">GITHUB_CONTEXT</span>: <span class="pl-s">${{ toJson(github) }}</span> <span class="pl-ent">run</span>: <span class="pl-s">echo "$GITHUB_CONTEXT"</span> - <span class="pl-ent">name</span>: <span class="pl-s">Dump job context</span> <span class="pl-ent">env</span>: <span class="pl-ent">JOB_CONTEXT</span>: <span class="pl-s">${{ toJson(job) }}</span> <span class="pl-ent">run</span>: <span class="pl-s">echo "$JOB_CONTEXT"</span> - <span class="pl-ent">name</span>: <span class="pl-s">Dump steps context</span> <span class="pl-ent">env</span>: <span class="pl-ent">STEPS_CONTEXT</span>: <span class="pl-s">${{ toJson(steps) }}</span> <span class="pl-ent">run</span>: <span class="pl-s">echo "$STEPS_CONTEXT"</span> - <span class="pl-ent">name</span>: <span class="pl-s">Dump runner context</span> <span class="pl-ent">env… | <Binary: 45,978 bytes> | 2020-04-19T07:50:03-07:00 | 2020-04-19T14:50:03+00:00 | 2020-04-19T07:50:03-07:00 | 2020-04-19T14:50:03+00:00 | 070e1fa70411ed2f9cd92ea28dc399e2 | dump-context |
| github-actions_ensure-labels.md | github-actions | Ensure labels exist in a GitHub repository | https://github.com/simonw/til/blob/main/github-actions/ensure-labels.md | I wanted to ensure that when [this template repository](https://github.com/simonw/action-transcription) was used to create a new repo that repo would have a specific set of labels. Here's the workflow I came up with, saved as `.github/workflows/ensure_labels.yml`: ```yaml name: Ensure labels on: [push] jobs: ensure_labels: runs-on: ubuntu-latest steps: - name: Create labels uses: actions/github-script@v6 with: script: | try { await github.rest.issues.createLabel({ ...context.repo, name: 'captions' }); await github.rest.issues.createLabel({ ...context.repo, name: 'whisper' }); } catch(e) { // Ignore if labels exist already } ``` This creates `captions` and `whisper` labels, if they do not yet exist. It's wrapped in a `try/catch` so that if the labels exist already (as they will on subsequent runs) the error can be ignored. Note that you need to use `await ...` inside that `try/catch` block or exceptions thrown by those methods will still cause the action run to fail. The `...context.repo` trick saves on having to pass `owner` and `repo` explicitly. | <p>I wanted to ensure that when <a href="https://github.com/simonw/action-transcription">this template repository</a> was used to create a new repo that repo would have a specific set of labels.</p> <p>Here's the workflow I came up with, saved as <code>.github/workflows/ensure_labels.yml</code>:</p> <div class="highlight highlight-source-yaml"><pre><span class="pl-ent">name</span>: <span class="pl-s">Ensure labels</span> <span class="pl-ent">on</span>: <span class="pl-s">[push]</span> <span class="pl-ent">jobs</span>: <span class="pl-ent">ensure_labels</span>: <span class="pl-ent">runs-on</span>: <span class="pl-s">ubuntu-latest</span> <span class="pl-ent">steps</span>: - <span class="pl-ent">name</span>: <span class="pl-s">Create labels</span> <span class="pl-ent">uses</span>: <span class="pl-s">actions/github-script@v6</span> <span class="pl-ent">with</span>: <span class="pl-ent">script</span>: <span class="pl-s">|</span> <span class="pl-s"> try {</span> <span class="pl-s"> await github.rest.issues.createLabel({</span> <span class="pl-s"> ...context.repo,</span> <span class="pl-s"> name: 'captions'</span> <span class="pl-s"> });</span> <span class="pl-s"> await github.rest.issues.createLabel({</span> <span class="pl-s"> ...context.repo,</span> <span class="pl-s"> name: 'whisper'</span> <span class="pl-s"> });</span> <span class="pl-s"> } catch(e) {</span> <span class="pl-s"> // Ignore if labels exist already</span> <span class="pl-s"> }</span></pre></div> <p>This creates <code>captions</code> and <code>whisper</code> labels, if they do not yet exist.</p> <p>It's wrapped in a <code>try/catch</code> so that if the labels exist already (as they will on subsequent runs) the error can be ignored.</p> <p>Note that you need to use <code>await ...</code> inside that <code>try/catch</code> block or exceptions thrown by those methods will still cause the … | <Binary: 45,815 bytes> | 2022-09-25T11:28:21-07:00 | 2022-09-25T18:28:21+00:00 | 2022-09-25T11:28:53-07:00 | 2022-09-25T18:28:53+00:00 | 147e94f19f28e7c13888d03c583014ee | ensure-labels |
| github-actions_grep-tests.md | github-actions | Using grep to write tests in CI | https://github.com/simonw/til/blob/main/github-actions/grep-tests.md | GitHub Actions workflows fail if any of the steps executes something that returns a non-zero exit code. Today I learned that `grep` returns a non-zero exit code if it fails to find any matches. This means that piping to grep is a really quick way to write a test as part of an Actions workflow. I wrote a quick soundness check today using the new `datasette --get /path` option, which runs a fake HTTP request for that path through Datasette and returns the response to standard out. Here's an example: ```yaml - name: Build database run: scripts/build.sh - name: Run tests run: | datasette . --get /us/pillar-point | grep 'Rocky Beaches' - name: Deploy to Vercel ``` I like this pattern a lot: build a database for a custom Datasette deloyment in CI, run one or more quick soundness checks using grep, then deploy if those checks pass. | <p>GitHub Actions workflows fail if any of the steps executes something that returns a non-zero exit code.</p> <p>Today I learned that <code>grep</code> returns a non-zero exit code if it fails to find any matches.</p> <p>This means that piping to grep is a really quick way to write a test as part of an Actions workflow.</p> <p>I wrote a quick soundness check today using the new <code>datasette --get /path</code> option, which runs a fake HTTP request for that path through Datasette and returns the response to standard out. Here's an example:</p> <div class="highlight highlight-source-yaml"><pre> - <span class="pl-ent">name</span>: <span class="pl-s">Build database</span> <span class="pl-ent">run</span>: <span class="pl-s">scripts/build.sh</span> - <span class="pl-ent">name</span>: <span class="pl-s">Run tests</span> <span class="pl-ent">run</span>: <span class="pl-s">|</span> <span class="pl-s"> datasette . --get /us/pillar-point | grep 'Rocky Beaches'</span> <span class="pl-s"></span> - <span class="pl-ent">name</span>: <span class="pl-s">Deploy to Vercel</span></pre></div> <p>I like this pattern a lot: build a database for a custom Datasette deloyment in CI, run one or more quick soundness checks using grep, then deploy if those checks pass.</p> | <Binary: 65,103 bytes> | 2020-08-19T21:26:05-07:00 | 2020-08-20T04:26:05+00:00 | 2020-08-22T21:18:06-07:00 | 2020-08-23T04:18:06+00:00 | 3e71efb58ec2d72ce37d6c93d7ace74e | grep-tests |
| github-actions_job-summaries.md | github-actions | GitHub Actions job summaries | https://github.com/simonw/til/blob/main/github-actions/job-summaries.md | New feature [announced here](https://github.blog/2022-05-09-supercharging-github-actions-with-job-summaries/). Here's the [full documentation](https://docs.github.com/en/actions/using-workflows/workflow-commands-for-github-actions#adding-a-job-summary). These are incredibly easy to use. GitHub creates a file in your workspace and puts the filename in `$GITHUB_STEP_SUMMARY`, so you can build the summary markdown over multiple steps like this: ```bash echo "{markdown content}" >> $GITHUB_STEP_SUMMARY ``` I decided to try this out in my [simonw/pypi-datasette-packages](https://github.com/simonw/pypi-datasette-packages/) repo, which runs a daily Git scraper that records a copy of the PyPI JSON for packages within the Datasette ecosystem. I ended up mixing it with the Git commit code, so the step [now looks like this](https://github.com/simonw/pypi-datasette-packages/blob/54d43180a97d30011149d1e7ae3aaafed2ad7818/.github/workflows/fetch.yml#L20-L32): ```yaml - name: Commit and push run: |- git config user.name "Automated" git config user.email "actions@users.noreply.github.com" git add -A timestamp=$(date -u) git commit -m "${timestamp}" || exit 0 echo '### Changed files' >> $GITHUB_STEP_SUMMARY echo '```' >> $GITHUB_STEP_SUMMARY git show --name-only --format=tformat: >> $GITHUB_STEP_SUMMARY echo '```' >> $GITHUB_STEP_SUMMARY git pull --rebase git push ``` This produces [a summary](https://github.com/simonw/pypi-datasette-packages/actions/runs/2336190331) that looks like this: <img width="657" alt="Screenshot of the summary" src="https://user-images.githubusercontent.com/9599/168874059-b08afb20-c9f3-4c6d-9224-311f21696bfd.png"> Two things I had to figure out here. First, the backtick needs escaping if used in double quotes but does not in single quotes: ```bash echo '```' >> $GITHUB_STEP_SUMMARY ``` I wanted to show just the list of affected filenames from the most recent Git commit. That's what this does: git … | <p>New feature <a href="https://github.blog/2022-05-09-supercharging-github-actions-with-job-summaries/" rel="nofollow">announced here</a>. Here's the <a href="https://docs.github.com/en/actions/using-workflows/workflow-commands-for-github-actions#adding-a-job-summary">full documentation</a>.</p> <p>These are incredibly easy to use. GitHub creates a file in your workspace and puts the filename in <code>$GITHUB_STEP_SUMMARY</code>, so you can build the summary markdown over multiple steps like this:</p> <div class="highlight highlight-source-shell"><pre><span class="pl-c1">echo</span> <span class="pl-s"><span class="pl-pds">"</span>{markdown content}<span class="pl-pds">"</span></span> <span class="pl-k">>></span> <span class="pl-smi">$GITHUB_STEP_SUMMARY</span></pre></div> <p>I decided to try this out in my <a href="https://github.com/simonw/pypi-datasette-packages/">simonw/pypi-datasette-packages</a> repo, which runs a daily Git scraper that records a copy of the PyPI JSON for packages within the Datasette ecosystem.</p> <p>I ended up mixing it with the Git commit code, so the step <a href="https://github.com/simonw/pypi-datasette-packages/blob/54d43180a97d30011149d1e7ae3aaafed2ad7818/.github/workflows/fetch.yml#L20-L32">now looks like this</a>:</p> <div class="highlight highlight-source-yaml"><pre> - <span class="pl-ent">name</span>: <span class="pl-s">Commit and push</span> <span class="pl-ent">run</span>: <span class="pl-s">|-</span> <span class="pl-s"> git config user.name "Automated"</span> <span class="pl-s"> git config user.email "actions@users.noreply.github.com"</span> <span class="pl-s"> git add -A</span> <span class="pl-s"> timestamp=$(date -u)</span> <span class="pl-s"> git commit -m "${timestamp}" || exit 0</span> <span class="pl-s"> echo '### Changed files' >> $GITHUB_STEP_SUMMARY</span> <span class="pl-s"> echo '```' >> $GITHUB_STEP_SUMMARY</span> <span class="pl-s"> git show --name-only --format=tformat: >> $… | <Binary: 70,945 bytes> | 2022-05-17T10:28:21-07:00 | 2022-05-17T17:28:21+00:00 | 2022-05-17T10:49:39-07:00 | 2022-05-17T17:49:39+00:00 | 4626096cbdbf784228ec31127d5ac199 | job-summaries |
Advanced export
JSON shape: default, array, newline-delimited, object
CREATE TABLE [til] (
   [path] TEXT PRIMARY KEY,
   [topic] TEXT,
   [title] TEXT,
   [url] TEXT,
   [body] TEXT,
   [html] TEXT,
   [shot] BLOB,
   [created] TEXT,
   [created_utc] TEXT,
   [updated] TEXT,
   [updated_utc] TEXT
, [shot_hash] TEXT, [slug] TEXT);